It’s the kind of message you never want to see on your screen. And yet, here it is right in front of you: “There has been a critical error on this website.”
Boom. Immediate panic. Your site is inaccessible. Your visitors see a blank page or this alert message. And you don’t know where to start tackling the problem.
Rest assured: this critical error on WordPress, as stressful as it may seem, is one of the most common issues on this CMS.
In the vast majority of cases, it is fixable without the intervention of an experienced developer, provided you follow the right steps in the right order.
In this article, we explain what this message means, why it appears, and above all how to fix it step by step. You’ll also discover how to prevent it from happening again in the future.
What does the message “There has been a critical error on this website” mean?
To properly understand the message “There has been a critical error on this website,” you first need to look at what’s happening behind the scenes, in the back end of your WordPress site.
WordPress is software based on PHP, a server-side programming language. When PHP encounters an error it cannot ignore — known as a fatal PHP error — it stops the script from running.
WordPress detects this interruption and displays the critical error message instead of your site.
This message may appear across the entire site, only in the admin dashboard, or on certain specific pages.
In any case, it indicates that a serious technical problem is preventing WordPress from functioning normally.
The message “There has been a critical error on this website” displayed on your screen was introduced by WordPress starting with version 5.2, released in May 2019.
More specifically, you will then see the following full message: “There has been a critical error on this website. Please check your site admin email inbox for instructions.”
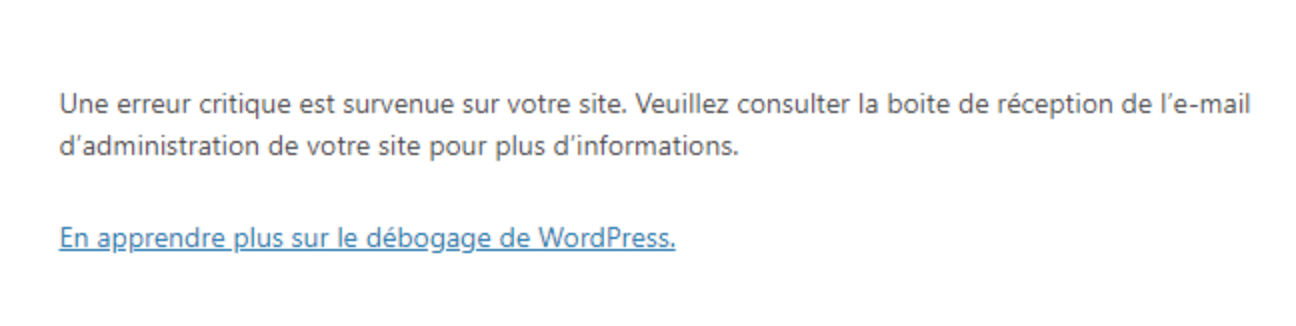
Before this update, a fatal PHP error simply resulted in a blank screen, known in the jargon as the White Screen of Death (WSoD), or “white screen of death.” A screen with no explanations, no clues, no solution.
WordPress therefore changed this behavior to display a readable message and, above all, to natively introduce a recovery mode.
In practical terms, when a theme or plugin has a bug, WordPress sends an email to the site administrator containing debugging information (we’ll come back to that).
This is a significant improvement, even if the visible result remains the same for your visitors: your site is down.
Common causes of a critical error on WordPress
Before looking for a solution, it is useful to understand the possible origins of the problem.
In practice, a WordPress critical error is almost always triggered by one of the following factors.
First, the most common cause—by far—lies in a faulty plugin. An update carried out incorrectly, a plugin incompatible with your version of WordPress or PHP, a poorly coded plugin: any of these situations can cause a fatal error.
Note that the problem does not necessarily come from the plugin you have just installed. Sometimes, an automatic update of an existing plugin is enough to bring everything down.
Just like plugins, a theme can generate a critical error if it is poorly designed, if it conflicts with other elements of your site, or if it has only been partially updated.
Next, PHP can also be a potential culprit for several reasons:
- When using an unsuitable PHP version. WordPress requires a minimum PHP version to function properly. If your host uses a version that is too old, or if you have recently migrated to a PHP version that is incompatible with your plugins or your theme, fatal errors may appear.
- When there is not enough PHP memory. WordPress allocates a certain amount of RAM to PHP to run its scripts. If this limit is reached, which can happen on complex sites or during resource-intensive operations, the server triggers a fatal error.
Other possibilities should not be ruled out when diagnosing a critical error on a WordPress site. A simple caching issue can sometimes be the cause of a critical error on WordPress.
More rarely, a WordPress Core update can conflict with elements of your installation. It’s a less common situation, but it does exist.
Finally, if you or a developer have recently manually modified PHP files (functions.php, wp-config.php, etc.), a simple syntax error can cause the entire site to go down, as can the presence of a corrupted file or database.
Now, as they say, all that’s left is to get started. If you’re facing this very troublesome issue on your site, discover practical step-by-step solutions to get rid of this error right away.
Before taking action, cover your bases by backing up your site, if you haven’t already. To do this, you can use a dedicated plugin such as UpdraftPlus, or a site maintenance and monitoring solution such as WP Umbrella.

How to fix a critical error on your WordPress site: step-by-step solutions
Check the WordPress debugging email
To begin, let’s return to the debugging email mentioned above. You know, the one WordPress may send you if a bug is caused by a theme or plugin (during an automatic update, for example).
The first thing to do is to open the inbox of the email address associated with your WordPress administrator account.
Since the release of version 5.2, WordPress automatically sends a message containing information about the detected error: the type of error, the PHP file involved, and the line number where the problem occurred.
Take a close look at this email before taking any action. It will give you a valuable indication of the source of the problem.
If the file mentioned belongs to a specific plugin, you know where to start.
If you do not receive this email, check your spam folder or your email configuration.
Do you have it in front of you? All you need to do is click on the hyperlink it contains. You will then be redirected to your WordPress back office, where you can deactivate and delete the culprit (theme or plugin).
Clear the cache
If you have not received this email and access to your administration interface is still possible, try clearing the cache.
This may seem simplistic, but it is a step you should never overlook. If your site uses a cache plugin (WP Rocket, W3 Total Cache, LiteSpeed Cache, etc.) or if your web host provides server caching, it is possible that cached files are hiding an old version of your site or are themselves generating conflicts.
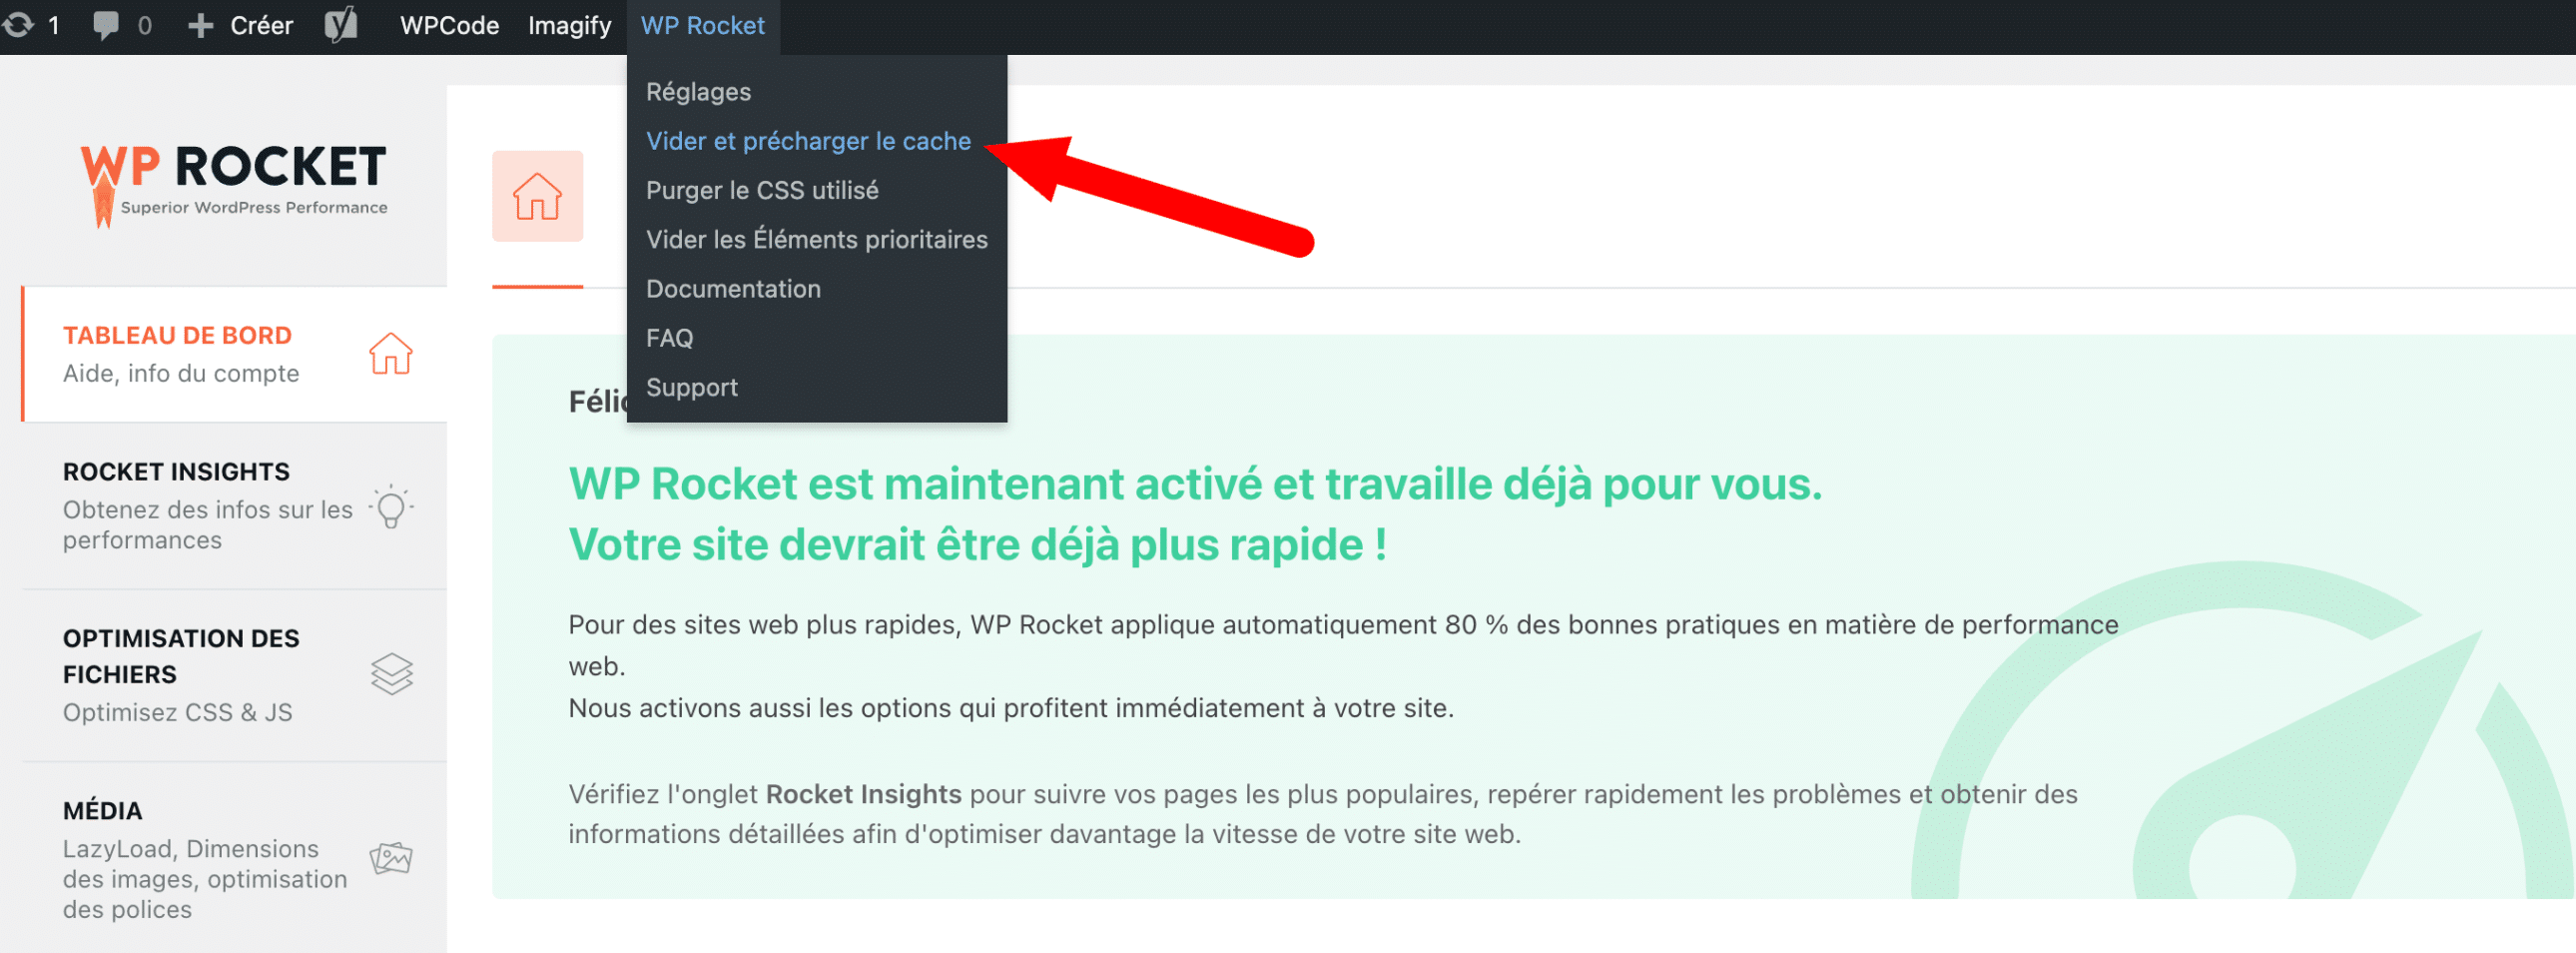
To clear the cache, log in to your WordPress dashboard, then use the menu of your cache plugin.
For example, with WP Rocket, click here on the WP Rocket > Clear and preload cache menu, located at the top of your WordPress dashboard:
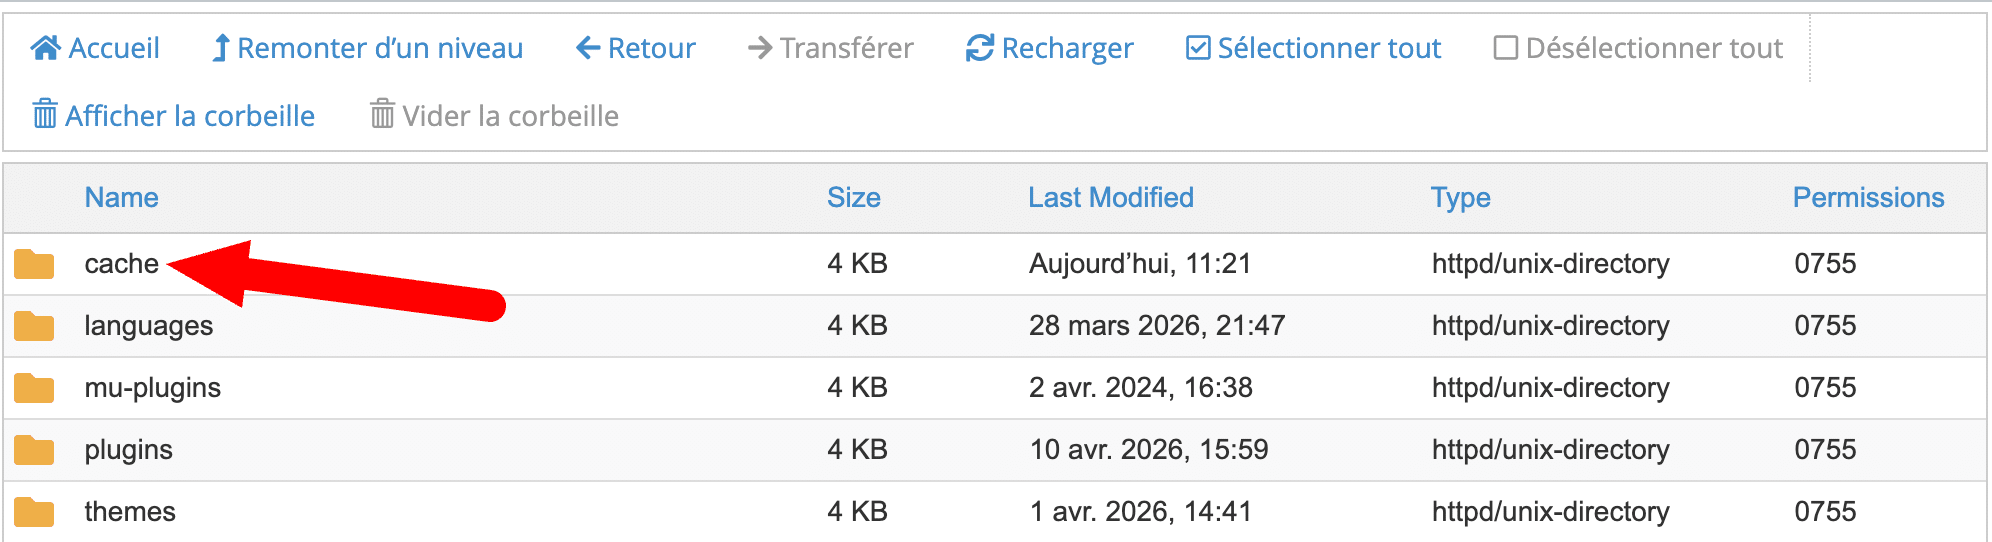
If your dashboard is inaccessible, log in to an FTP client (e.g., FileZilla) or to your server administration interface.
On cPanel, for example, go to the File Manager menu, then clear the contents of the wp-content/cache folder:
Another option to consider: clear the server cache directly from your host’s settings interface, if it has enabled a cache module by default.
To learn more about this, feel free to contact your host’s support team.
Debug WordPress
If these first two workaround measures prove ineffective, you’ll need to step things up and move on to slightly more technical operations.
Nothing insurmountable, don’t worry. By default, you should know that WordPress has a debug mode built in that allows PHP errors to be displayed directly on the screen or saved in a log file.
To enable it, connect to your server via FTP or through your host’s file manager, then open the wp-config.php file located at the root of your WordPress installation (often in the public_html, htdocs, or www folder).
Look for the following line:
define( 'WP_DEBUG', false );
Replace it with:
define( 'WP_DEBUG', true );
define( 'WP_DEBUG_LOG', true );
define( 'WP_DEBUG_DISPLAY', false );
WP_DEBUG is a PHP constant (a permanent global variable) that can be used to enable “debug” mode in WordPress. By default, it is normally set to the value false (true enables debug mode). WP_DEBUG_LOG creates an error log, and WP_DEBUG_DISPLAY displays errors publicly (unless the value is set to false).
In the configuration above, errors are saved in a file named debug.log, located in the /wp-content/ folder.
Check this file to identify the exact source of the error. Once the issue has been resolved, remember to set WP_DEBUG back to false so you do not expose this information in production.
Activate a default WordPress theme
If the debugging email or log file points to a file belonging to your active theme, the quickest solution is to temporarily activate a default WordPress theme.
If your dashboard is accessible, go to Appearance > Themes and activate a default theme such as Twenty Twenty-Five:
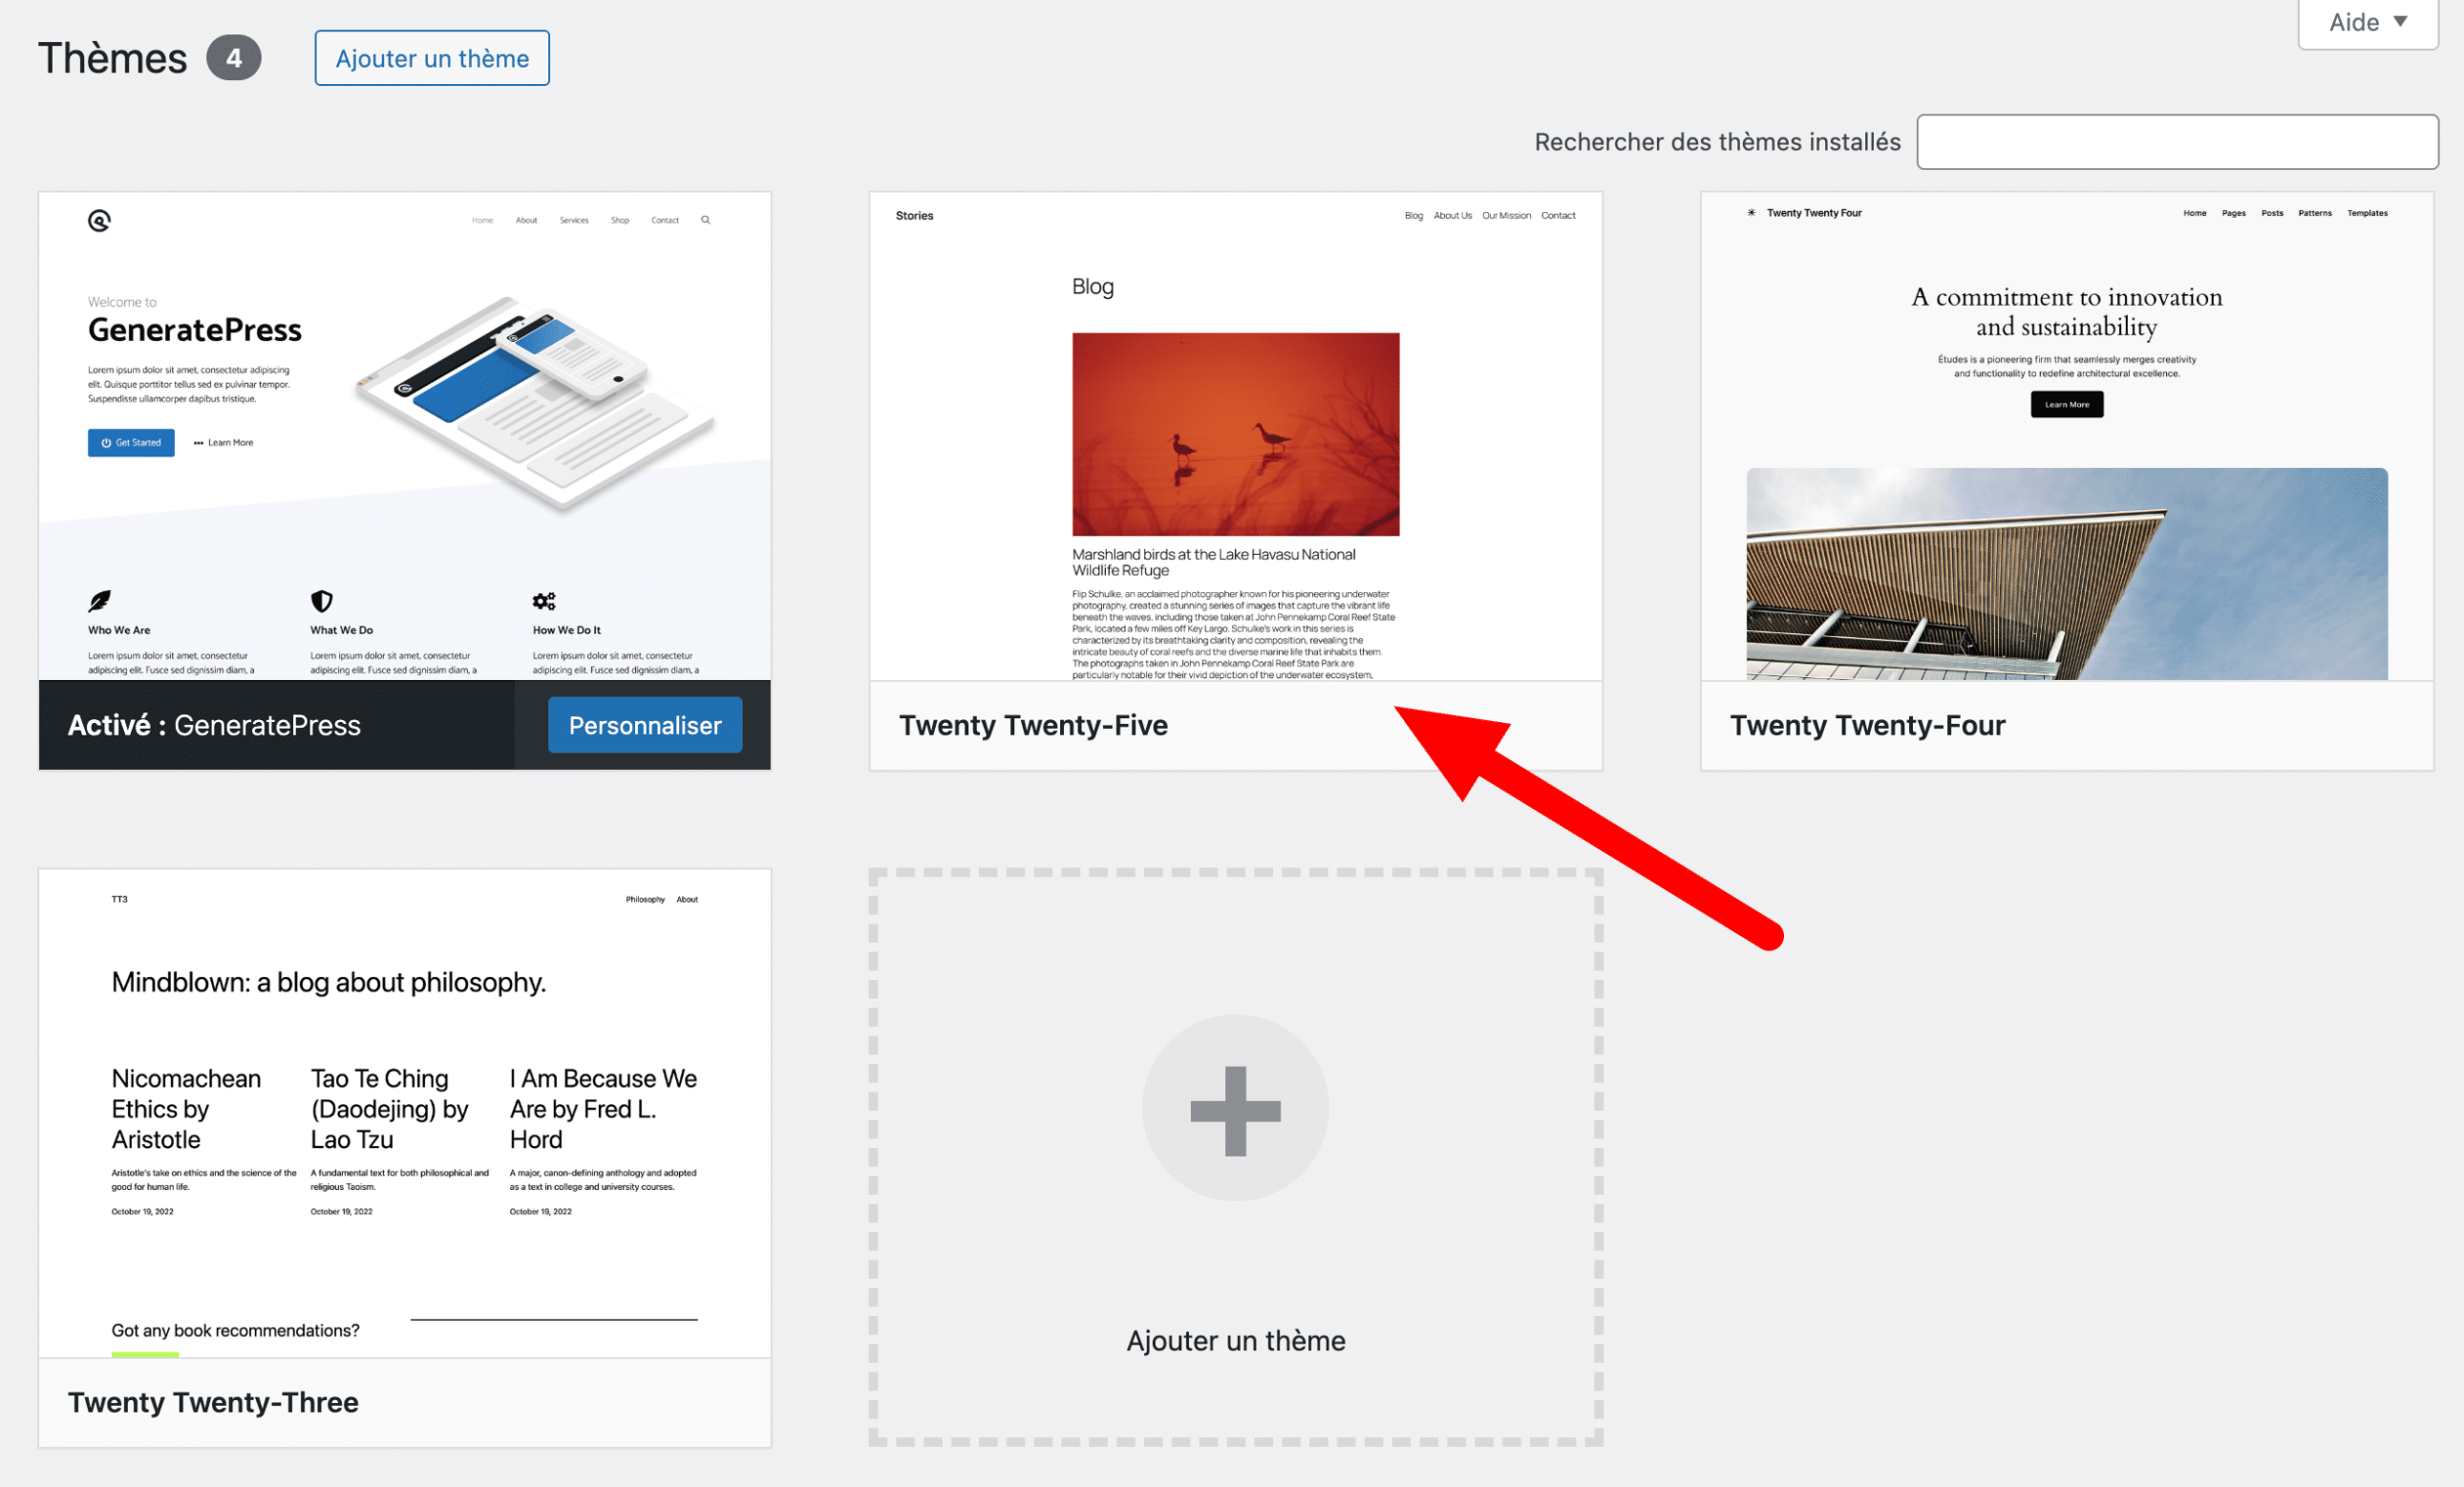
All default WordPress themes start with Twenty. Depending on the major version of WordPress you are using, you will have access to different native themes. At the time this article was published, Twenty Twenty-Five was the most recent native theme to be released.
If you still cannot access your back office, return to your file manager, either via an FTP client or through your server management interface (such as cPanel).
Go to the wp-content > Themes folder. Rename the folder of your active theme to something like themeactif-desactive (right-click the directory and click “Rename” to do this):
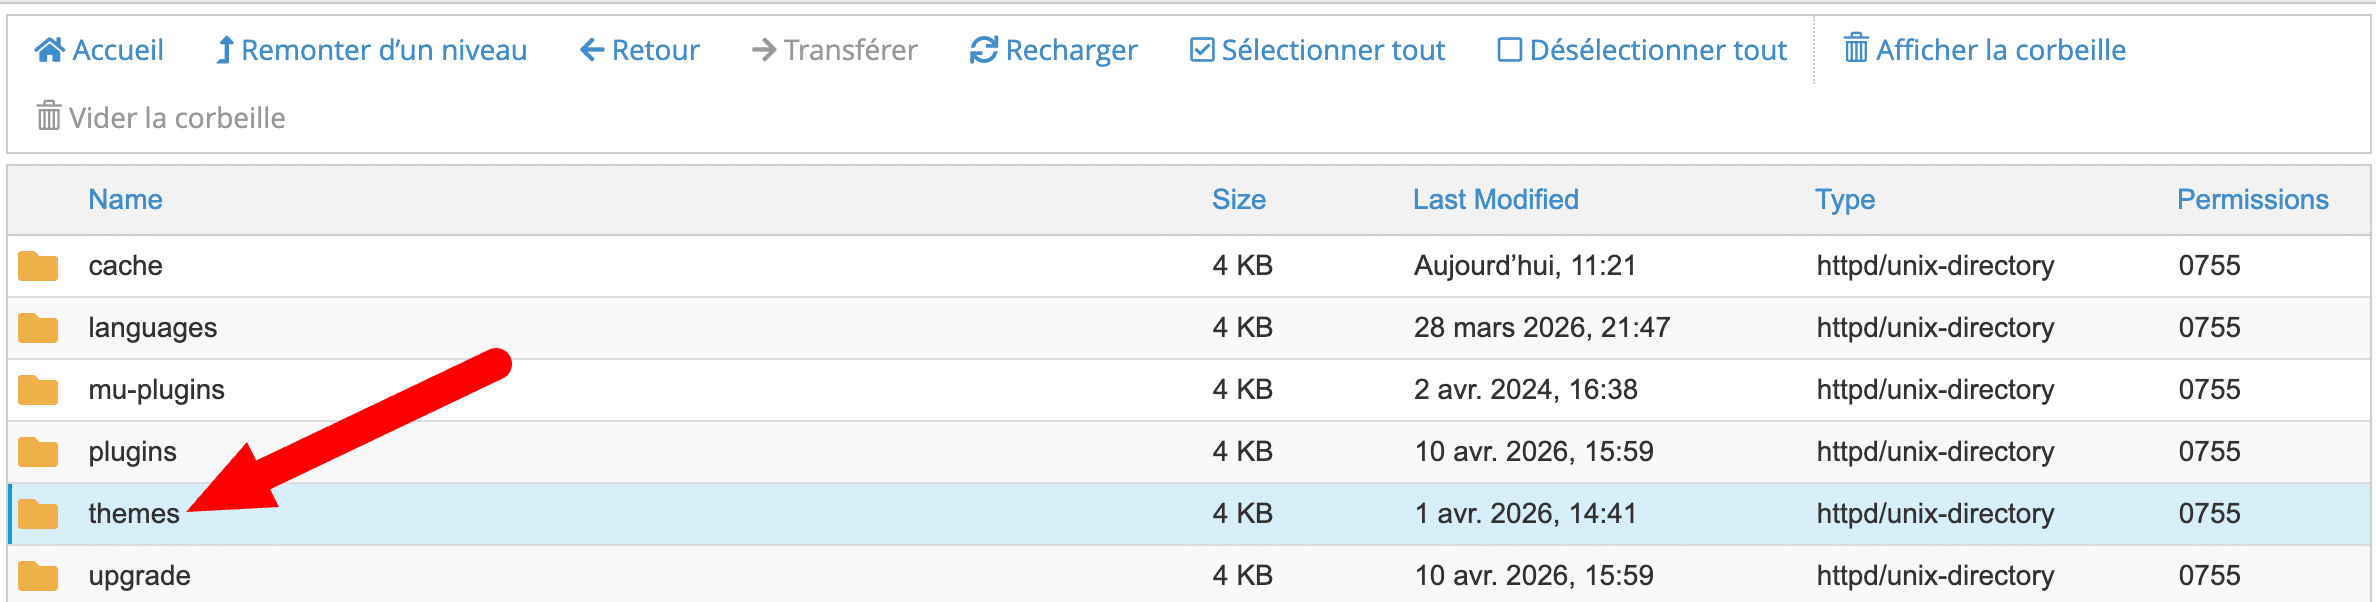
Refresh your site. If it loads and displays correctly, this indicates that there is a conflict with your theme. You may then need to revert to an earlier version of the theme or choose a new one.
Disable plugins
Are you still stuck, with no solution for the moment? Don’t get discouraged, because we’re now moving on to one of the most effective steps for identifying the source of a critical WordPress error related to a plugin.
If you have access to your dashboard, go to Plugins > Installed Plugins and deactivate all plugins at once using the bulk action.
Then reactivate each plugin one by one and see how your site responds each time. As soon as your site crashes when you reactivate a plugin, you’ve found the culprit. Then delete the plugin in question.
Now, what should you do if you don’t have access to the admin area? Well, as before, you can use FTP or your hosting provider’s file manager.
Log in to your server and navigate to the /wp-content/plugins/ folder. Rename this folder (for example to plugins_old): WordPress will no longer find the plugins and will automatically deactivate them.
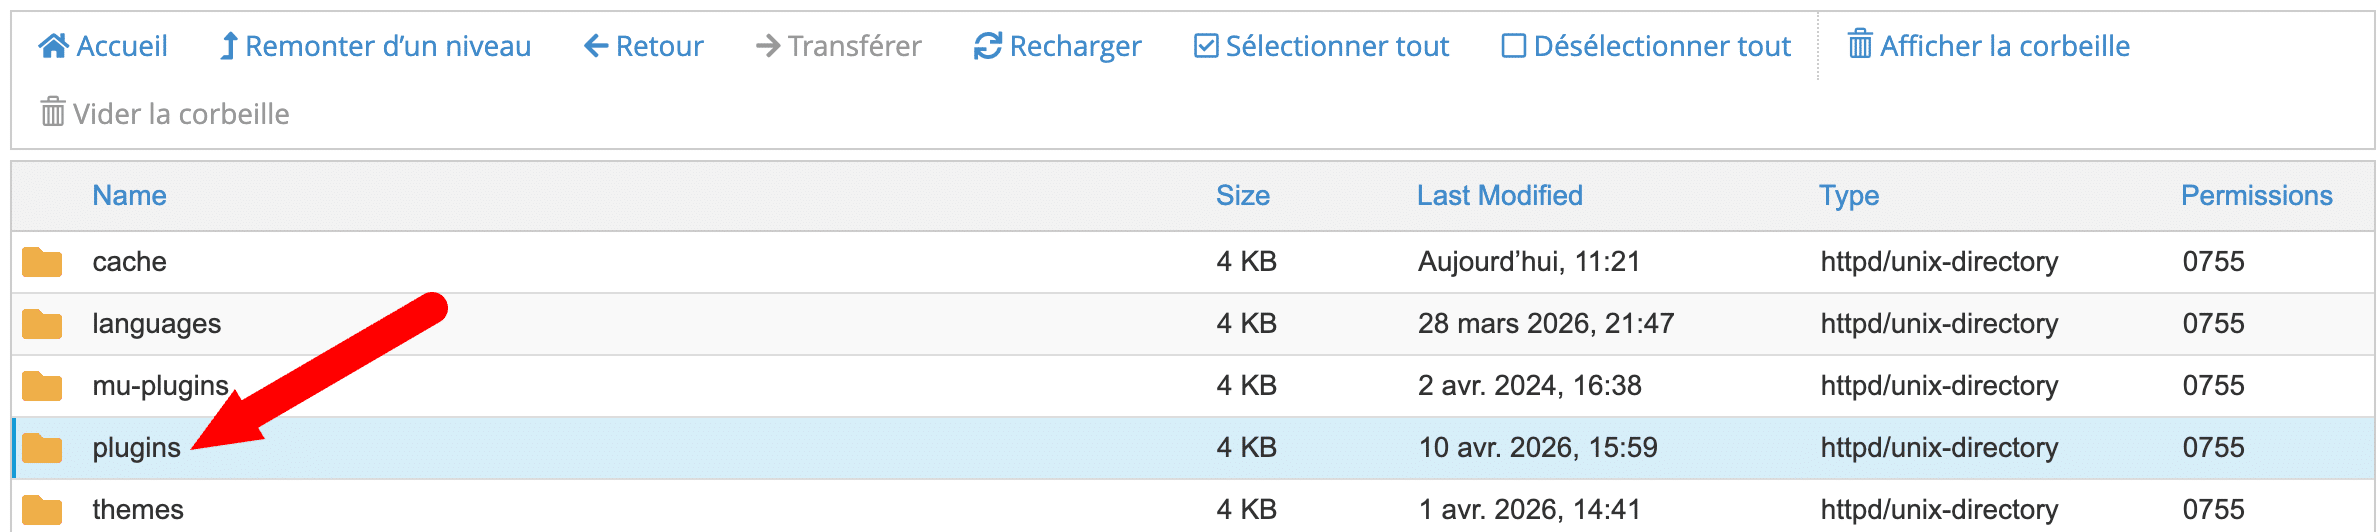
Once the site is accessible, rename the “plugins_old” folder back to “plugins”. Finally, reactivate your plugins one by one to identify the one causing the error. This method is simple but very effective.
Restore a backup of your site
If you can’t identify the cause of the problem, or if the previous steps weren’t enough, restoring a recent backup of your site is often the fastest and safest solution.
It is important to note that this option is only possible if you actually have regular backups. That is why, later in this article, we emphasize their importance in a serious WordPress maintenance strategy.
Most web hosts offer automatic backups that can be accessed from their management panel.
You can then retrieve a recent backup, then restore it to make your site accessible again.
If you use a dedicated plugin, such as UpdraftPlus or WP Umbrella, for example, you can also manage and restore your backups independently.
Increase the PHP memory limit
With the solutions we have just covered so far, there is a good chance that your site will be restored after a critical error on WordPress.
In some cases, that still won’t always be enough and you will need to roll up your sleeves.
We will now look at some slightly more technical troubleshooting methods—without being insurmountable—which require using a bit of code most of the time.
In some cases, be aware that the problem you are experiencing may come from a lack of memory allocated to PHP on your web server.
WordPress uses this memory to run scripts, for example. The problem? If it is too low, you will encounter an error message such as “Fatal error: Allowed memory size exhausted”.
To fix this, open your wp-config.php file and add the following line before the mention /* That’s all, stop editing! */:
define( 'WP_MEMORY_LIMIT', '256M' );
You can enter the limit of your choice (e.g., ‘1024M’), but it will have no effect if your hosting provider enforces a limit. In that case, contact your hosting provider to increase this limit directly from the server.
Note that some shared hosting providers impose a maximum limit that you will not be able to exceed without changing your hosting plan.
Update the PHP version to resolve a critical error on WordPress
Another important point: the PHP version used by your server may be the cause of a critical error on WordPress.
If you are using an outdated version of PHP (lower than 7.4, for example), some modern plugins will refuse to work properly.
Conversely, if your hosting provider has recently updated PHP to a newer version (8.1, 8.2, 8.3, etc.), and your theme or plugins are not compatible with that version, fatal errors may appear.
You can generally manage the PHP version from your hosting provider’s control panel (cPanel, Plesk, etc.).
In cPanel, go to the Software > Select PHP Version menu. On the next screen, select the desired PHP version in the “PHP version” box:
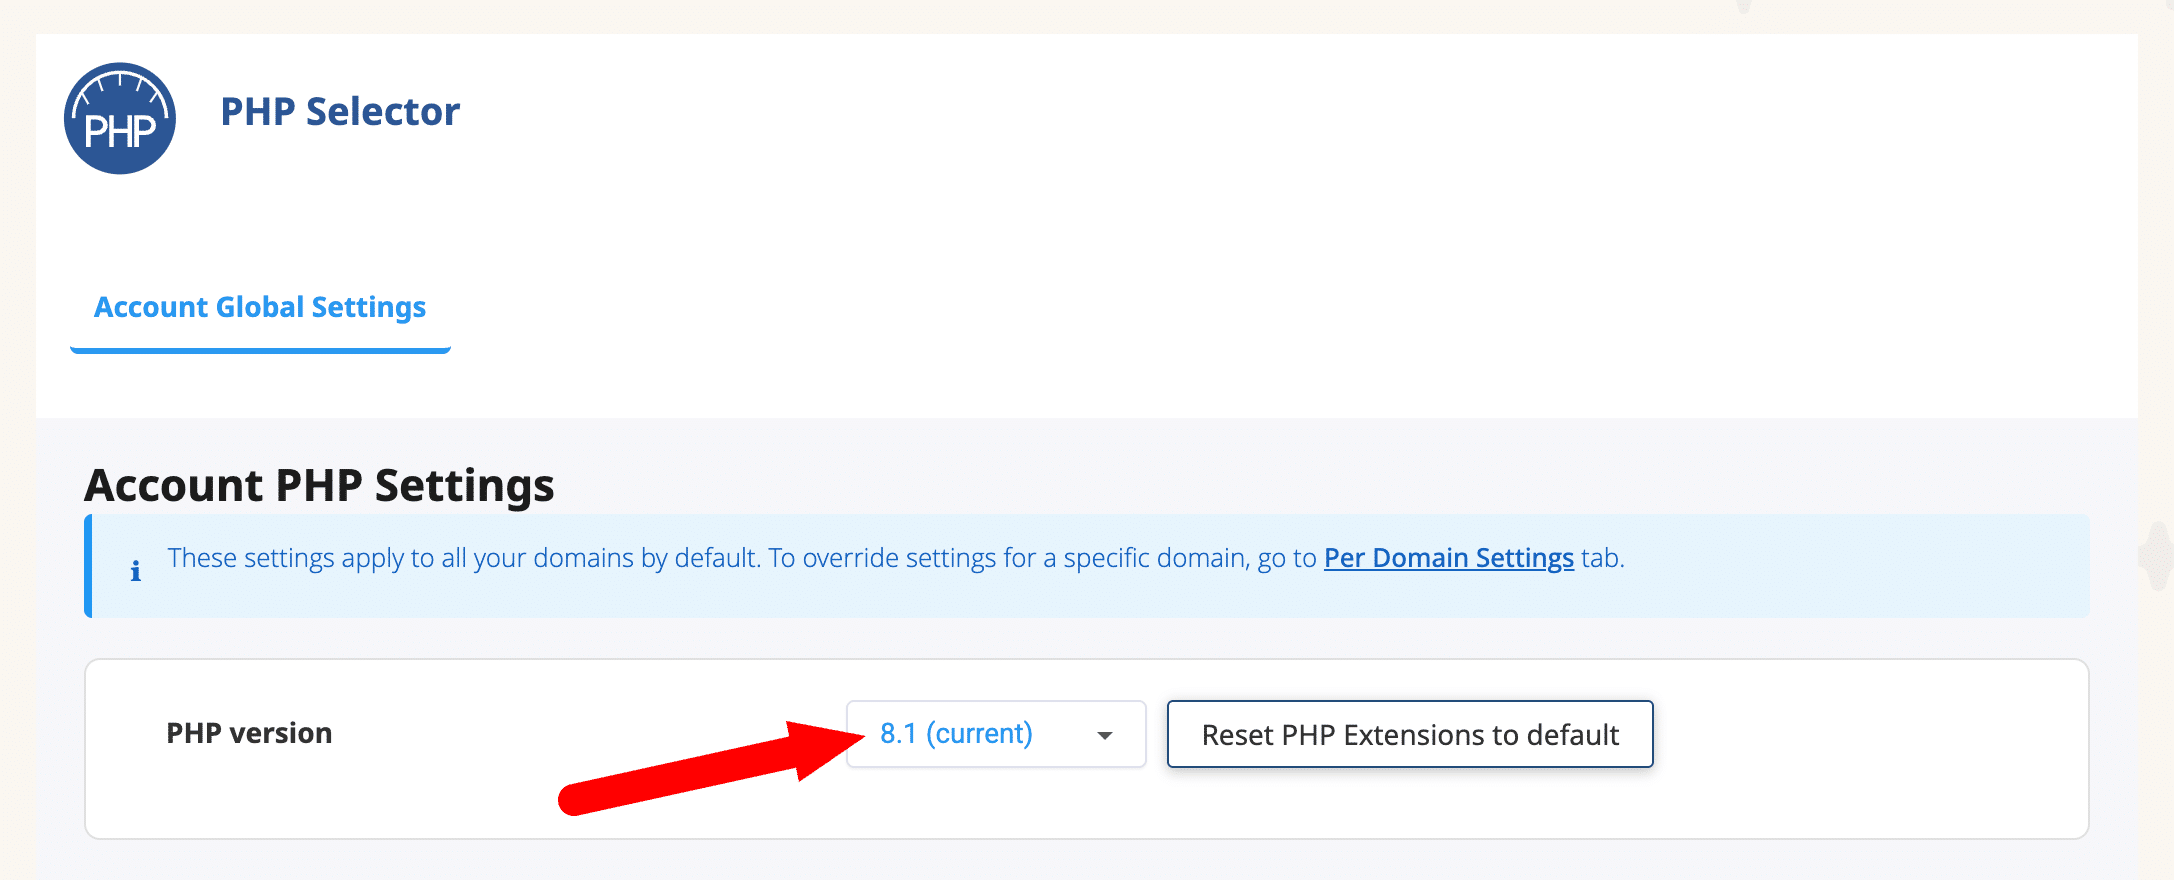
We recommend always checking the compatibility of your plugins and theme before changing the PHP version, and doing so first in a test environment (staging or local) before making the change on your production site (online).
Contact your hosting provider
If all the previous steps have not resolved the critical error on WordPress, it is time to contact your hosting provider’s support.
A web host’s technical teams have access to server logs (error logs) and can identify problems that are invisible from your interface: errors at the Apache or Nginx server level, configuration conflicts, and limitations specific to your hosting plan.
Prepare as much information as possible before contacting them: the time the error appeared, the latest changes made to your site, and the contents of the debug.log file if you have enabled debug mode.
Resources and tools for getting additional help
If you need to go further or find additional help, there are also several reliable resources available for WordPress users.
The official WordPress.org forum is a goldmine of information. Thousands of discussion threads cover the most common errors, and the community there is active and helpful.
Search for your exact error message to find solutions suggested by other users.
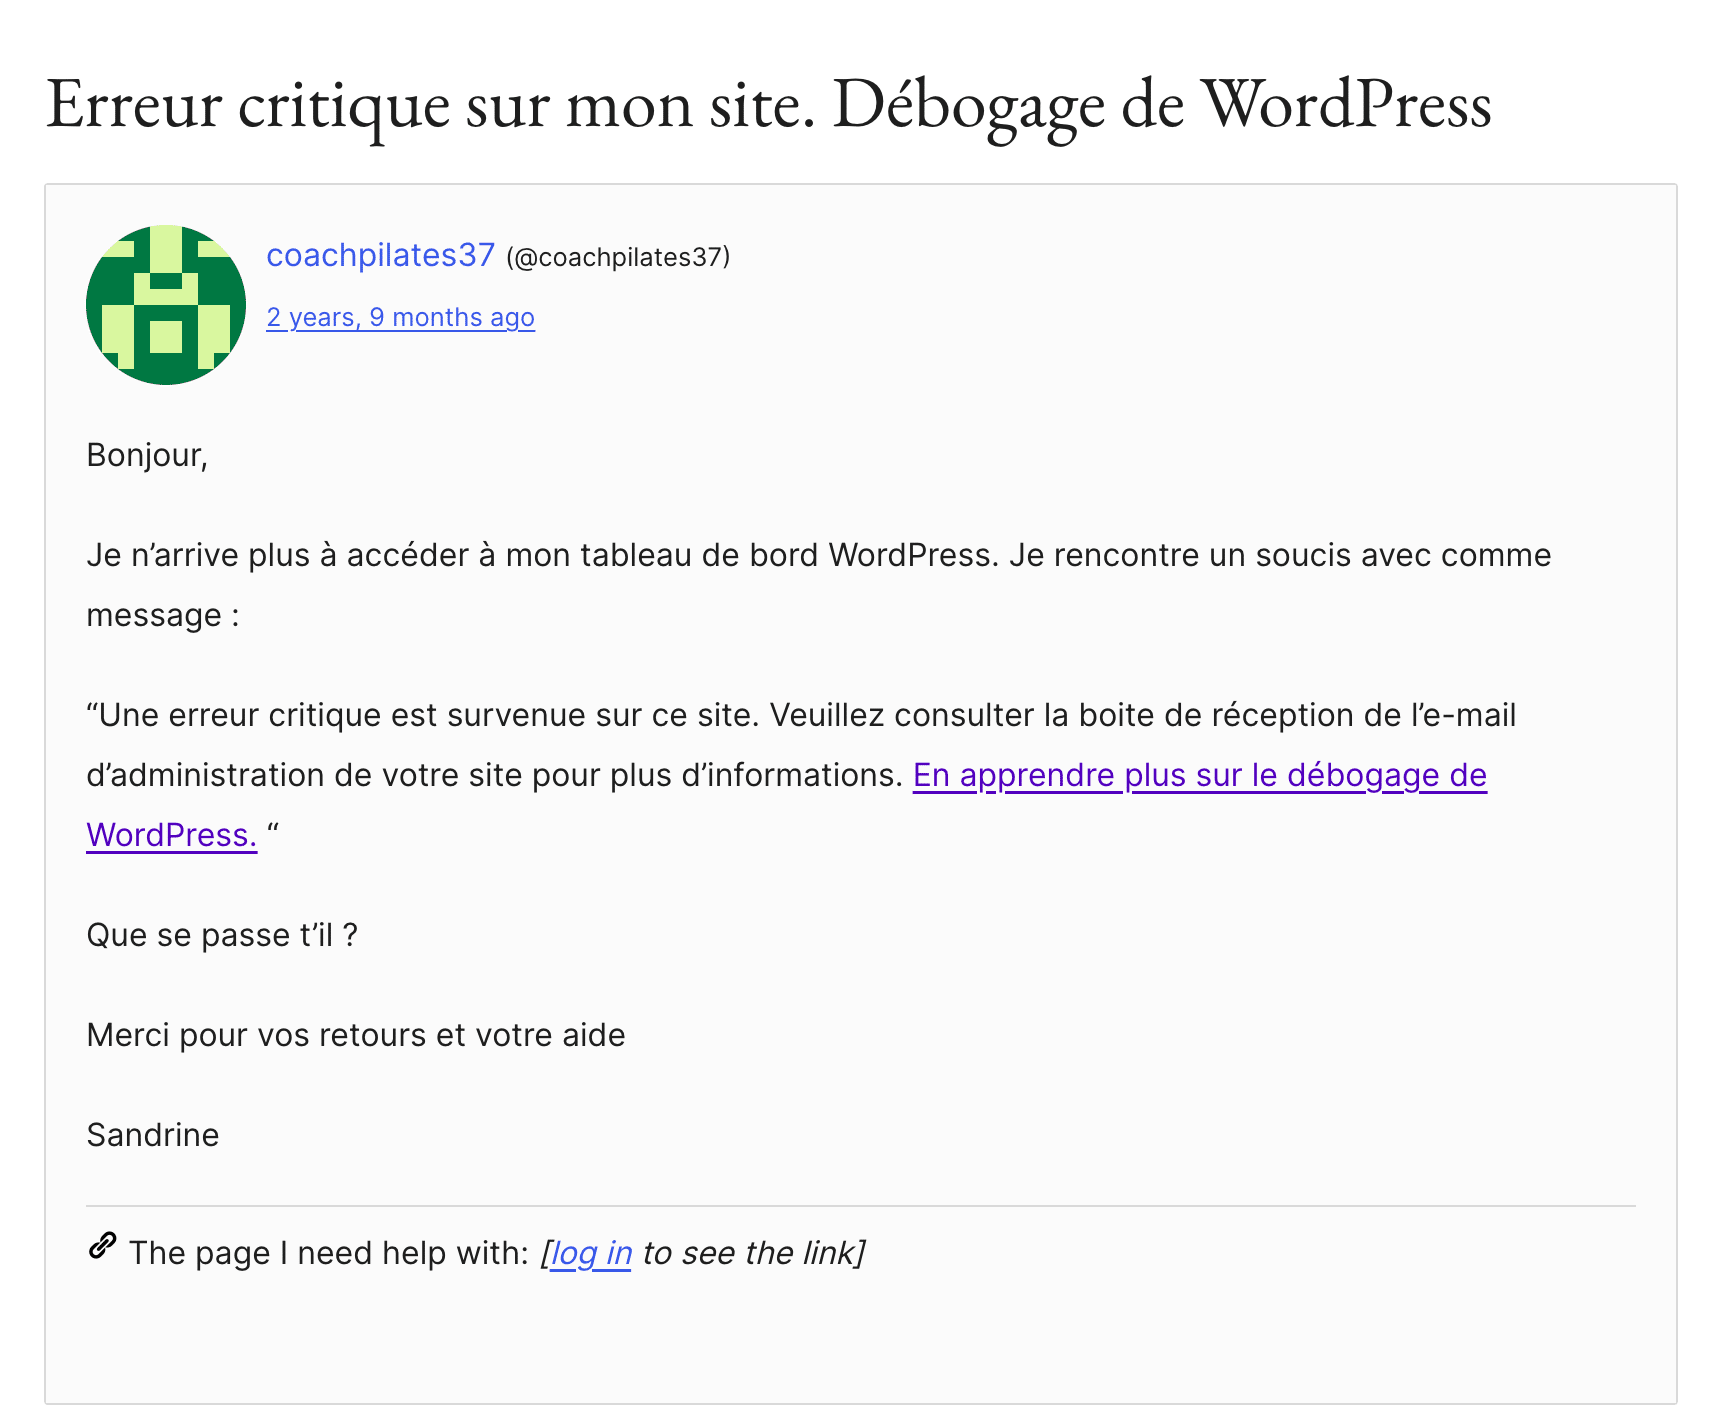
The official WordPress documentation offers detailed guides on debugging, managing plugins and themes, and common errors. It is an essential reference.
In addition, depending on your skill level, other resources may be useful to you:
- WP-CLI, the command-line interface for WordPress, allows advanced users to perform maintenance operations (disabling plugins, updating, clearing the cache) without going through the dashboard. This is particularly useful when the dashboard is inaccessible.
- Query Monitor is a debugging plugin highly appreciated by WordPress developers. It displays detailed information about the PHP and SQL queries and the hooks executed on your site, making it easier to identify conflicts.
Finally, a tool like WordPress Healthc
heck (Site Health) can provide you with clear leads on the common issues encountered by your site.
How can you prevent the critical error on WordPress from happening again in the future?
Fixing a critical error is good. Making sure it doesn’t come back is even better, don’t you think?
To keep your WordPress site stable and secure over time, discover a few best practices to incorporate into your daily routine as a webmaster:
- Perform updates regularly, but methodically. WordPress, themes, and plugins must be kept up to date to benefit from security fixes and compatibility improvements. However, we recommend that you never update directly in production without first testing on a staging environment. A test site is a copy of your real site where you can experiment without risk.
- Set up automatic and regular backups. A daily or weekly backup of your database AND your files is essential insurance. In the event of a problem, you will be able to return to a stable state in just a few minutes.
- Choose your plugins and themes carefully. Prioritize plugins with a large number of active installations, positive ratings, and a recent update. Beware of plugins that have been abandoned for more than a year, as they are probably not compatible with the latest versions of WordPress and PHP. Also limit the number of installed plugins: each additional plugin is a potential point of failure.
- Use quality hosting. Entry-level shared hosting may impose PHP memory or PHP version limitations that weaken your site. Managed WordPress hosting generally provides a better-optimized environment, with managed PHP updates and responsive technical support.
- Call on a professional for maintenance. Managing a live WordPress site requires time and technical skills. Preventive maintenance provided by a specialized agency helps anticipate conflicts, monitor performance and security, and intervene quickly in the event of a problem.
Summary
In conclusion, the critical error in WordPress is a serious issue, but rarely impossible to fix.
In the vast majority of cases, it is caused by a faulty plugin, a theme conflict, or an unsuitable PHP configuration. These are identifiable and fixable problems by following the steps described in this article.
The key takeaway is the importance of a methodical approach: check the debugging email, deactivate plugins one by one, verify the PHP version, restore a backup if necessary. Each step brings you closer to the solution.
But the best way to handle a critical error is still to prevent it. Regular backups, controlled updates, suitable hosting, and continuous monitoring make the difference between a site that goes down and a site that stays online no matter what.
Don’t want to manage the technical maintenance or support of your WordPress site on your own? The Maintenance WP agency is here to support you.
Need to know more? Our team is available to answer your questions.