It’s a routine operation for many webmasters. Most of the time, it runs on its own, automatically, without you even thinking about it.
Its importance is crucial for your WordPress site. Thanks to it, you’ll be able to restore your site in the event of a major problem, such as a hack of your data.
This operation is the WordPress backup. While backing up WordPress may seem simple on the surface, its technical implementation can prove more complex. That’s why it’s important to master it properly by applying best practices.
That’s what you’ll know how to do by the end of this article. It will detail 4 methods for copying your website to a safe place, with or without the help of a plugin.
What is a WordPress backup?
A WordPress backup refers to saving your website.
This action consists of copying the latest version of your site (files + database) to a secure location so that you can restore it in the event of a problem (hacking, server error, webmaster mistake, etc.).
If we were to simplify it, let’s say that WordPress can be backed up in two different ways:
- Manually.
- Automatically, for example using a backup plugin or a dedicated tool provided by your hosting provider.
What are the best practices for backups?
Backing up WordPress is essential, especially for security reasons (but not only that—we’ll come back to this shortly). For a backup to be effective, it must be:
- Complete. A WordPress backup must include both your site’s files AND database. The database contains all your site’s posts, comments, links, and other content.
The files correspond to your WordPress site as a whole (WordPress core, plugins, themes, images, etc.). This is what you find inside your site’s root directory, in your FTP client:
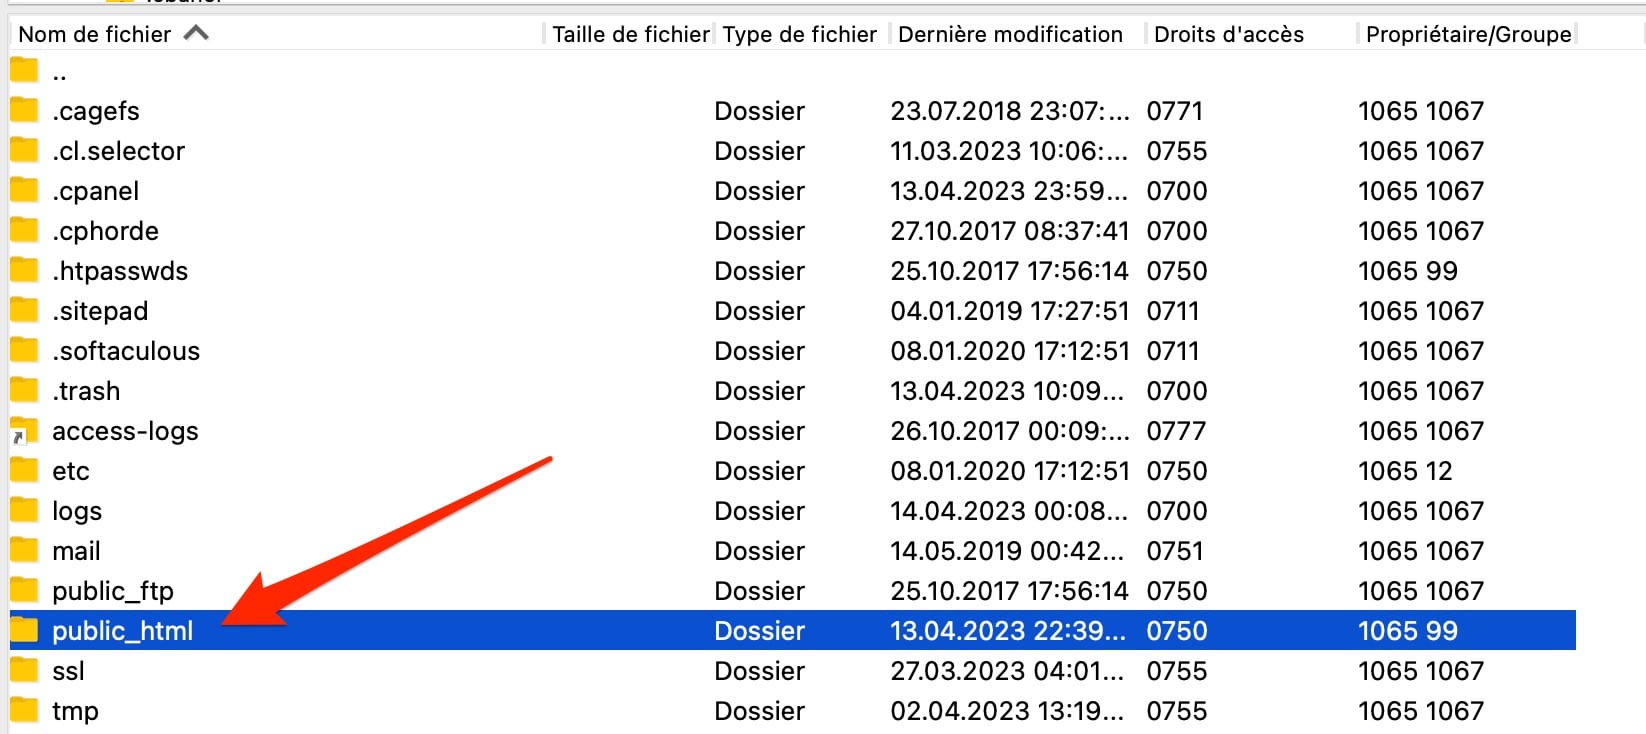
public_html.- Automated. By scheduling your backups, you ensure that you always have a copy of your site at regular intervals. It is also good practice to perform manual backups from time to time, to protect yourself in case there is a problem with your automated backup service.
- Stored in different locations and outside your site. To do this, you can copy your site to remote storage space (in the cloud), to a hard drive, another server, an email account, etc. If your site is hacked, you will be able to recover its copy without any problem.
- Secure, so that your data is protected against unauthorized access.
How often should you perform a WordPress backup?
A good backup is also a regular backup. In this regard, you may be wondering when to perform a backup of your WordPress website?
“It all depends on how often you publish content,” explains the WordPress documentation on backups. To help you find the answer, ask yourself: if your site were no longer available right now, what is the oldest version of your site that you would want to restore?”.
To help you decide, here is our advice:
- If your site has static content that does not change (no content or product additions), a weekly backup will be sufficient. There is no need to perform a WordPress backup every day in this case, as you risk unnecessarily overloading your database, which can slow down your page loading speed;
- If your site is dynamic and you modify it several times a day, back it up daily. This would be the case, for example, for a blog on which you publish one or more articles per day;
- If you have a WooCommerce-type online store with many products and daily transactions, we recommend backing it up even more often (e.g., every 6 hours or every 12 hours, for example).
Please note that the cases above are general examples that should be adapted to your personal situation. Ultimately, it is better to back up too much than not enough.
Finally, keep in mind that it is important to make a WordPress backup as soon as you make a major change to your website.
Why make a WordPress backup?
Backing up WordPress is a good practice to adopt without delay. Indeed, thanks to a backup, you can restore the latest copy of your site whenever you like. A backup also provides an appropriate response to:
- A hack that could lead to the theft of your data and/or your customers’ data. Unfortunately, hacking does not only happen to others. On average, 30,000 sites are hacked every day, according to security specialist iThemes.
If such a mishap happens to you, the faster you restore your WordPress site, the more you limit the damage. - Human error due to mishandling, especially if you are used to giving your clients control over their sites, or if several users have access to your site (e.g.: on a WordPress multisite installation).
- A conflict between two plugins following an update that went wrong, resulting in your site crashing (such as a 500 error, 502 error, or 503 error).
- A desire to migrate your site to another destination (new hosting provider, local installation, etc.). Thanks to a backup, you can easily transfer it.
More broadly, backing up a WordPress site is an essential preventive maintenance operation for the proper functioning of your WordPress site, just like regular updates, performance optimization, or fixing security vulnerabilities.
There are several methods for backing up the WordPress CMS, which we will now detail. Let’s start with a classic: backing up WordPress using a plugin.
How to back up WordPress with a plugin?
Which WordPress backup plugins are available to you?
Backing up WordPress with a plugin is the simplest and fastest method: the plugin will take care of everything for you automatically.
What’s more, this solution is suitable for both beginners and more experienced users. The remaining question is which plugin to choose. Among the dozens available in the official WordPress plugin directory, we could mention:
- UpdraftPlus.
- BackWPup.
- Jetpack.
- BlogVault.
- Duplicator.
- Backup Guard.
- WPvivid, etc.
For the purposes of this tutorial, we primarily chose UpdraftPlus for several reasons:
- With more than 3 million active installations, it is the most popular backup plugin;
- It is frequently updated.
- Its rating is excellent, as are its user reviews. In our opinion, it is one of the best backup plugins for WordPress.
- Its interface is easy to use and translated into French.
- It is a free WordPress backup plugin (in any case, its free plan is enough to get started).
- UpdraftPlus includes the basic options of a good backup plugin for WordPress: backup scheduling, manual and/or automatic backups, the ability to back up files and the database, possible export to remote storage space (Google Drive, Amazon S3, Dropbox, etc.), and possible restoration from the plugin interface.
Some general security plugins such as iThemes Security or SecuPress also offer a backup feature. However, the options provided are often more limited than with a dedicated backup plugin.
In addition, you can also back up WordPress using a plugin dedicated to maintenance, such as WP Umbrella or ManageWP. At the same time, you will also be able to perform your updates from one single dashboard. This is an interesting solution if you manage several WordPress sites, for example for your clients.
How to create a WordPress backup with UpdraftPlus?
Step 1: Install and activate the plugin
In your WordPress administration interface (back office), go to Plugins > Add New and type “UpdraftPlus” in the search bar. Install and then activate the plugin:
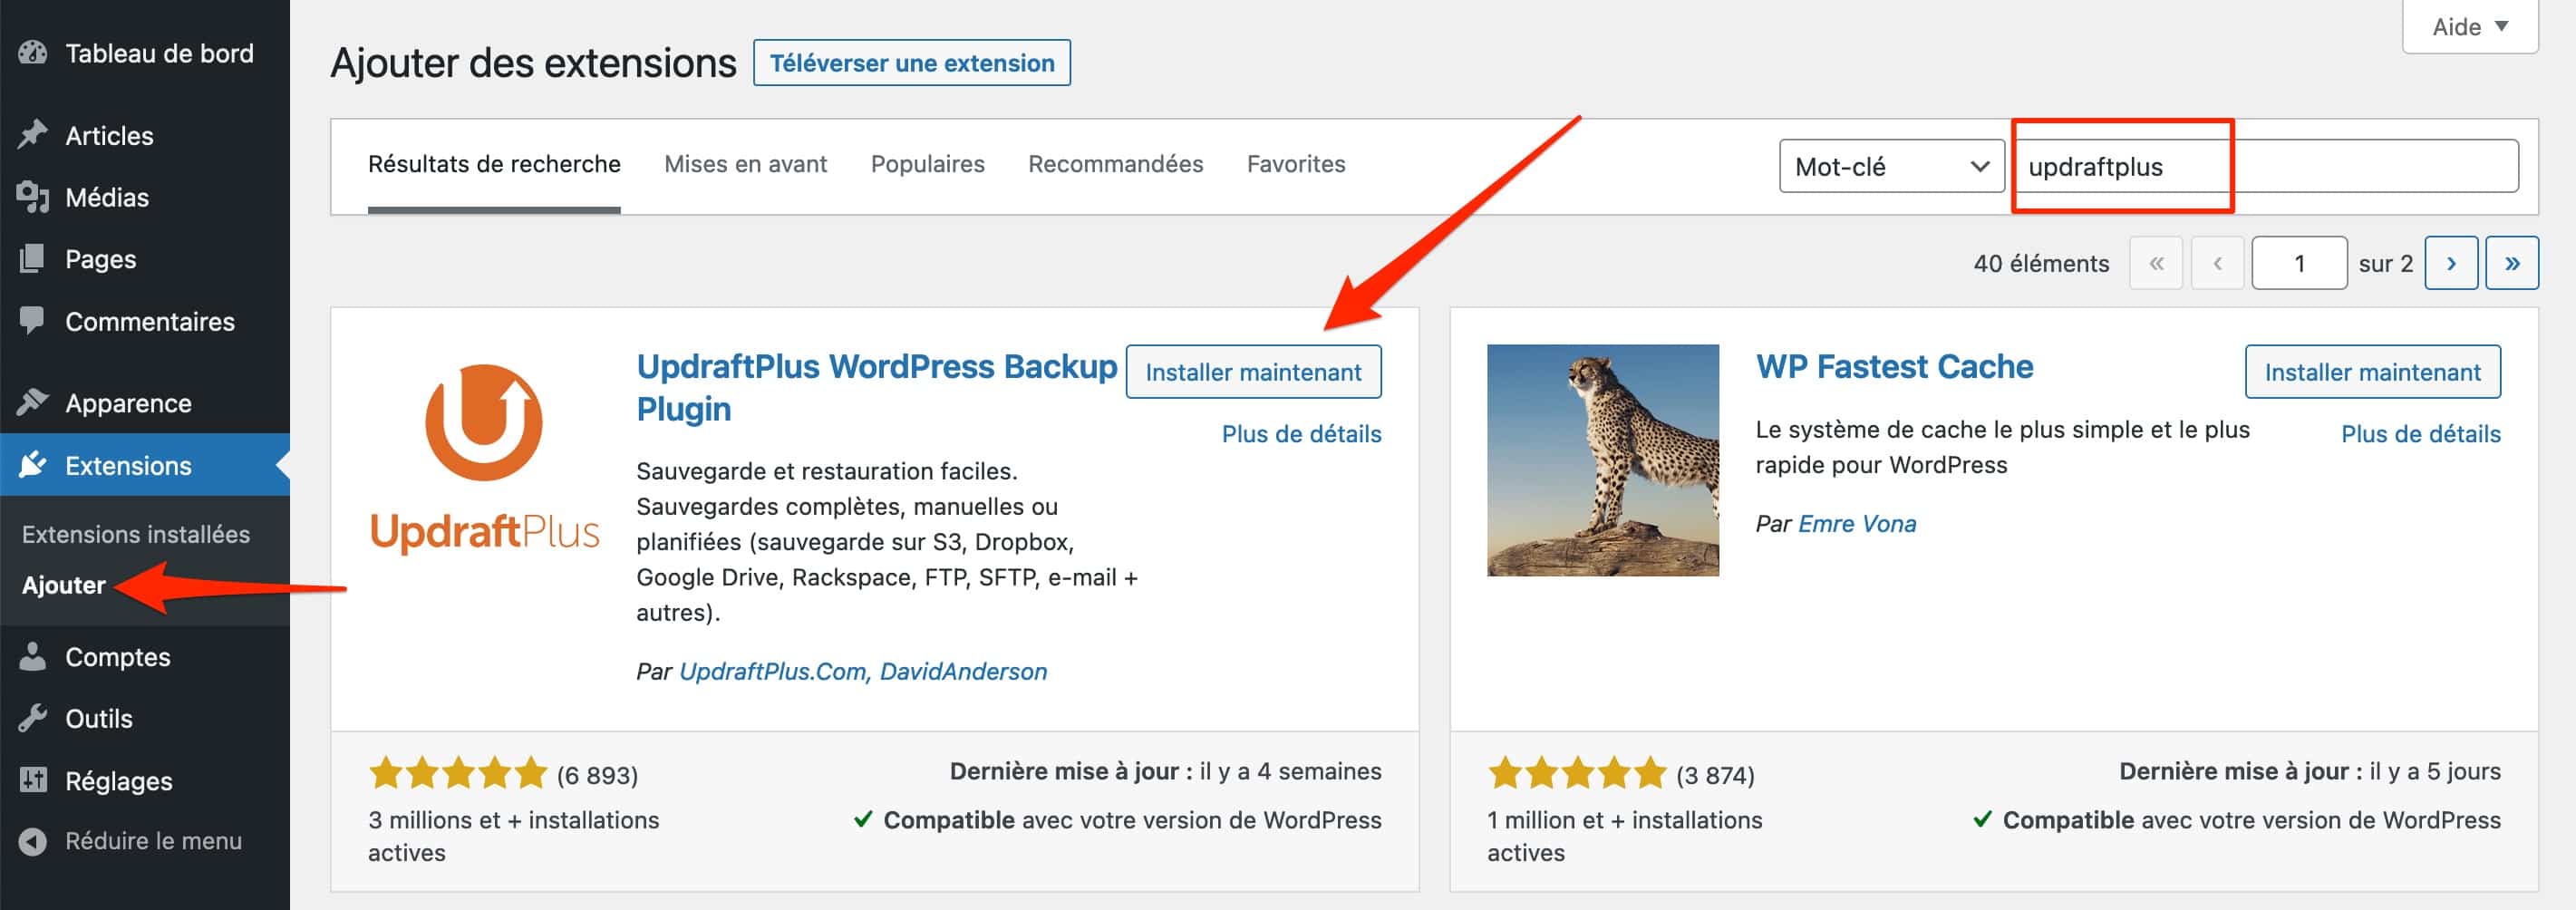
Step 2: Create a WordPress backup
Go to Settings > UpdraftPlus Backups to access the plugin dashboard.
From there, you have two options:
- Create a manual backup to obtain a copy of your site immediately.
- Schedule an automatic backup.
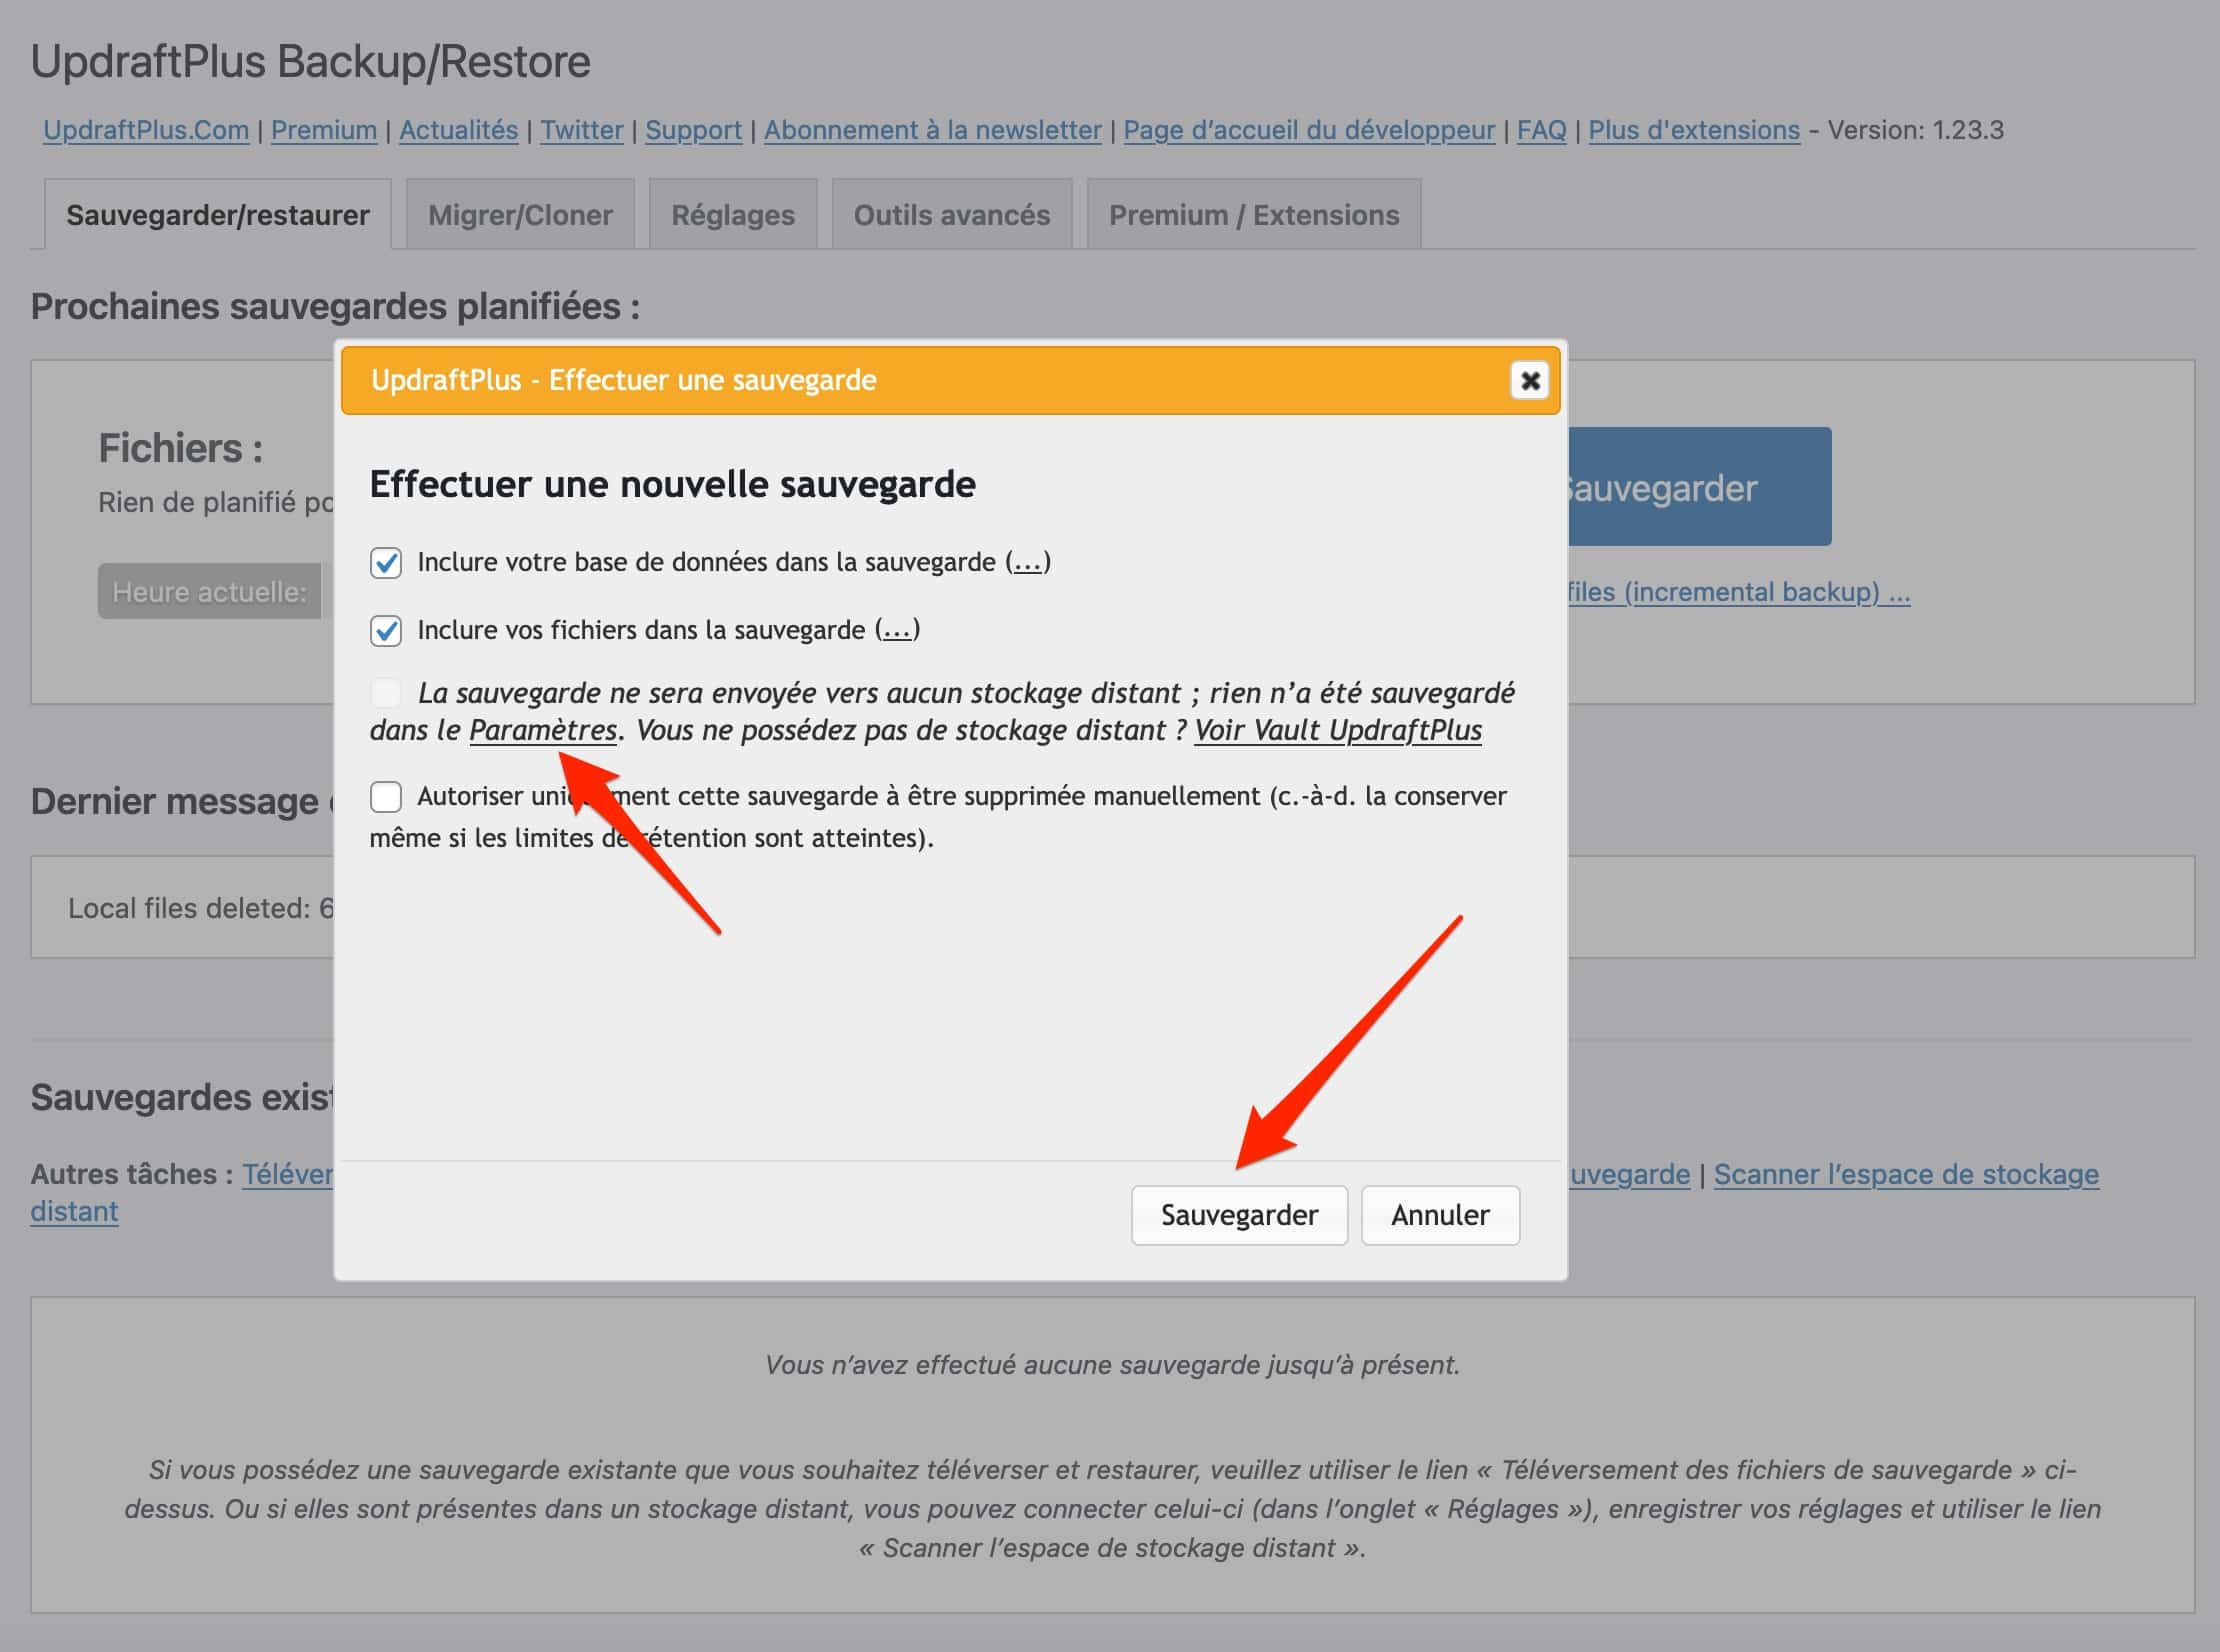
Let’s start with the manual method. To use it, click the blue “Back Up” button.
A highlighted pop-up window will open. Then check the following boxes according to your needs:
- Include your database in the backup (recommended).
- Include your files in the backup (recommended).
We also recommend sending your backup to remote storage by clicking the “Settings” link. Finish by clicking the “Back Up” button.
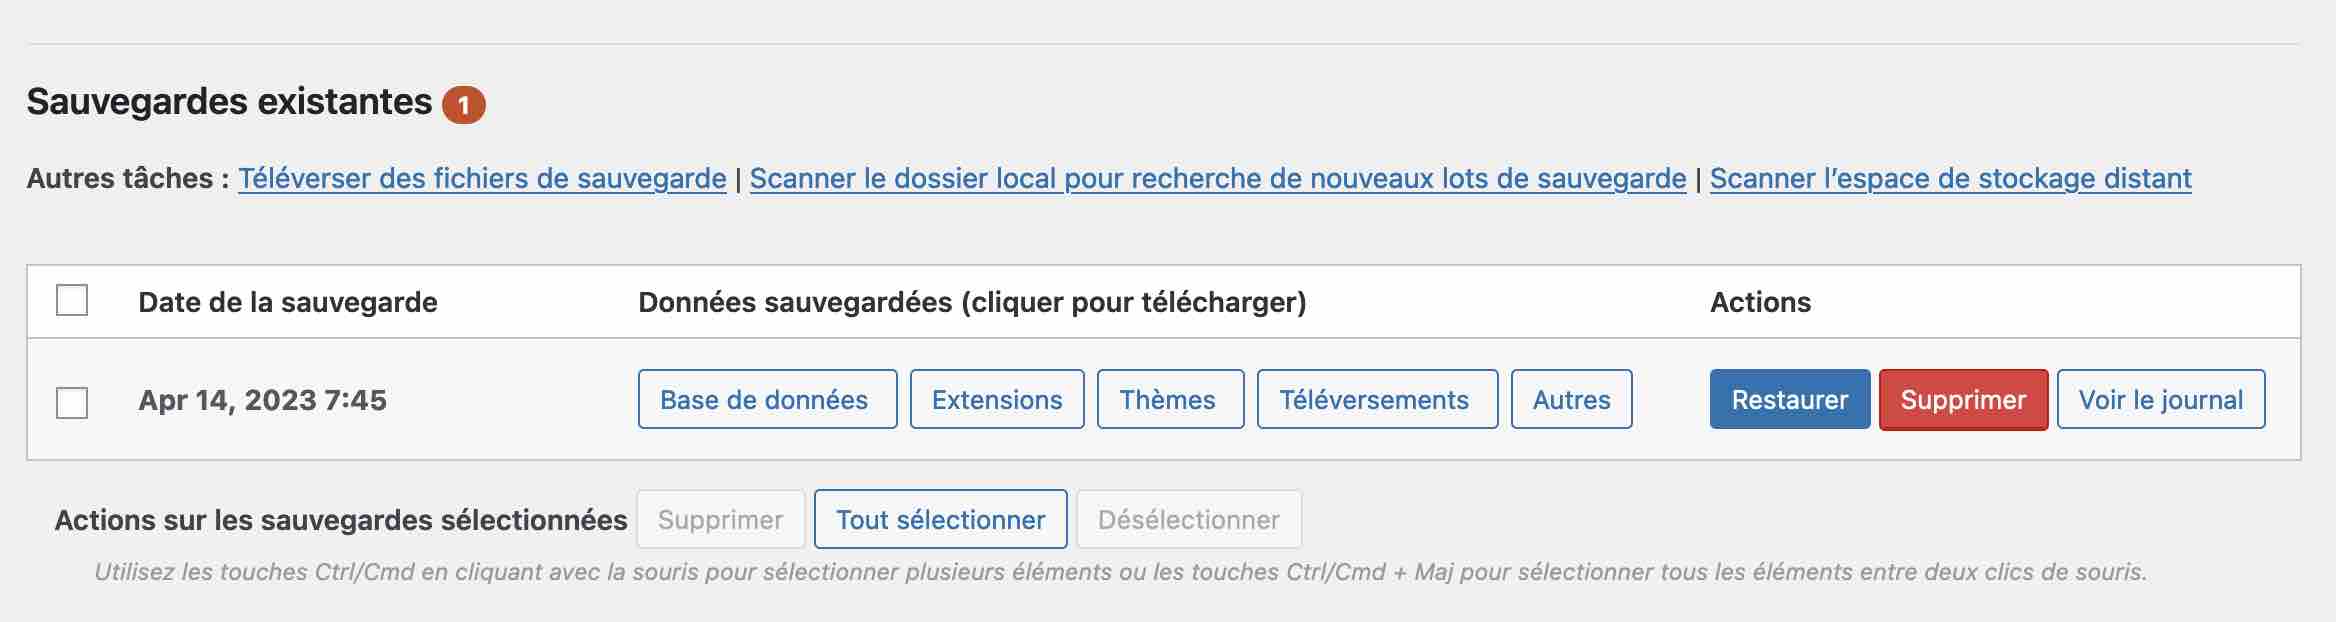
Once the WordPress backup has been completed, you will find it in the section called “Existing backups”:
If you want to schedule an automatic backup, simply click the “Settings” tab and choose the backup frequency you want:
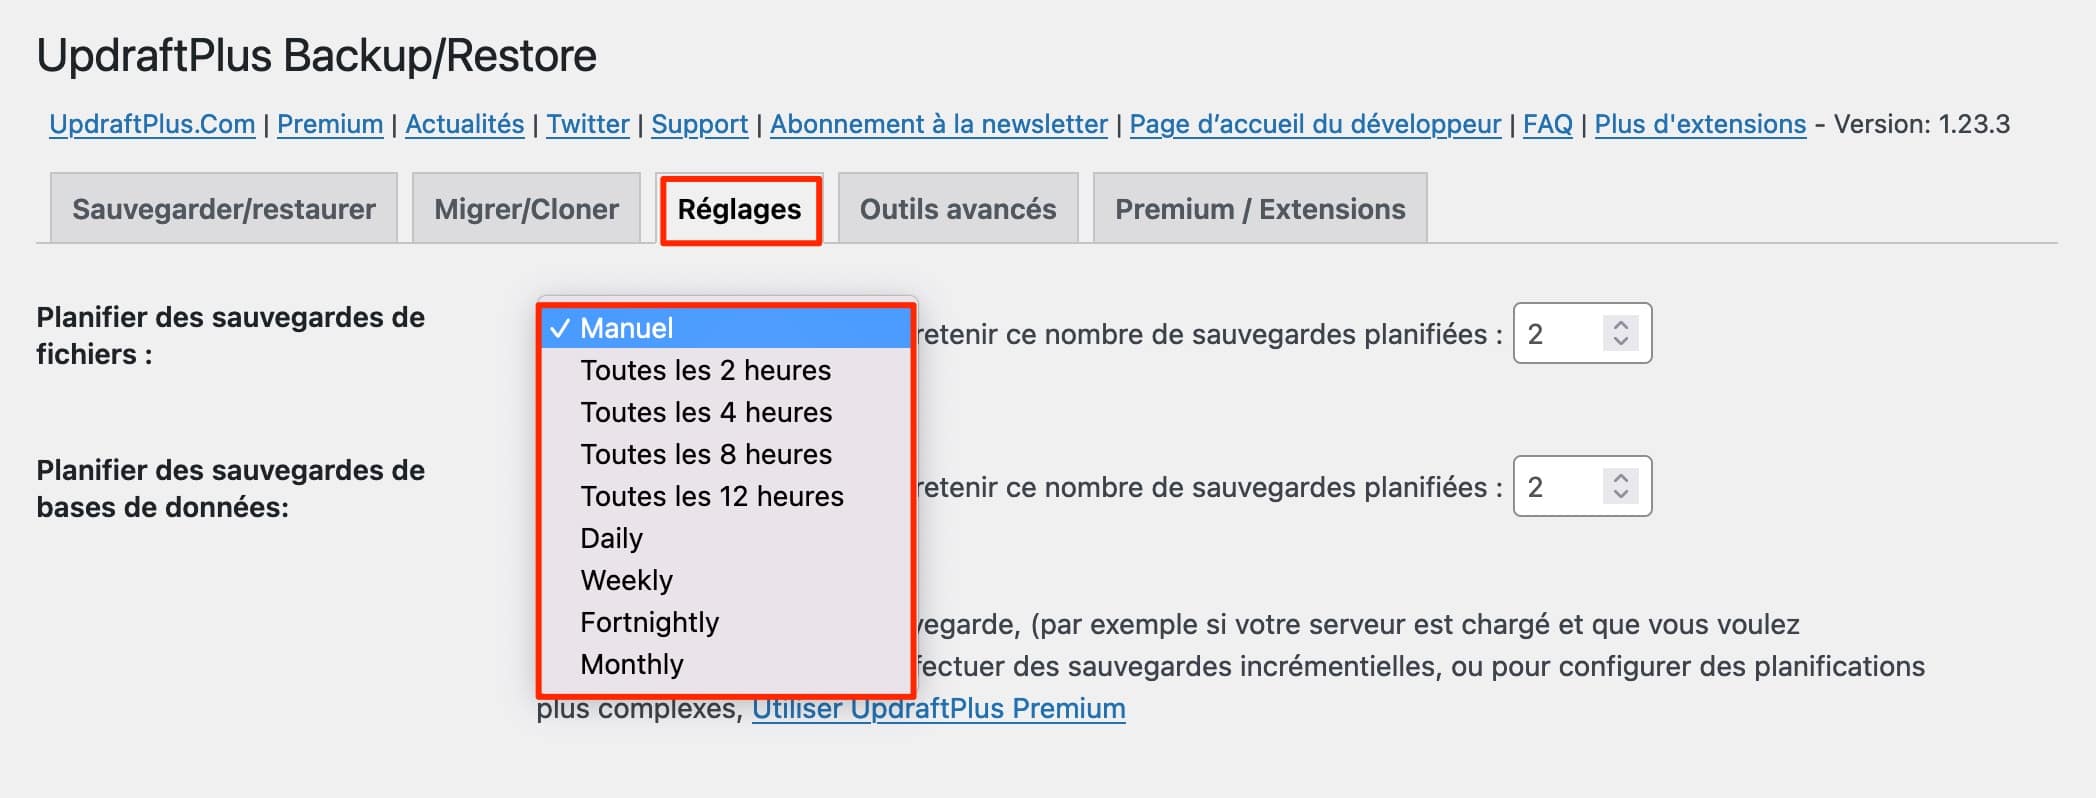
Finally, don’t forget to send it to the remote storage of your choice by clicking the icon of the service you’re interested in, just below. Finish by saving your changes at the bottom of the page.
How to restore a WordPress backup with UpdraftPlus?
Once your site has been backed up, this opens the door to a possible restoration.
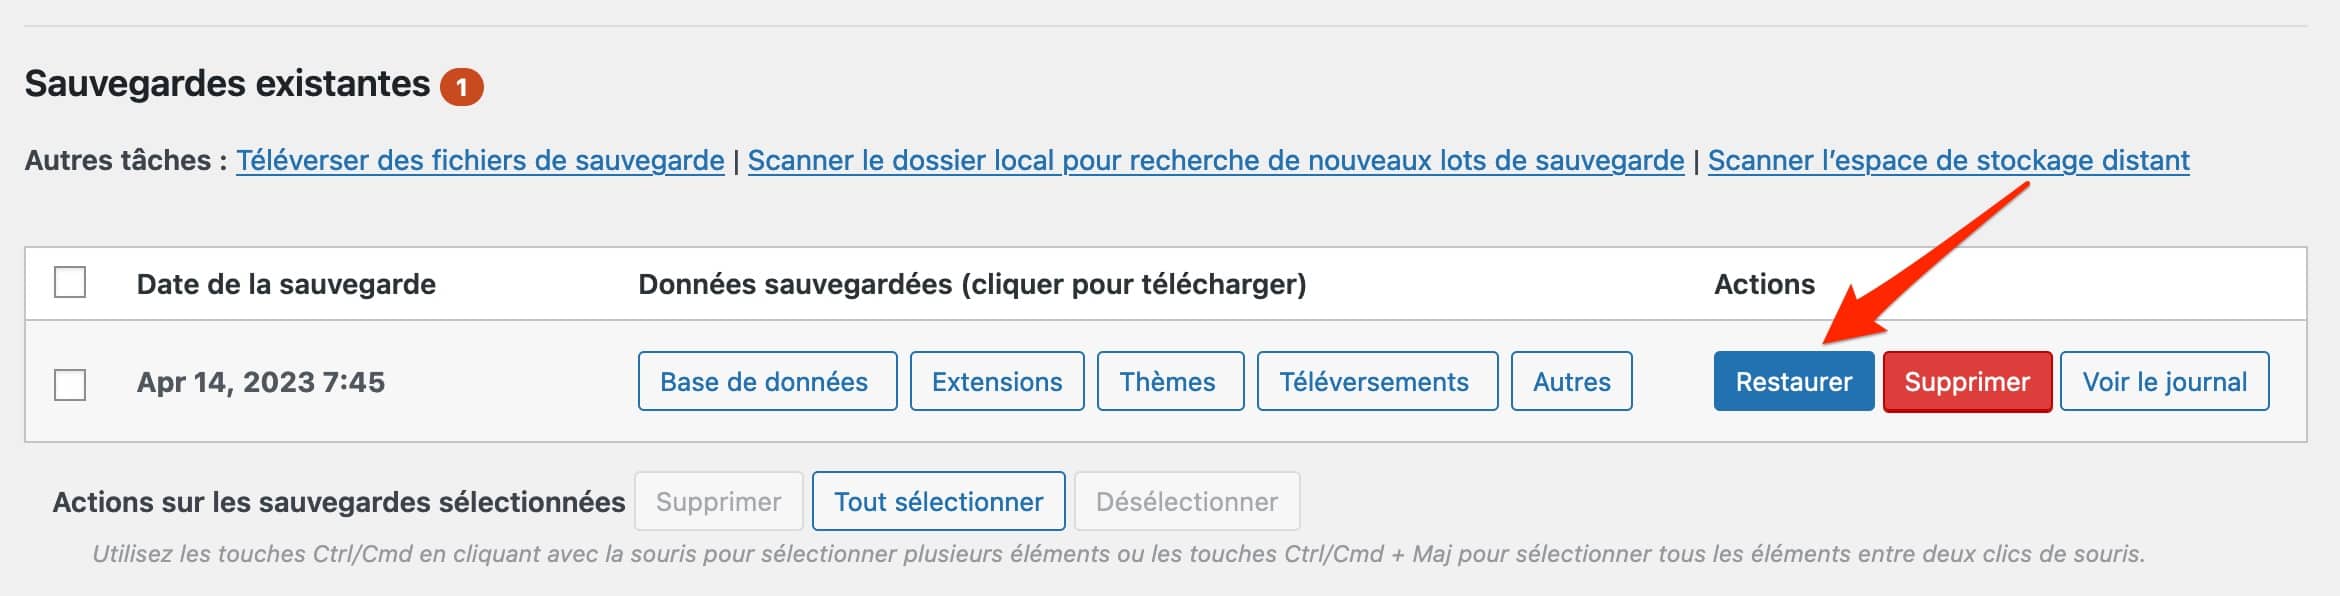
If you need to use this option, click the “Restore” button in the “Existing backups” section.
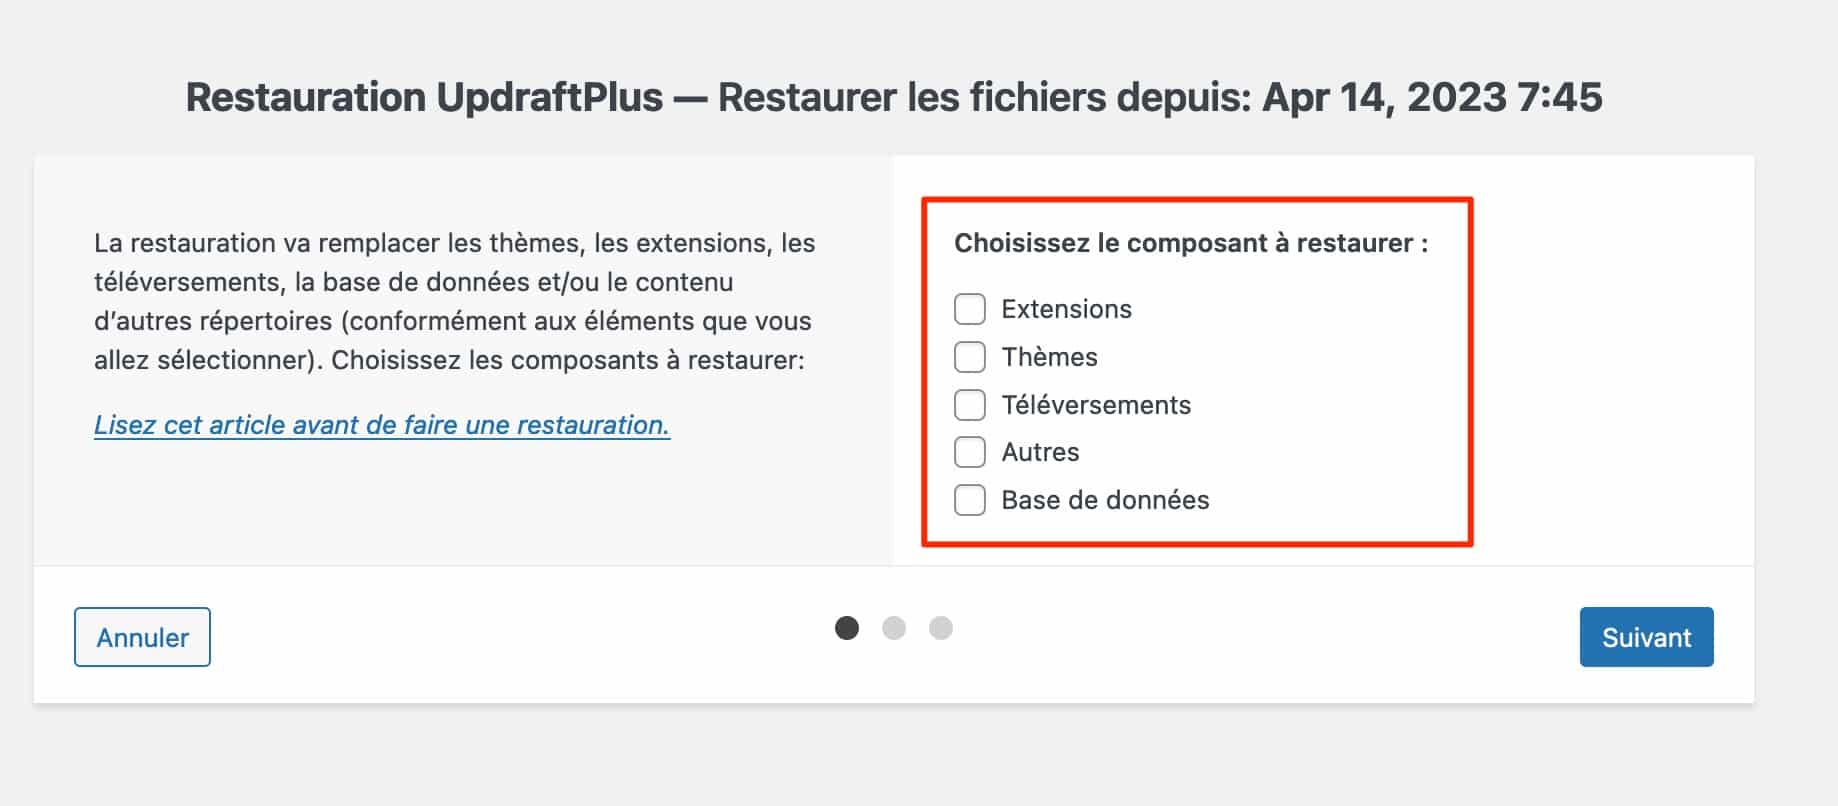
Next, choose the elements of your site that you want to restore by selecting the boxes of your choice:
How to back up your WordPress site manually?
After using a backup plugin, it’s time for method no. 2, which is a little more technical: manual backup.
The process will also take longer than with a plugin. However, you will stay in control of your actions and won’t have to install an additional plugin on your site.
Finally, sometimes, a manual backup will be necessary if you can no longer access your administration interface. In this case, using a plugin will be pointless.
Step 1: Back up the site files using an FTP client
To get started, you first need to make a copy of your site’s files. You can access WordPress files using two tools:
- Either an FTP client (File Transfer Protocol). This is software that allows you to send the files of your choice to your hosting server (online, therefore).
- Or the administration interface provided by your web host. One of the most common is cPanel, but your host may not offer it. So here we will focus on using an FTP client, which is more universal.
One of the most famous FTP clients is called Filezilla (free). This is the one we will introduce to you in the following lines.
Log in to Filezilla using the credentials provided by your web host. You need 4 pieces of information: the connection host, the port, a username, and a password.

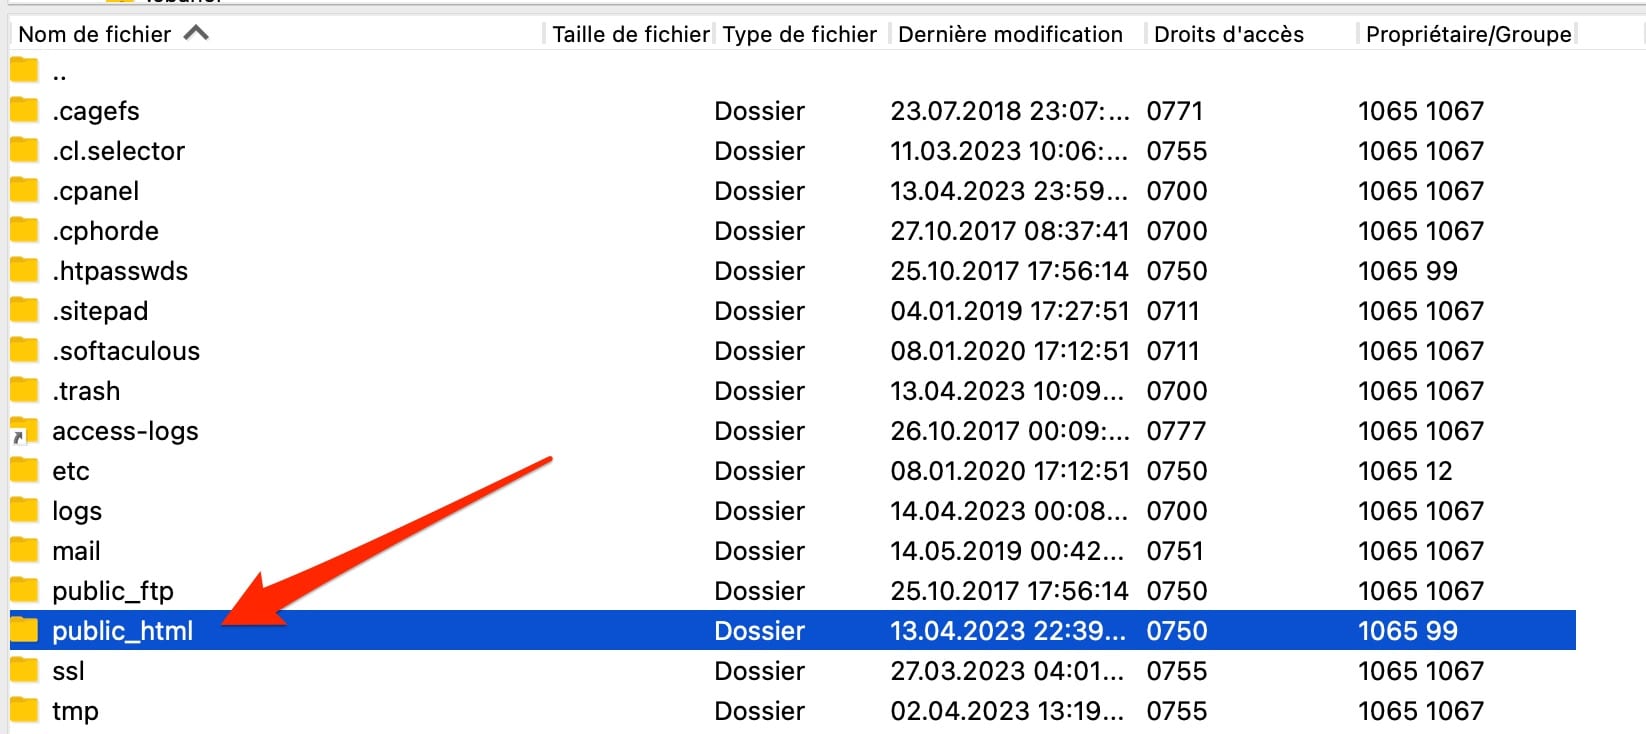
Then go to the root directory of your site. Depending on your web host, it will have a different name. For example, in the example below, the folder is called public_html (you may also have www, for example).
To copy your root folder, select it and right-click, then click “Download”:
Once your files have been downloaded—this can take up to several minutes depending on the size of your site—store them in a safe place. For example, copy them to a hard drive and/or to a cloud storage account.
Step 2: Back up the database in phpMyAdmin
Next, we’ll focus on the key element of your WordPress site: its database. For now, you only have the WordPress files in your possession.
That is not enough to have a complete backup and will make any restoration impossible.
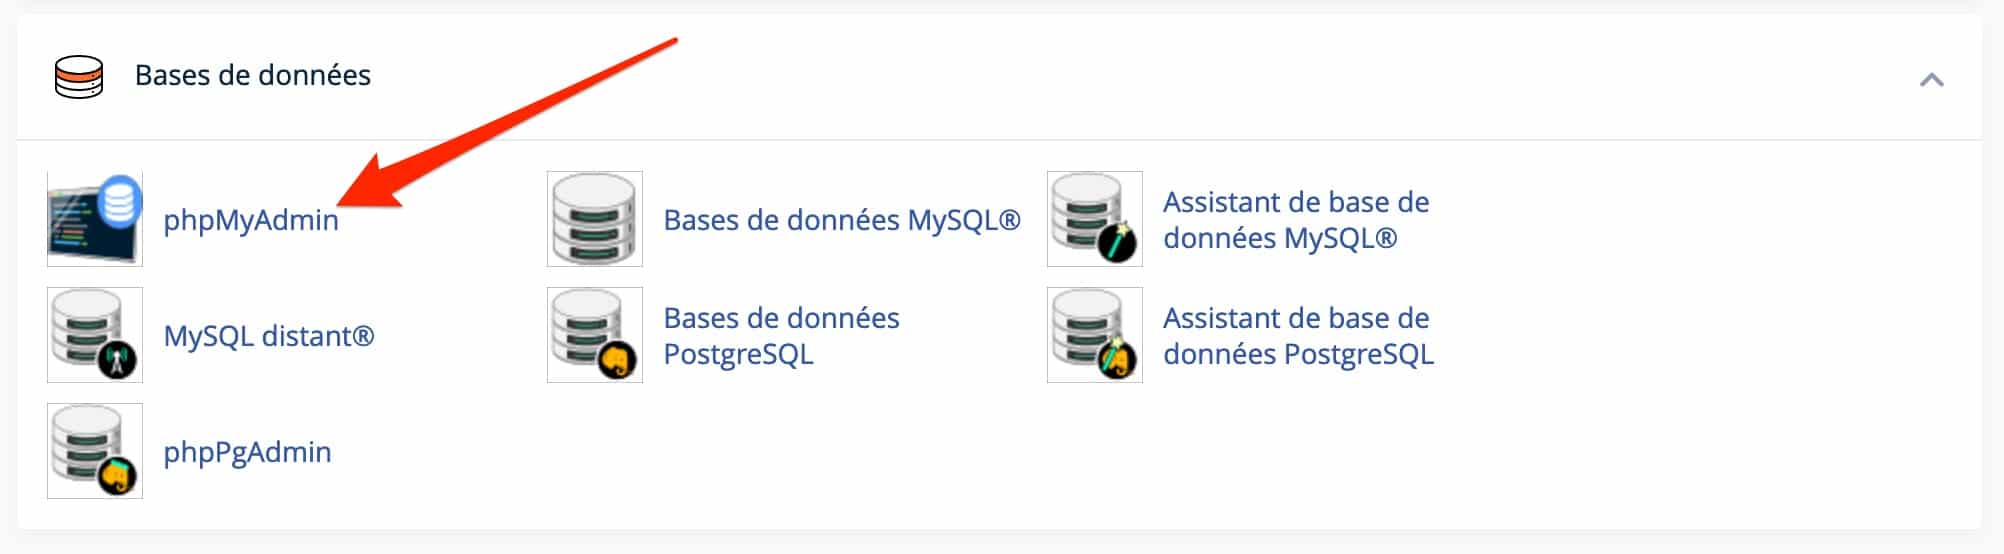
To back up your WordPress database, you need to export it. To do this, head to phpMyAdmin, a web application that allows you to manage your database.
You can easily access it from your hosting provider’s interface. In cPanel, simply click phpMyAdmin in the “Databases” section:
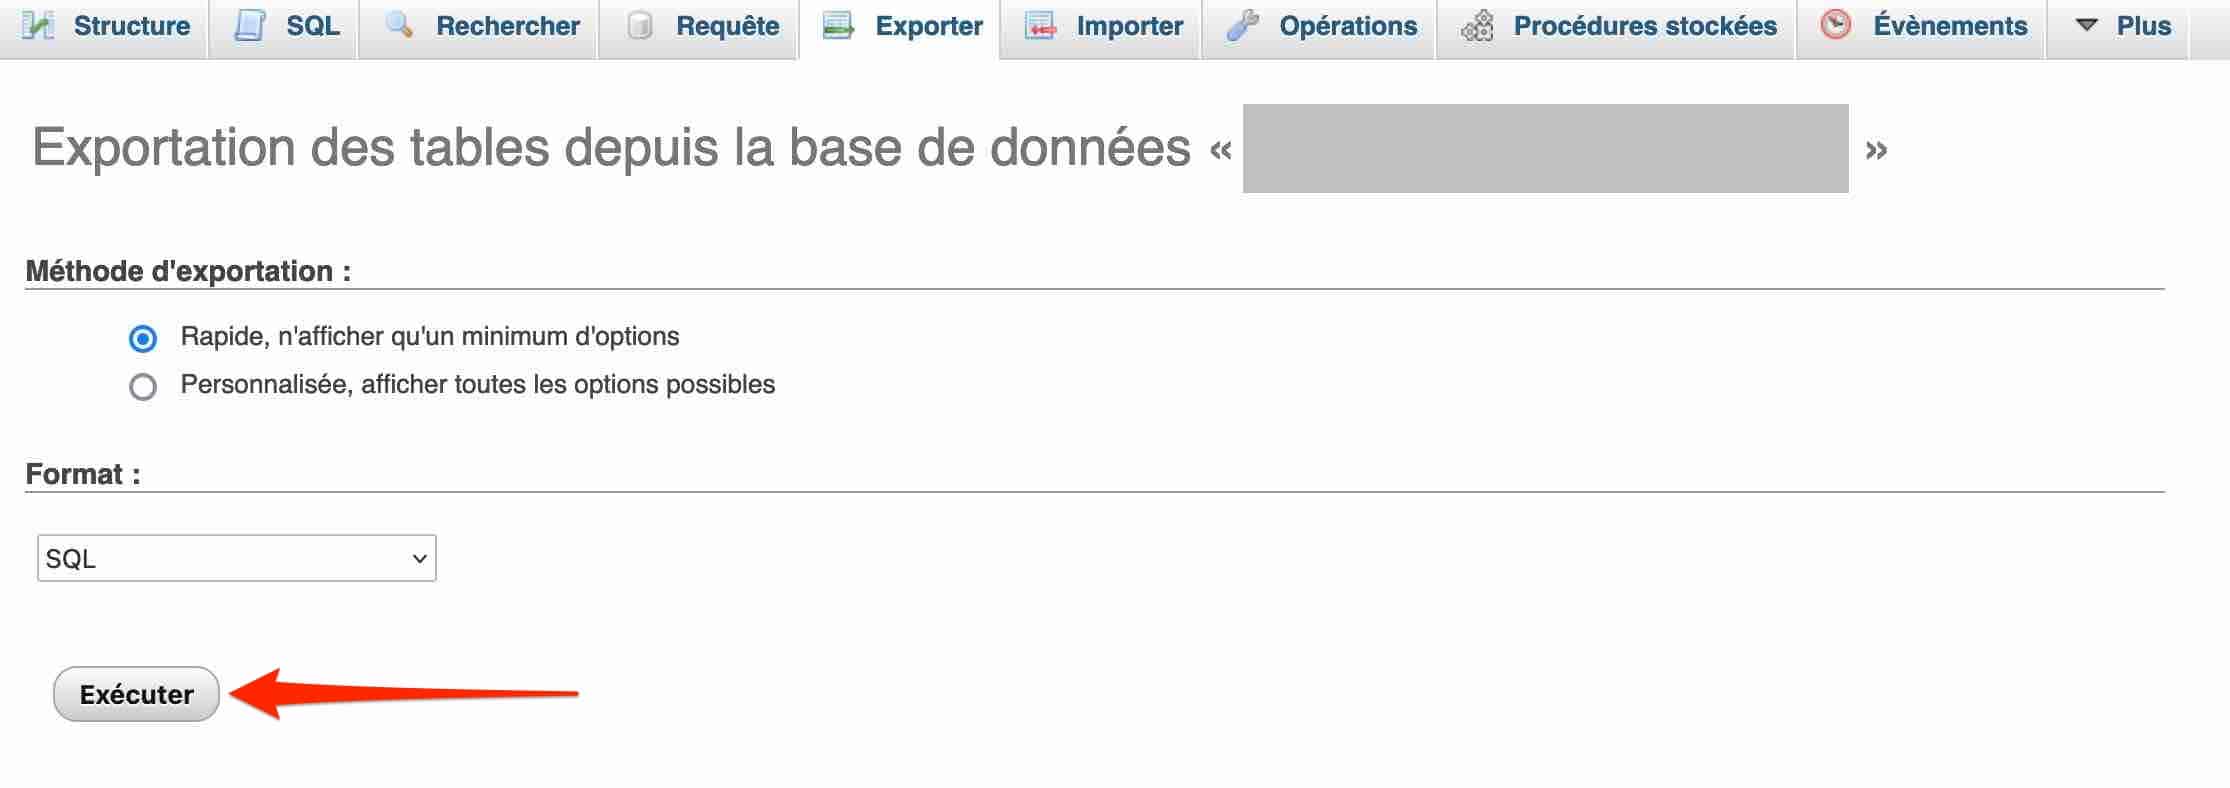
Choose the database you want from the left-hand section, then click the “Export” tab. Two export methods are available:
- Quick: all your tables will be automatically included in the backup.
- Custom: you can choose which tables you want to export.
Leave the format set to SQL, and click “Go”:
How do you restore a manual WordPress backup?
Need to restore a copy of your site that was backed up manually? Proceed in two steps:
- Upload the backed-up root directory using your FTP client… to the root of your site. First give it another name (e.g., public) so you don’t overwrite the current directory. When everything is ready, delete the original root directory (public_html) and rename the folder called public to public_html.
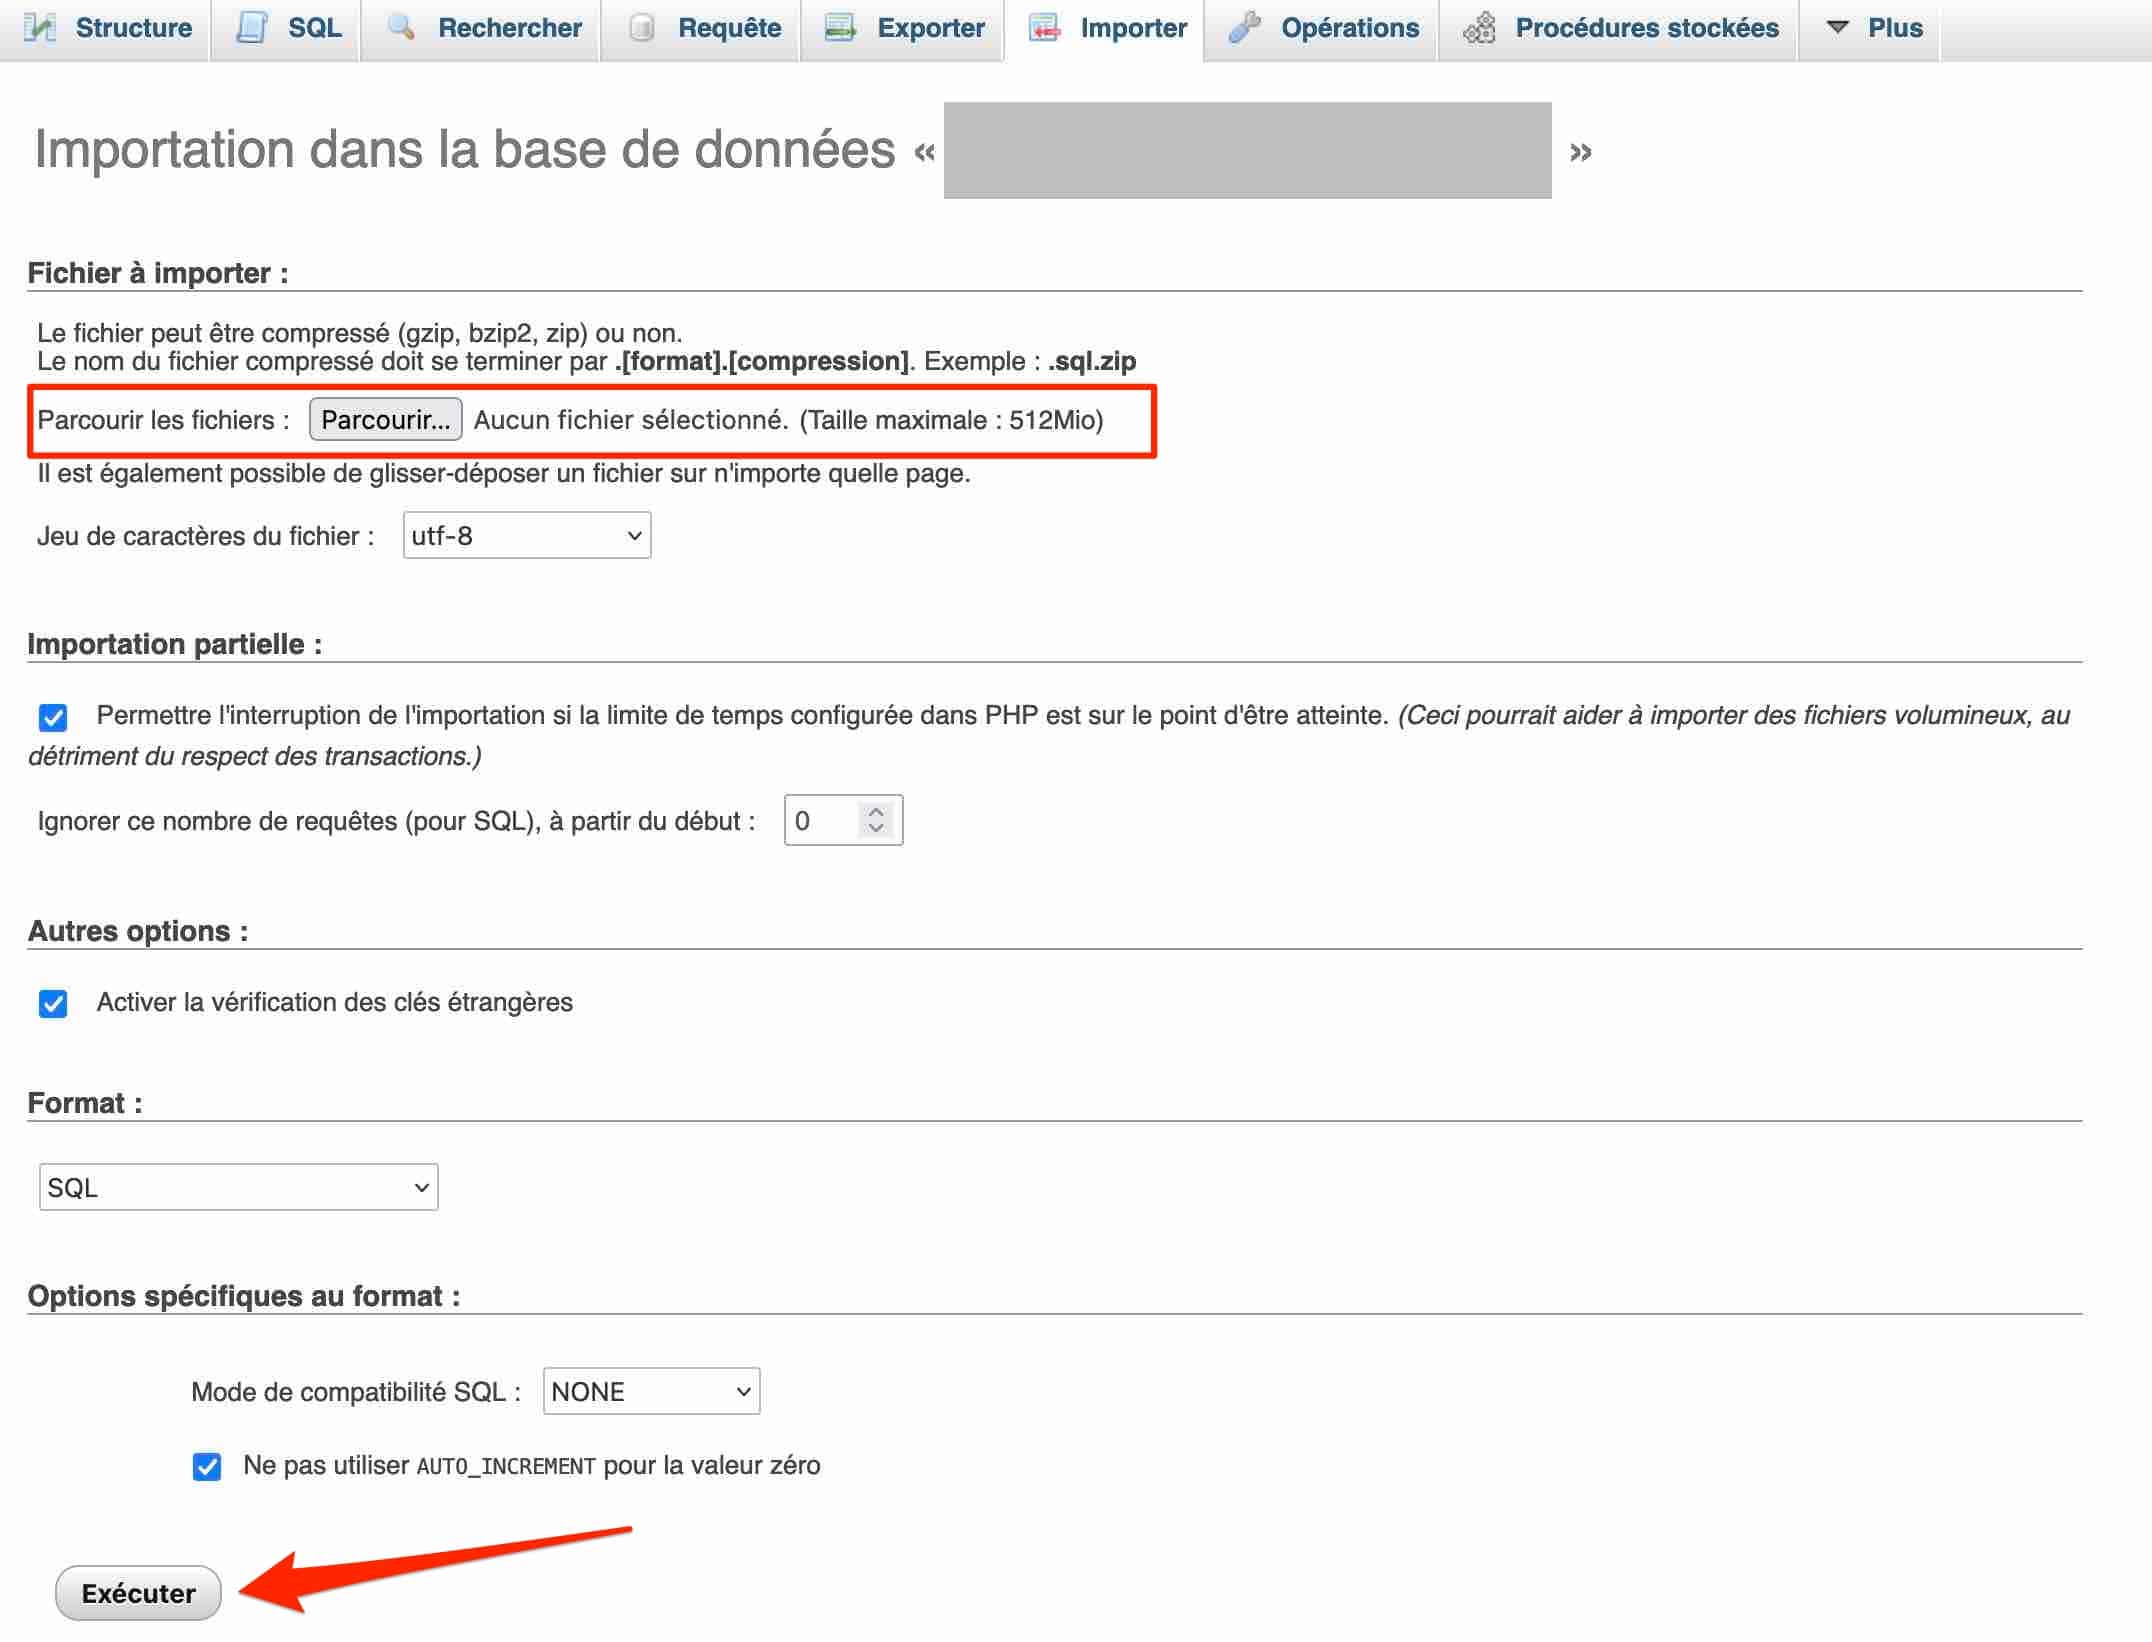
- Import your database into phpMyAdmin via the “Import” tab (importing a WordPress backup). To do this, simply upload the latest exported file of your database by clicking “Browse”. Do not change the other default settings and finish by clicking the “Execute” button:
How do you back up WordPress with your hosting provider?
After using a plugin and the manual method, there is a third method for backing up WordPress: going through your hosting provider.
However, be careful. First of all, not all hosting providers necessarily offer backup features.
Next, the backup options offered may vary from one hosting provider to another. For example, some do not allow you to perform manual backups or schedule them.
Others will offer you a limited number of automatic backups. To find out more, the simplest option is to contact your hosting provider’s customer support.
If you are looking for hosting providers that are high-performing, secure, and have impeccable customer support, we recommend the following providers:
How do you back up a WordPress site locally?
To conclude this overview of the methods for backing up your WordPress site, let’s take a look at local backups.
Locally, you work directly on your own computer (and not online). This is useful, for example, for carrying out risk-free tests (updates, adding new plugins, etc.), or simply for designing a site from scratch before migrating it to production.
One of the best-known tools for working locally is called Local (formerly Local by Flywheel).
Now here’s how to back up a WordPress site locally using the free Local tool:
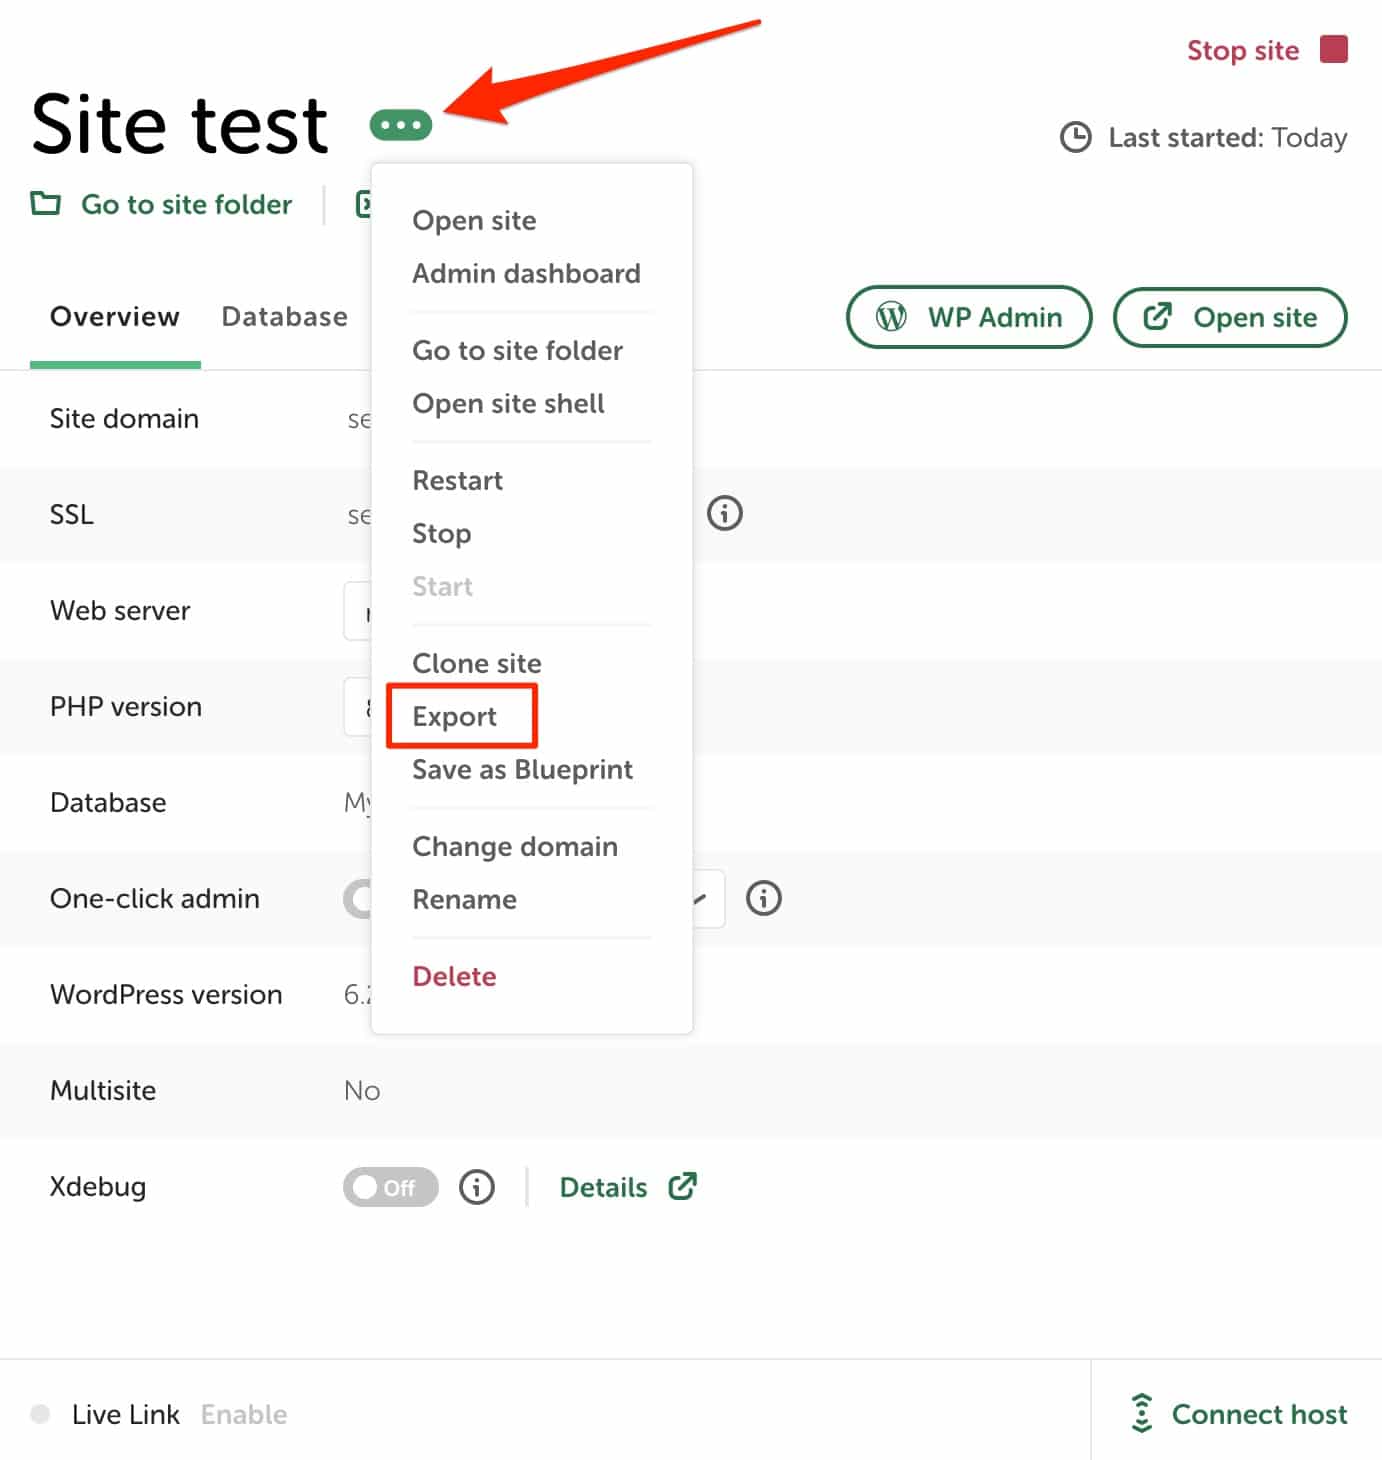
- Start your site by clicking “Start site” in the top right.
- Click the 3 small dots next to its name, then click “Export”.
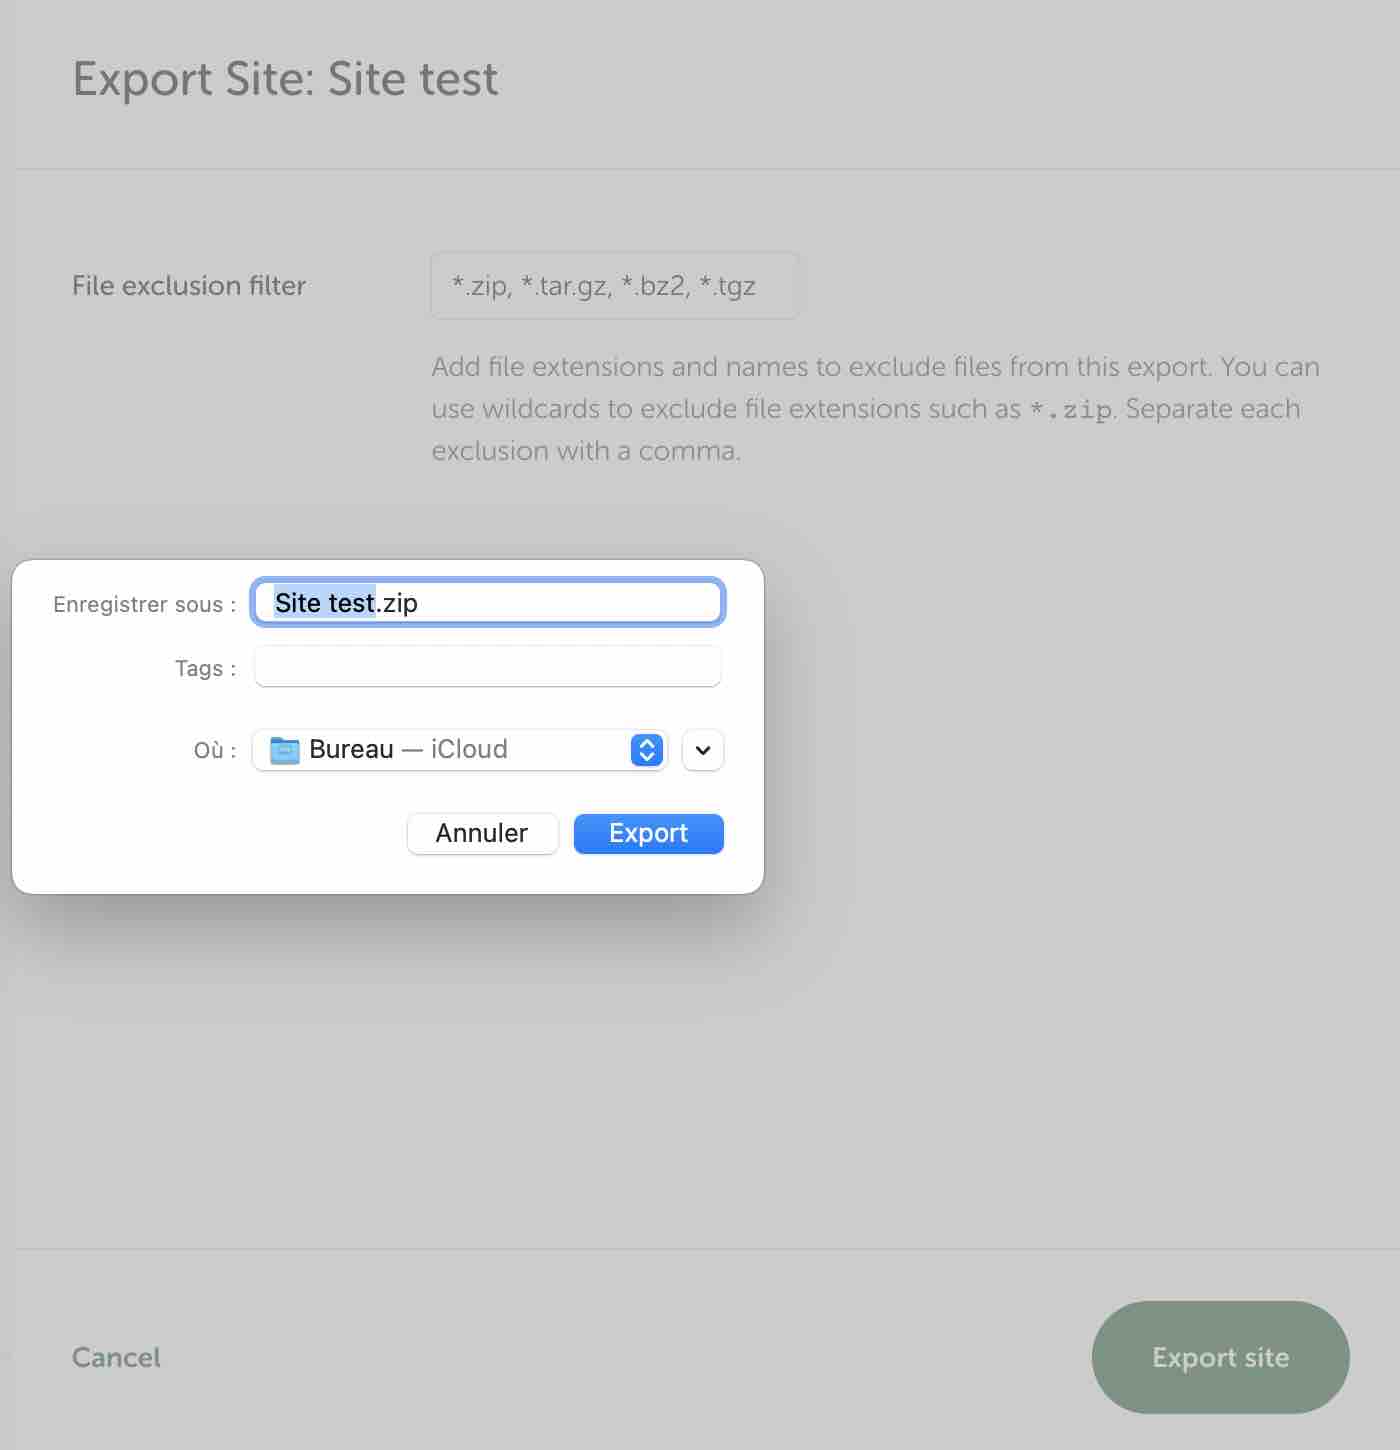
- In the next window, click “Export site” (you can exclude the file extensions of your choice, if needed).
- Give the generated zip file a name and select where to save it for your WordPress site.
- Once again, copy it to different locations (hard drive, cloud, etc.).
After that, if you need to import a copy of your local site, all you have to do is drag and drop your zip file onto the Local interface.
Summary
In this article, you learned how to back up WordPress using 4 methods:
- With a plugin.
- Manually.
- Via the backup system offered by your hosting provider.
- Locally.
Regularly backing up a live WordPress site is essential to protect your content and data. It is also a necessary prerequisite for being able to restore your site in the event of a problem.
WordPress backups should be part of your site’s regular maintenance operations, which are essential to ensure it runs optimally.
Would you like support in implementing our various tips for backing up WordPress? Entrust your WordPress maintenance to experts and focus fully on your business!