It is the source of a great evolution, even a revolution. It works with blocks. It can be used without coding. And you most likely use it to write your articles and pages.
Do you have it? It’s the Gutenberg editor of WordPress. With it, you can do almost anything. As long as you know how to use it. And that’s not so easy, because this editor has so many hidden features and new options all the time.
By the end of this practical guide, you will know everything about how Gutenberg works. And you’ll know how to use it right away, thanks to our detailed tutorials and practical tips.
What is Gutenberg WordPress?
Gutenberg is the text editor of WordPress. It is based on the principle of “blocks”, content elements that are used by the user to write, but also to customize the design of posts and pages of his WordPress site. It replaces the old classic WordPress text editor, called TinyMCE.
With Gutenberg, “the overall goal is to simplify the first-time WordPress experience – for those who write, edit, publish and design web pages,” says the text editor FAQ. The editing experience is intended to give users a better visual representation of what their post or page will look like when they hit the Publish button.”
Because of this, as you’ll see in detail in this article, all your changes to the appearance and text of your content types are visible in real time, as soon as a change is made.
In this way, Gutenberg on WordPress can be compared to what is called a WYSIWYG editor(What You See Is What You Get).
Did you know that? The name of the WordPress Gutenberg editor is a reference to Johannes Gutenberg, the 15th century inventor of the printing press. This invention, which was revolutionary at the time, also finds an echo and a parallel in WordPress. Indeed, the appearance of Gutenberg is considered as “one of the most important changes made to WordPress in many years”.
What is the Gutenberg plugin?
This major change, precisely, took shape from 2017, before an official launch in December 2018, with the release of version 5.0 of WordPress.
Since that date, the Gutenberg editor is present by default on versions 5.0 and later of the CMS (Content Management System), the most widely used web application in the world.
So, in principle, you should use – even without knowing it – Gutenberg on your website. Indeed, at the time of writing, the last major updated version of WordPress was 6.1.
However, there is also a Gutenberg plugin is available on the official WordPress extension repository.
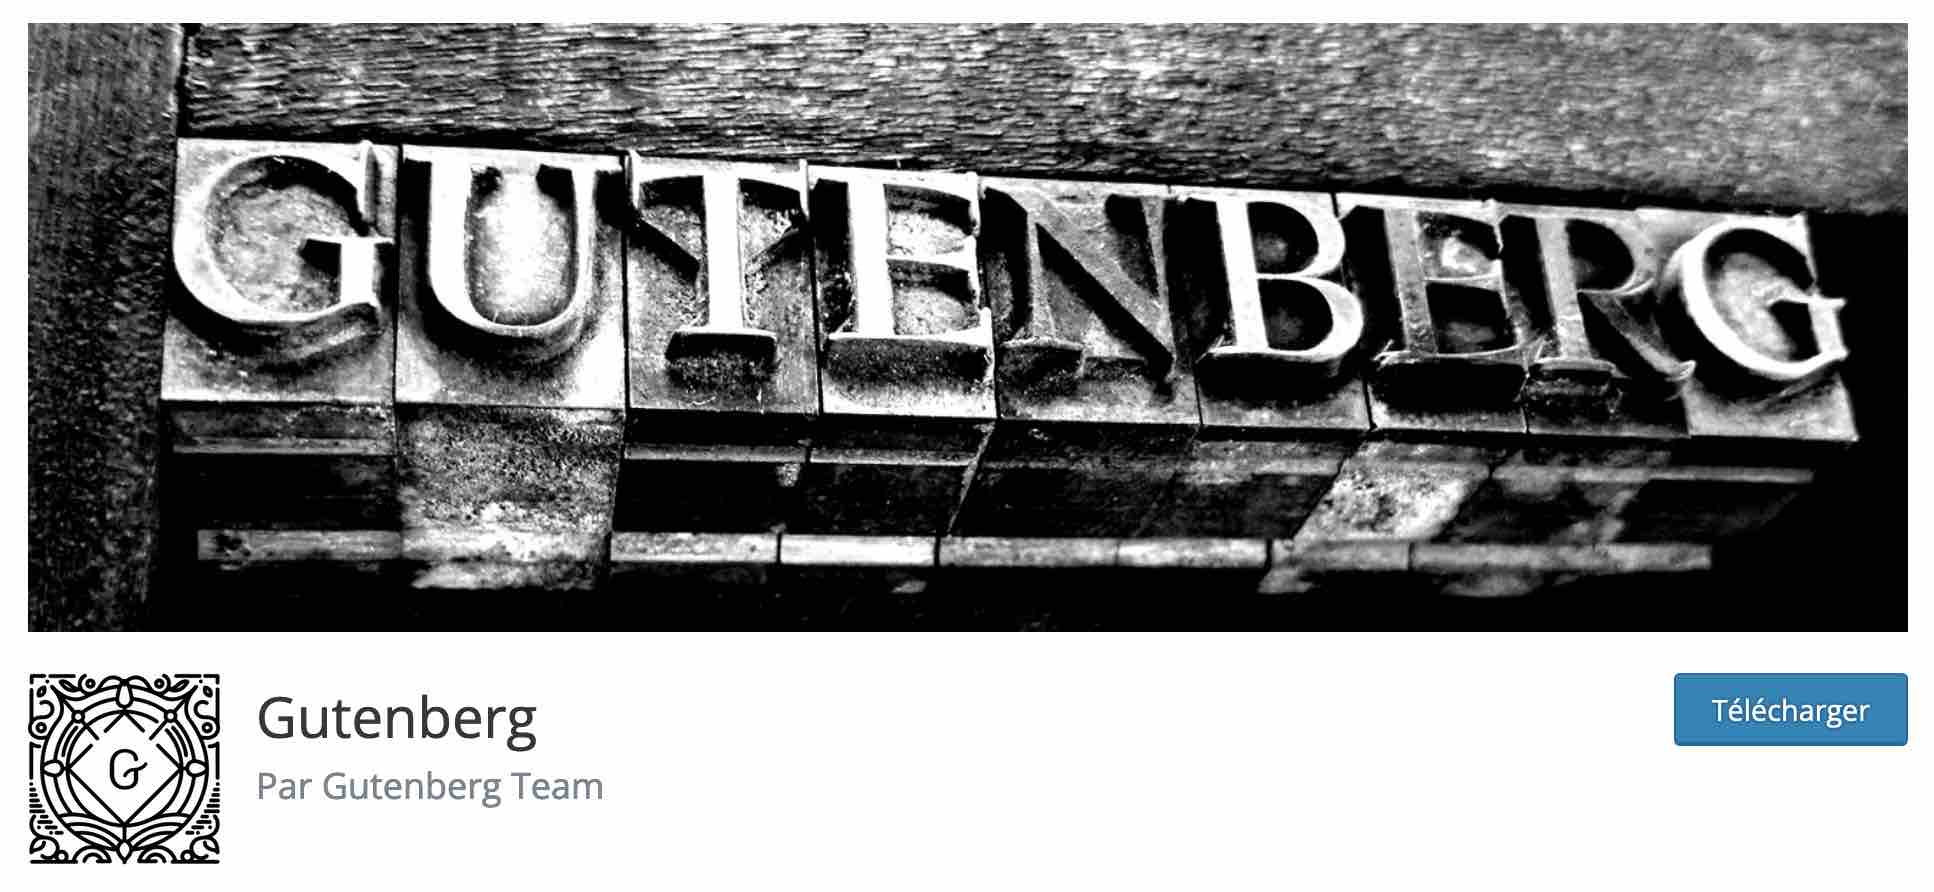
This plugin contains the new developments, options and experiments of Gutenberg. When they are approved, they appear in each new major version of WordPress.
You can find a list of all the Gutenberg versions included in each new major WordPress release on this page.
You are asking yourself the following question: Should I install the Gutenberg editor on WordPress? Just to be clear: if your website is running on a version higher than WordPress 5.0, you do NOT need to activate the Gutenberg extension on your back office.
Gutenberg is already present on your site by default. If you still want to discover the latest Gutenberg experiments and new features before they are available, you can install and activate the extension, but not on your production site. Prefer a staging site or a local site to test this plugin.
What are the different phases of Gutenberg’s evolution on WordPress?
Although it has been running on WordPress since the end of 2018, the Gutenberg “project” on WordPress is in constant development and evolution, as indicated on its roadmap(Gutenberg roadmap).
Four phases mark its existence:
- Phase 1: Making it easier for users toedit
- Phase 2 : Customization. Gutenberg allows you to completely modify all parts of your site, from the header to the footer (and not only the articles and pages). This is the phase we are in at the time of publishing these lines (November 2022).
- Phase 3: Collaboration. Gutenberg will allow co-authoring content “in a more intuitive way”.
- Phase 4: Multilingualism. The text editor will be implemented as a standard feature for multilingual sites.
How does Gutenberg work on WordPress?
Blocks, the fundamental base
As you have seen above, Gutenberg goes hand in hand with a central concept: the famous “blocks”.
The Gutenberg presentation page explains that “blocks are content elements that you can move around”. They “allow you to build your own publications and personalized pages without any coding knowledge”.
Each content item in the editor is a block (a kind of container section). This can be, for example:
- a paragraph
- a title ;
- an image ;
- a video ;
- a button etc.
Each block can be edited and customized by users without touching a single line of code (HTML, PHP etc.). All this, in a visual way, with an immediate rendering of your changes:
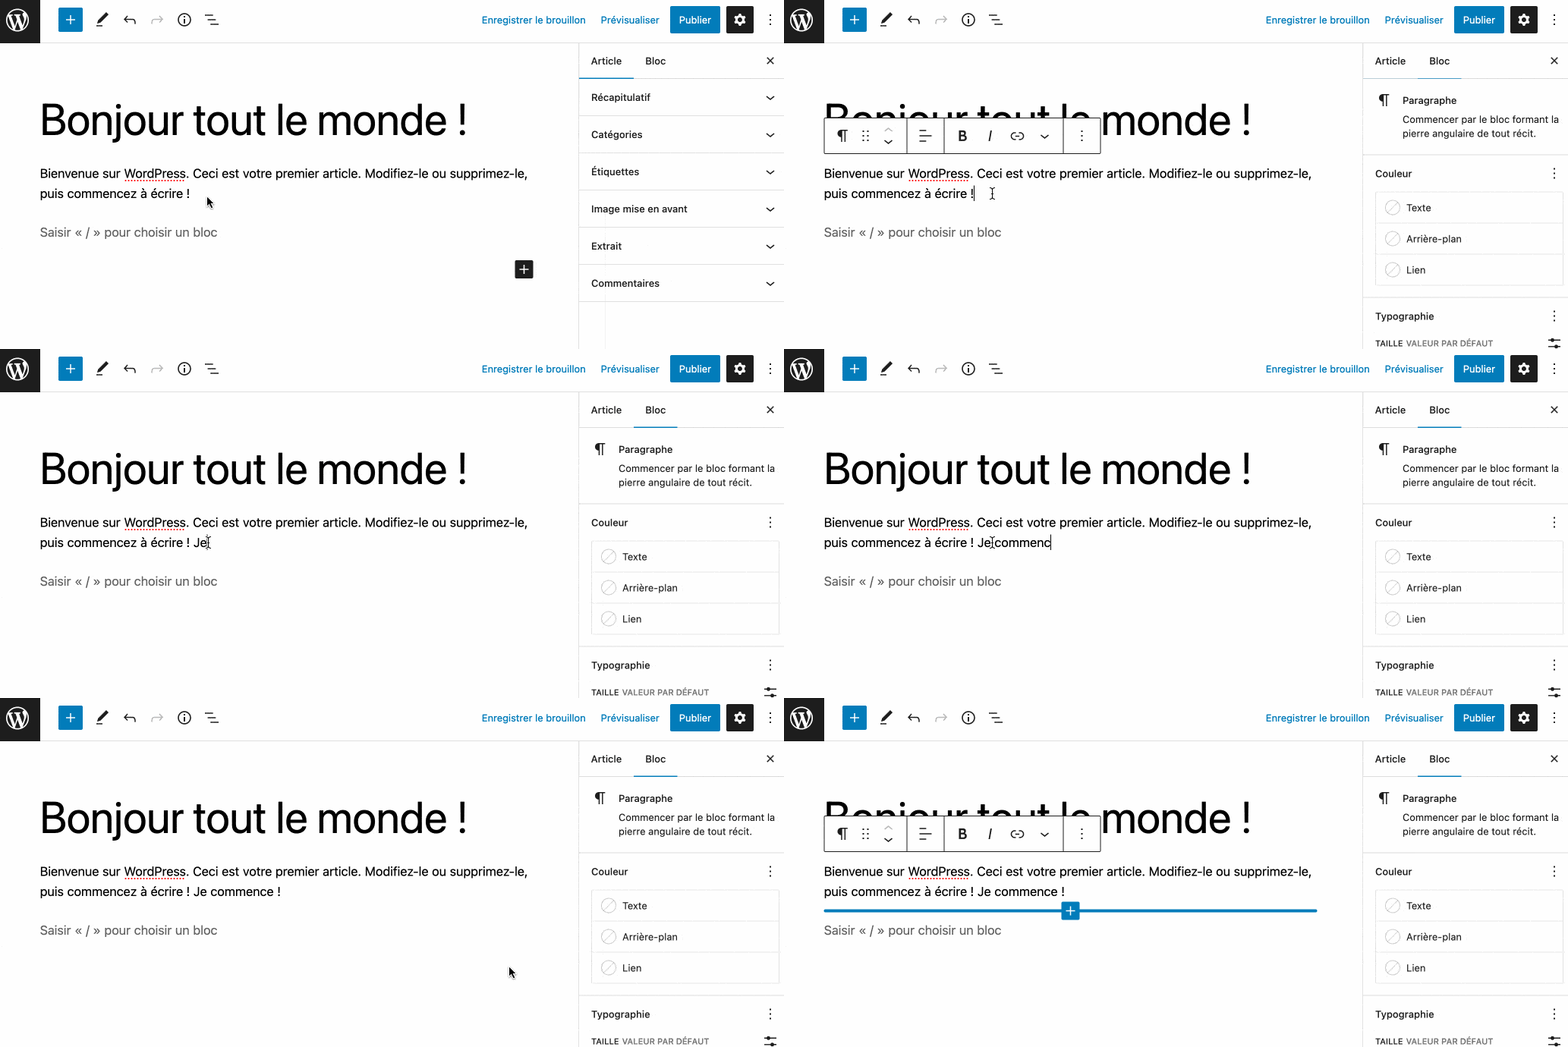
Posts, pages and even an entire site!
When it was launched in 2018, Gutenberg only worked on articles and pages
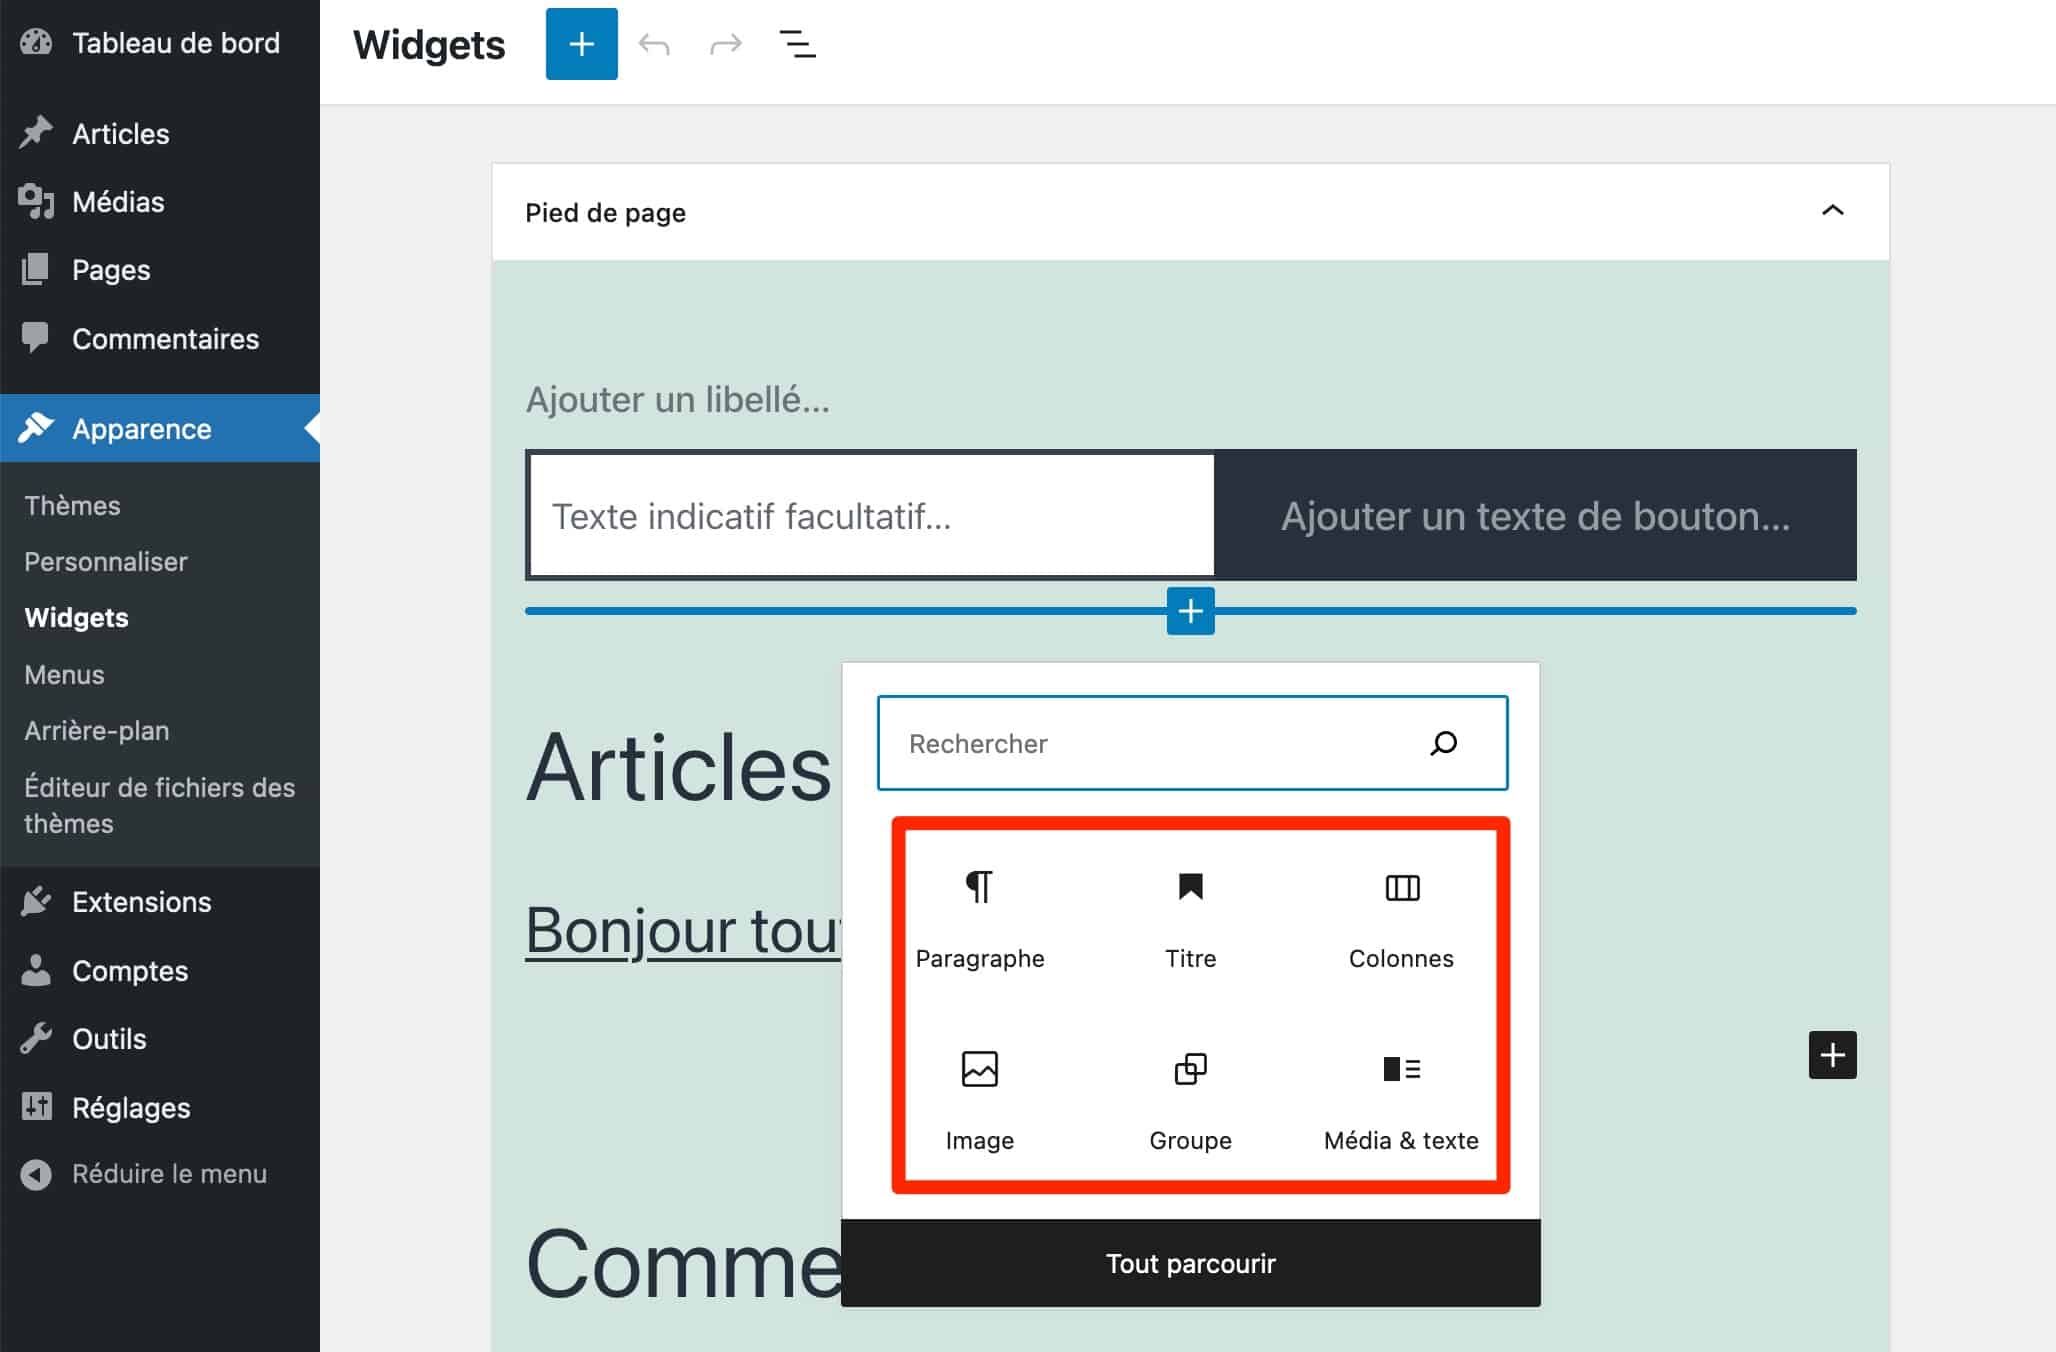
In the meantime, the editor has come a long way. Since the release of WordPress 5.8 in July 2021, the WordPress widget editor works with content items (blocks), for example
If you go to Appearance > Widgets, on the menu of your admin interface, you will see that it is possible to insert blocks (sections) in the widget areas offered by your theme (e.g. sidebar, footer etc.) :
But wait, you haven’t seen everything yet. Since the release of WordPress 5.9 in early 2022, the Gutenberg editor on WordPress now allows you to create and customize entire sites with blocks!
This is called Site Editor (previously called Full Site Editing, FSE). With this project, blocks are now used to edit all parts of your site, not just your posts and pages.
With the site editor, users can now manage elements normally controlled by their WordPress theme (header, footer, 404 page, post archives etc.) using a unique concept: the Gutenberg block.
To take advantage of it, there are at least two prerequisites
- Your site must be running at least version 5.9 of WordPress. If so, you will be able to access the full site edition by going to Appearance > Editor ;
- You must be using a blockbasedtheme. This is the case, for example, with Twenty Twenty Three, the default theme delivered with WordPress 6.1. For your information, you can find a list of block based themes on the official WordPress directory.
If you are new to WordPress and/or have limited technical knowledge of web development and web design, we do not recommend using Full Site Editing at this time. There are still few compatible themes, and it takes a solid overall knowledge to be able to create a professional site that stands up to the test with only Gutenberg blocks on WordPress.
What is the difference between Gutenberg and a page builder like Divi or Elementor?
Gutenberg allows you to edit an entire site? This might remind you of something. Understand: pagebuilders.
Like the WordPress text editor, page builders like Elementor or Divi Builder, two of the most famous ones, allow you to design a site from scratch. And they let you control all the parts and options of your site
However, the Gutenberg editor still doesn’t reach their level of options and creative possibilities. For example, the Divi Builder or Elementor offer ready-madetemplates that you just have to activate with a click.
Gutenberg is slowly approaching this with itsblock patterns, but it is far from being a match.
On the other hand, at the moment, we think it is easier to edit a whole site with a page builder, especially if you are a beginner.
We still need to give time to the Site Editor so that Gutenberg can compete with page builders (even if the creation experience is totally different).
In summary, if you have to choose between Gutenberg or the Elementor extension – yes, it’s technically an extension – to create a WordPress site, first ask yourself about your technical level
If you have a good basic knowledge of WordPress, but also of web design, you can start with a Full Site Editing compatible theme.
If you don’t, you can use Gutenberg to write and edit your posts, or even some pages that don’t require much graphic creation (e.g. the Contact page). And use a page builder for more advanced layouts.
After this detailed general presentation, which has enabled us to lay the foundations, let’s move on to practice.
You will now learn how to use Gutenberg on WordPress, and will become totally autonomous very quickly.
How to use Gutenberg: a step-by-step guide
How is the Gutenberg interface organized on WordPress?
To start using Gutenberg, go to either Posts > Add or Pages > Add
Slice and dice depending on the type of content you want to create. For the purposes of this test, I’ll choose an article.
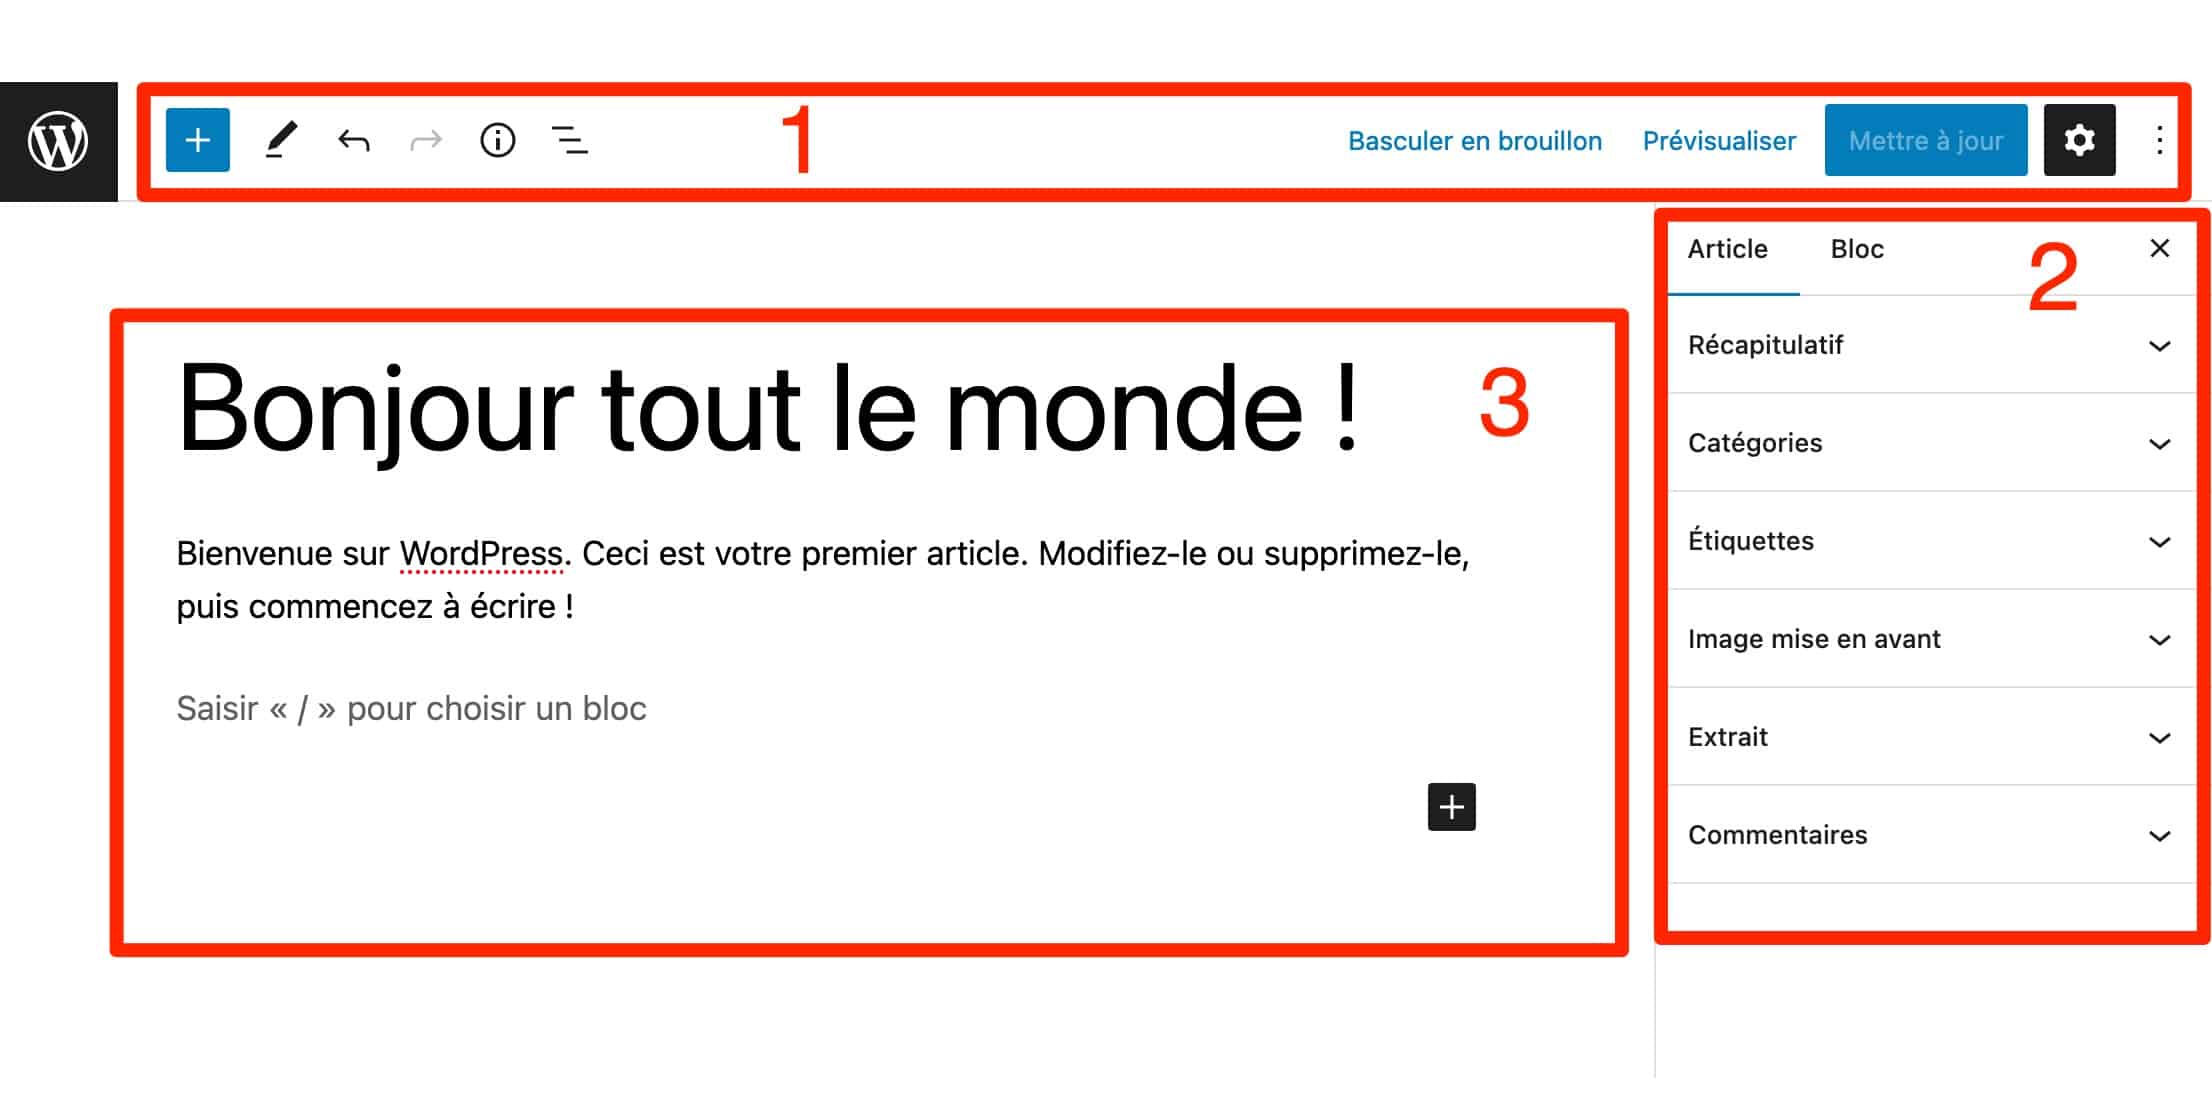
By default, the editing interface splits into 3 for users:
- A top bar (figure 1 on the capture), with quick access buttons, like the one to insert a block (section), for example.
- A sidebar(number 2), which contains settings on the article and the blocks you are going to add.
- A content area (number 3), in the center of the page. It contains all the blocks you are going to add, as you go along.
How to add Gutenberg blocks?
To add a block to your article, click on the blue “+” icon at the top of the page. This action opens a menu in the form of a sidebar with 6 families of content elements (blocks)
- Text, with (among others) the blocks Paragraph, Title, Quote, List etc.
- Media offers the blocks Image, Gallery, Audio, Video etc.
- Design lists blocks for inserting buttons, columns, separator etc.
- Widgets displays the old default WordPress widgets, which are now blocks (remember).
- Theme lists blocks for adding a logo, a navigation menu, a list of your posts, a login form for your website etc. Here, the choice of blocks will be more or less important depending on the theme you use.
- Embedded content. Here you will find blocks to add content (via a simple embed link, embedded) from platforms like YouTube, Twitter or Spotify.
In total, there are nearly a hundred blocks that are offered natively by WordPress. To integrate one into the body of your page, you can either
- drag and dropit to the location of your choice;
- click on it. In this case, it will automatically be added below the last block (section) you just included.
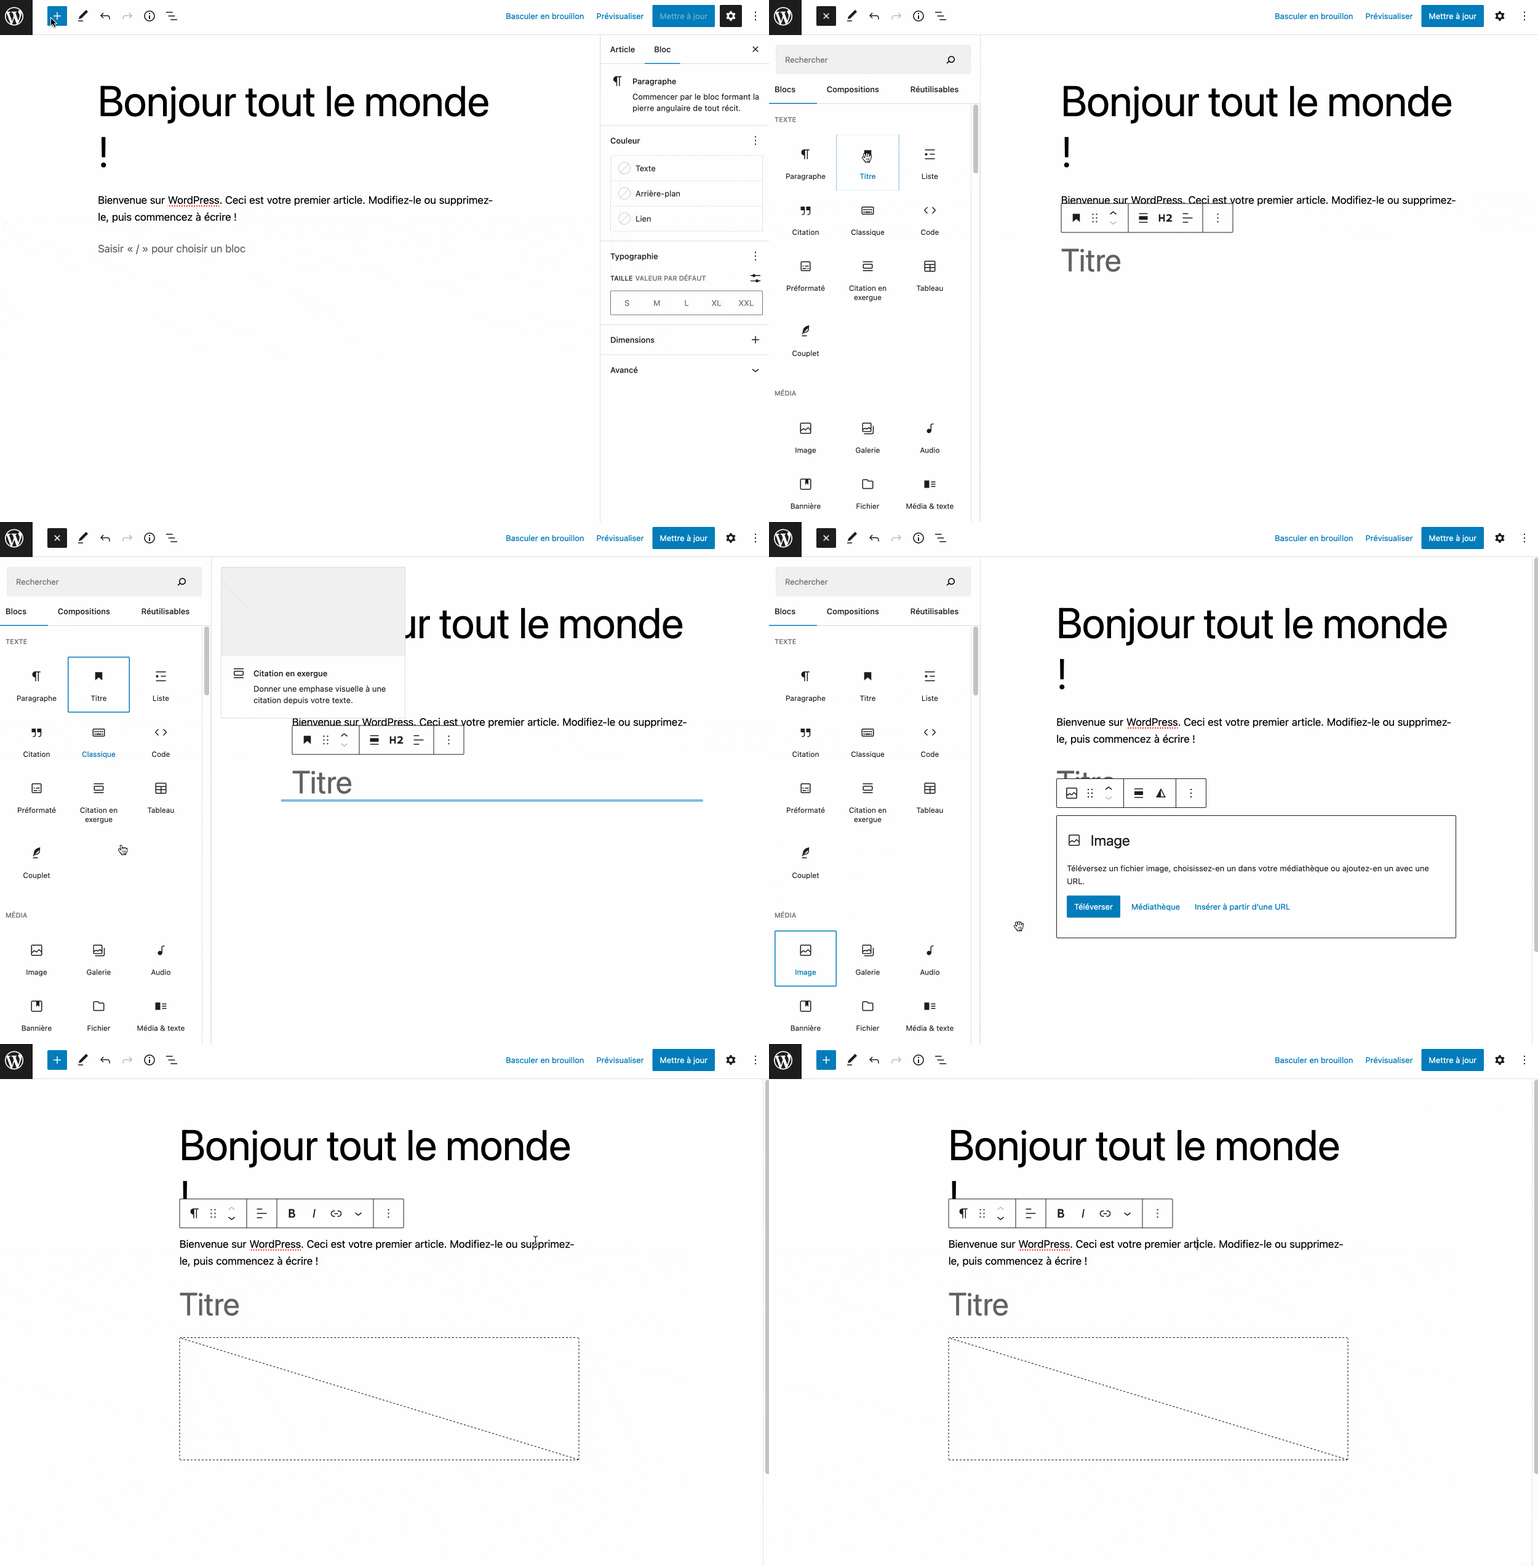
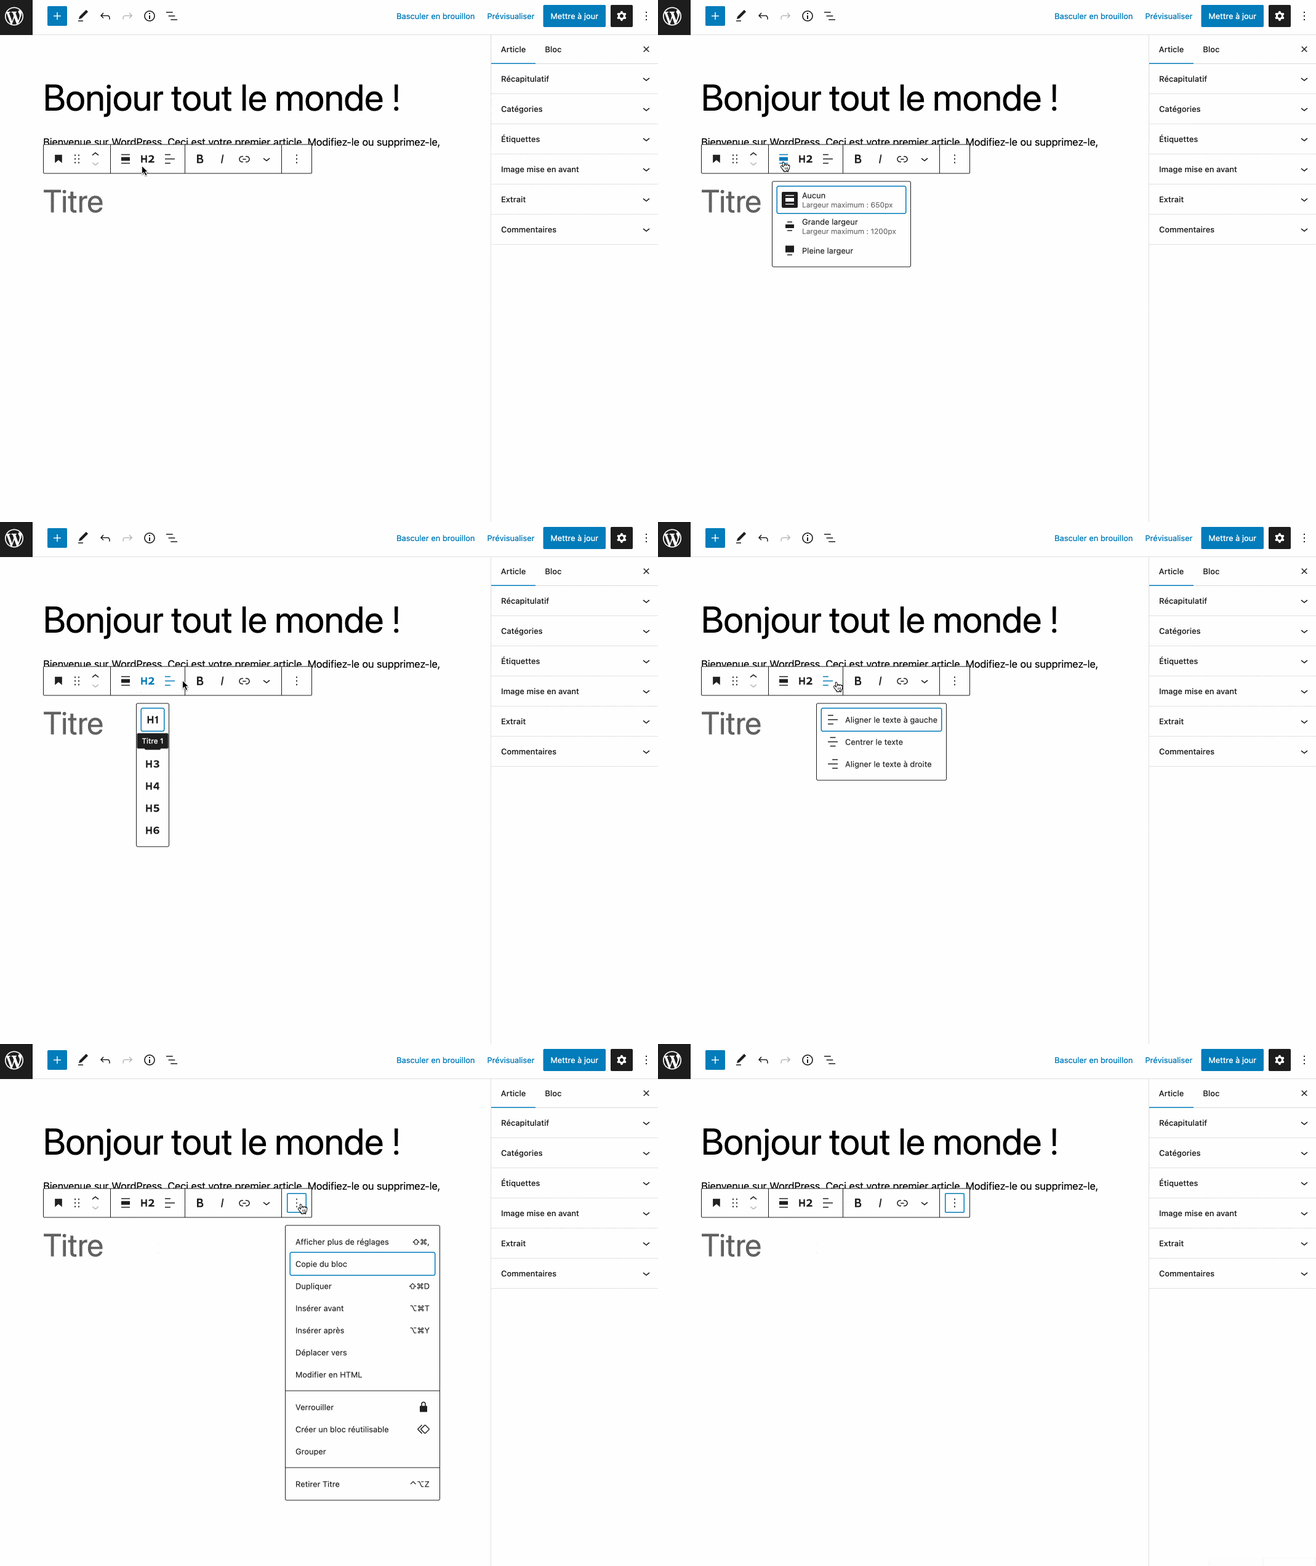
Once you have added content to your block, a toolbar allows you to make initial modifications, if necessary.
For example, in this Title block, you can
- change its alignment and width ;
- change its title level (hn h2, h3, h4 tags etc.) ;
- add bold or italics to it;
- insert a hyperlink;
- access more detailed settings to copy, duplicate, group and even lock the block in question.
This is an interesting introduction, but it is possible to go much further in customizing the visual appearance of a block, we assure you.
How to customize the style of a block?
As soon as you add a block, specific settings for that block become available in the right sidebar of the Gutenberg WordPress editor.
The number and type of settings vary depending on the block you add.
For example, the Title block essentially offers settings for typography (size, fat) and text color.
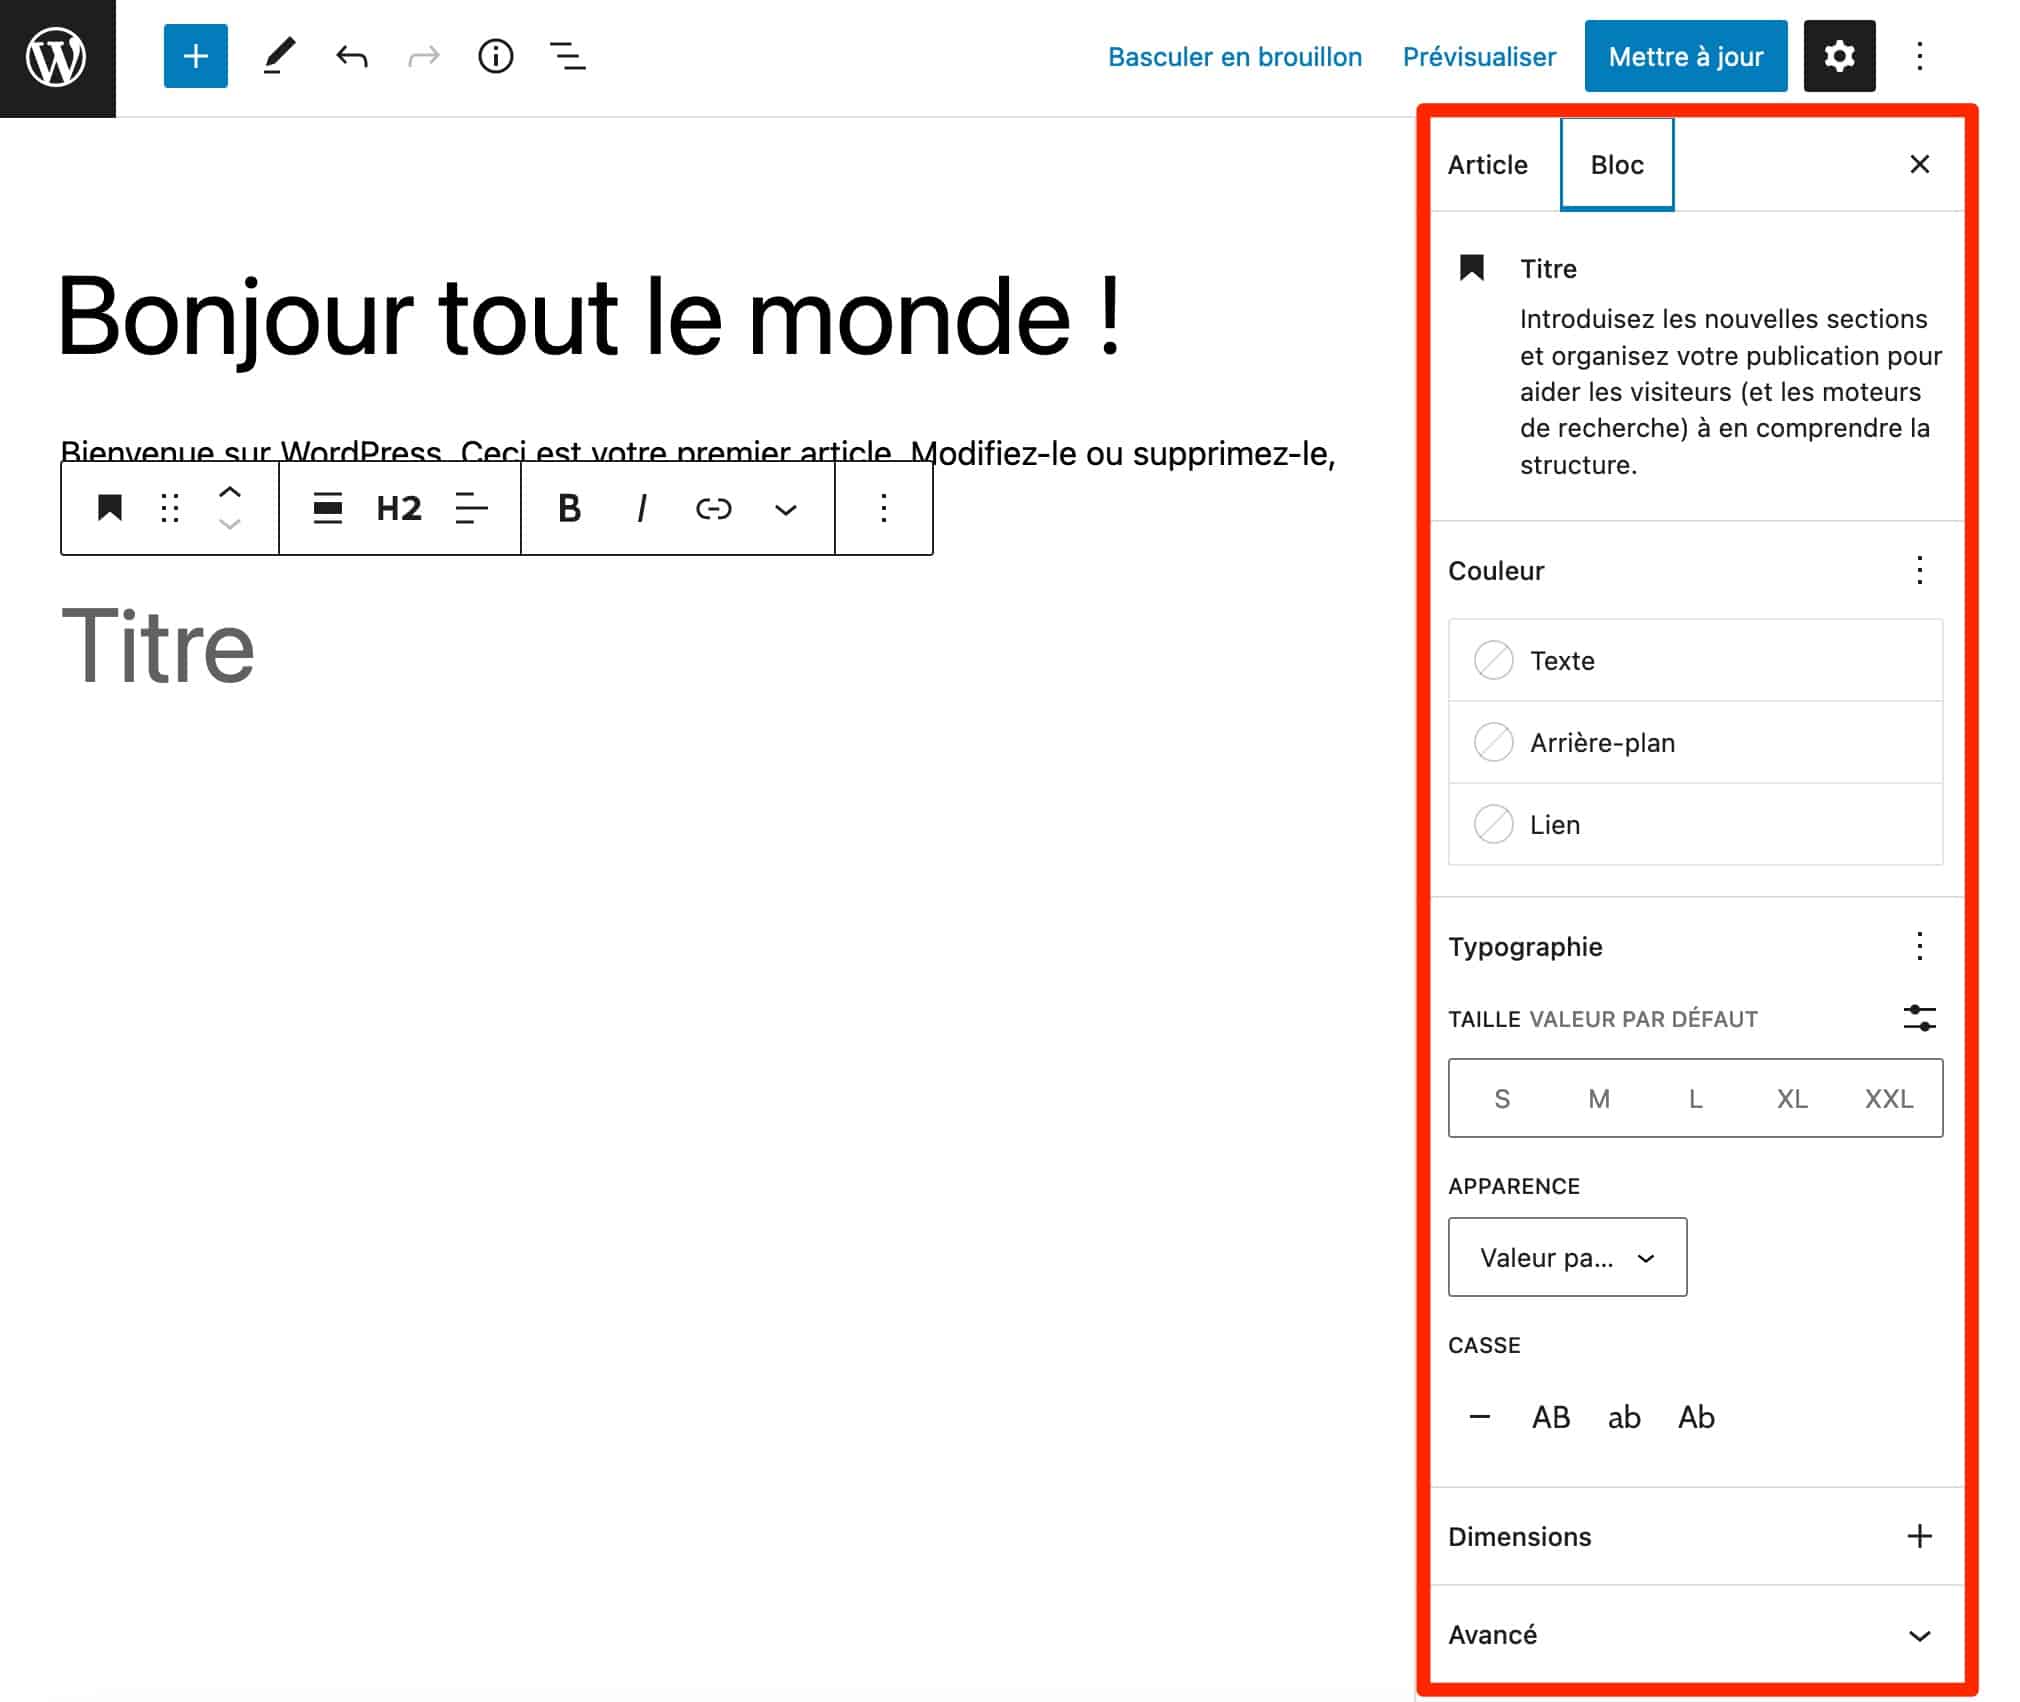
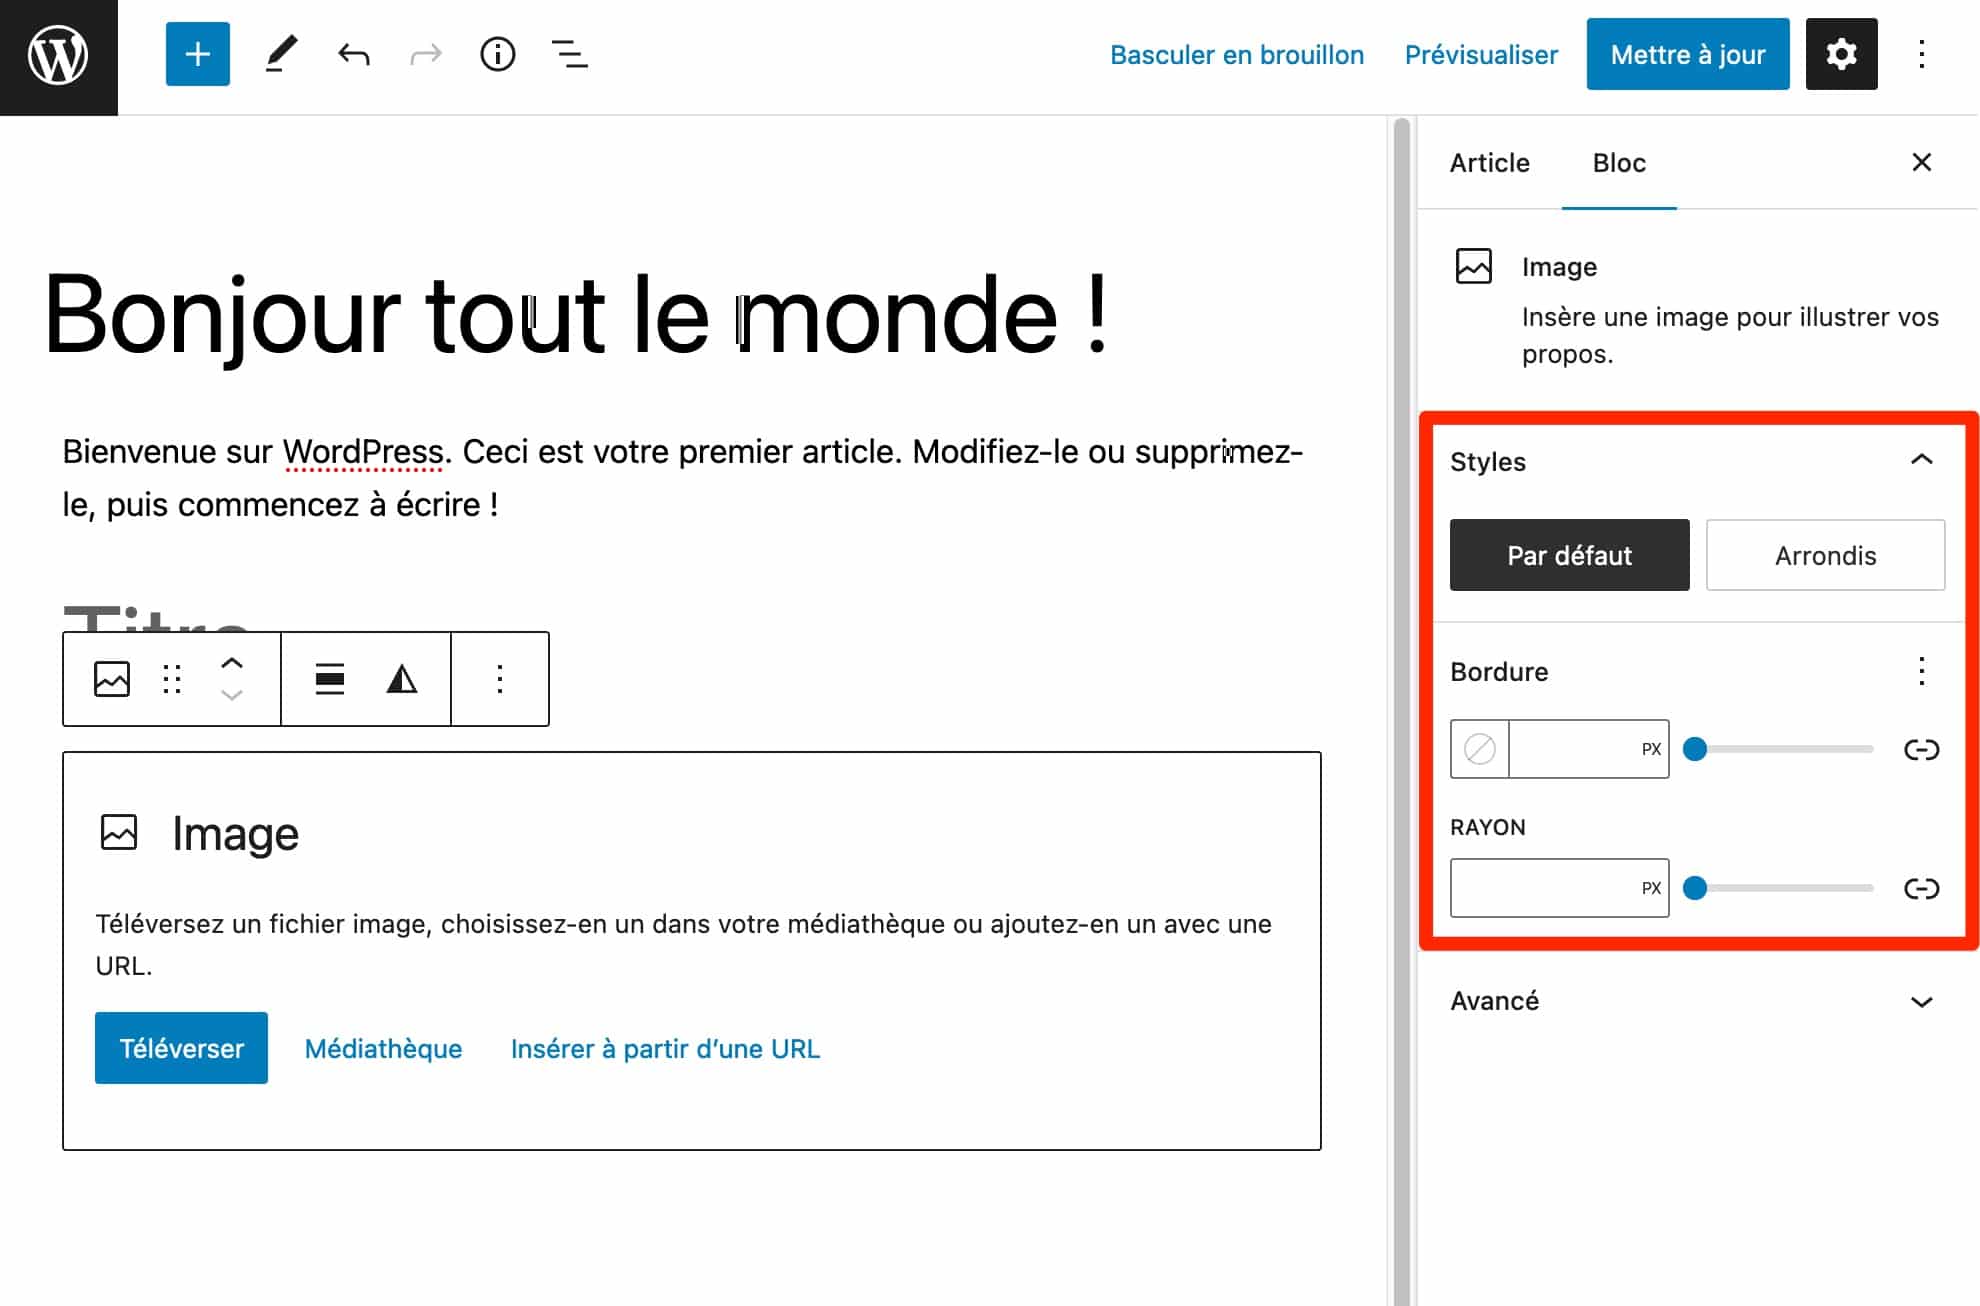
Now look, it’s very different with the Image block. Here, no settings related to typography (logical). Instead, the editor offers you to play with :
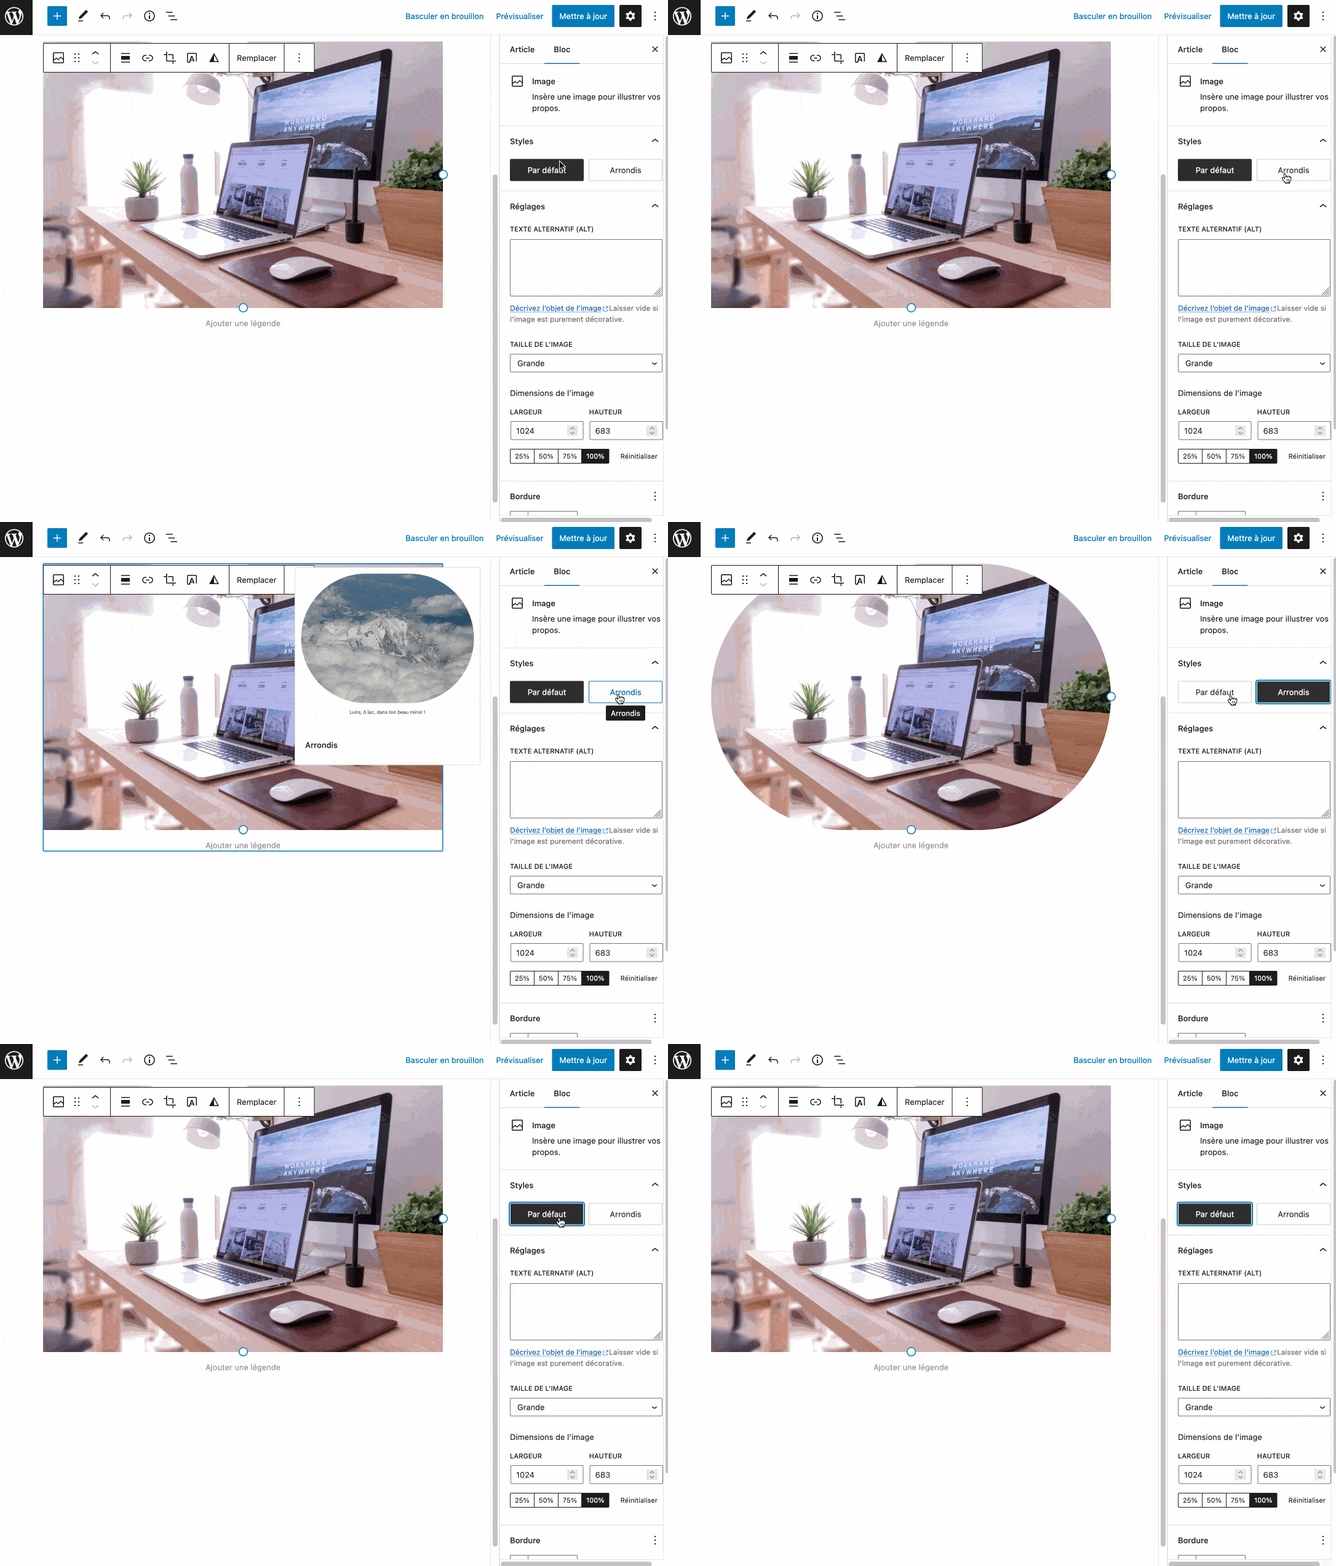
- the image style (rounded or default) ;
- the image border.
You want to change the style of your image? Simply click on the setting provided for this purpose, choose the option you want for your image, and see the result immediately:
How to use block compositions?
So far, we’ve talked about individual blocks. But the Gutenberg WordPress editor has more in store for its users
If you don’t want to start from scratch, you can also insert what are calledblock patterns.
Simply put, this is a ready-made template containing several blocks. The number of blocks differs depending on the theme you are using.
To get an overview of what you have, click on the “+” button, the same one you used to add a block (section).
You will see a “Compositions” tab. A drop-down menu allows you to filter the compositions by categories, to make it easier for you to find what you are looking for:

In the example below, we will add the composition “Rate table”. If we unpack it, we can see that it has several blocks, divided into 3 columns
- A Column block, therefore ;
- A Title block ;
- A Paragraph block ;
- A Separator block ;
- A List Item block;
- A Button block.
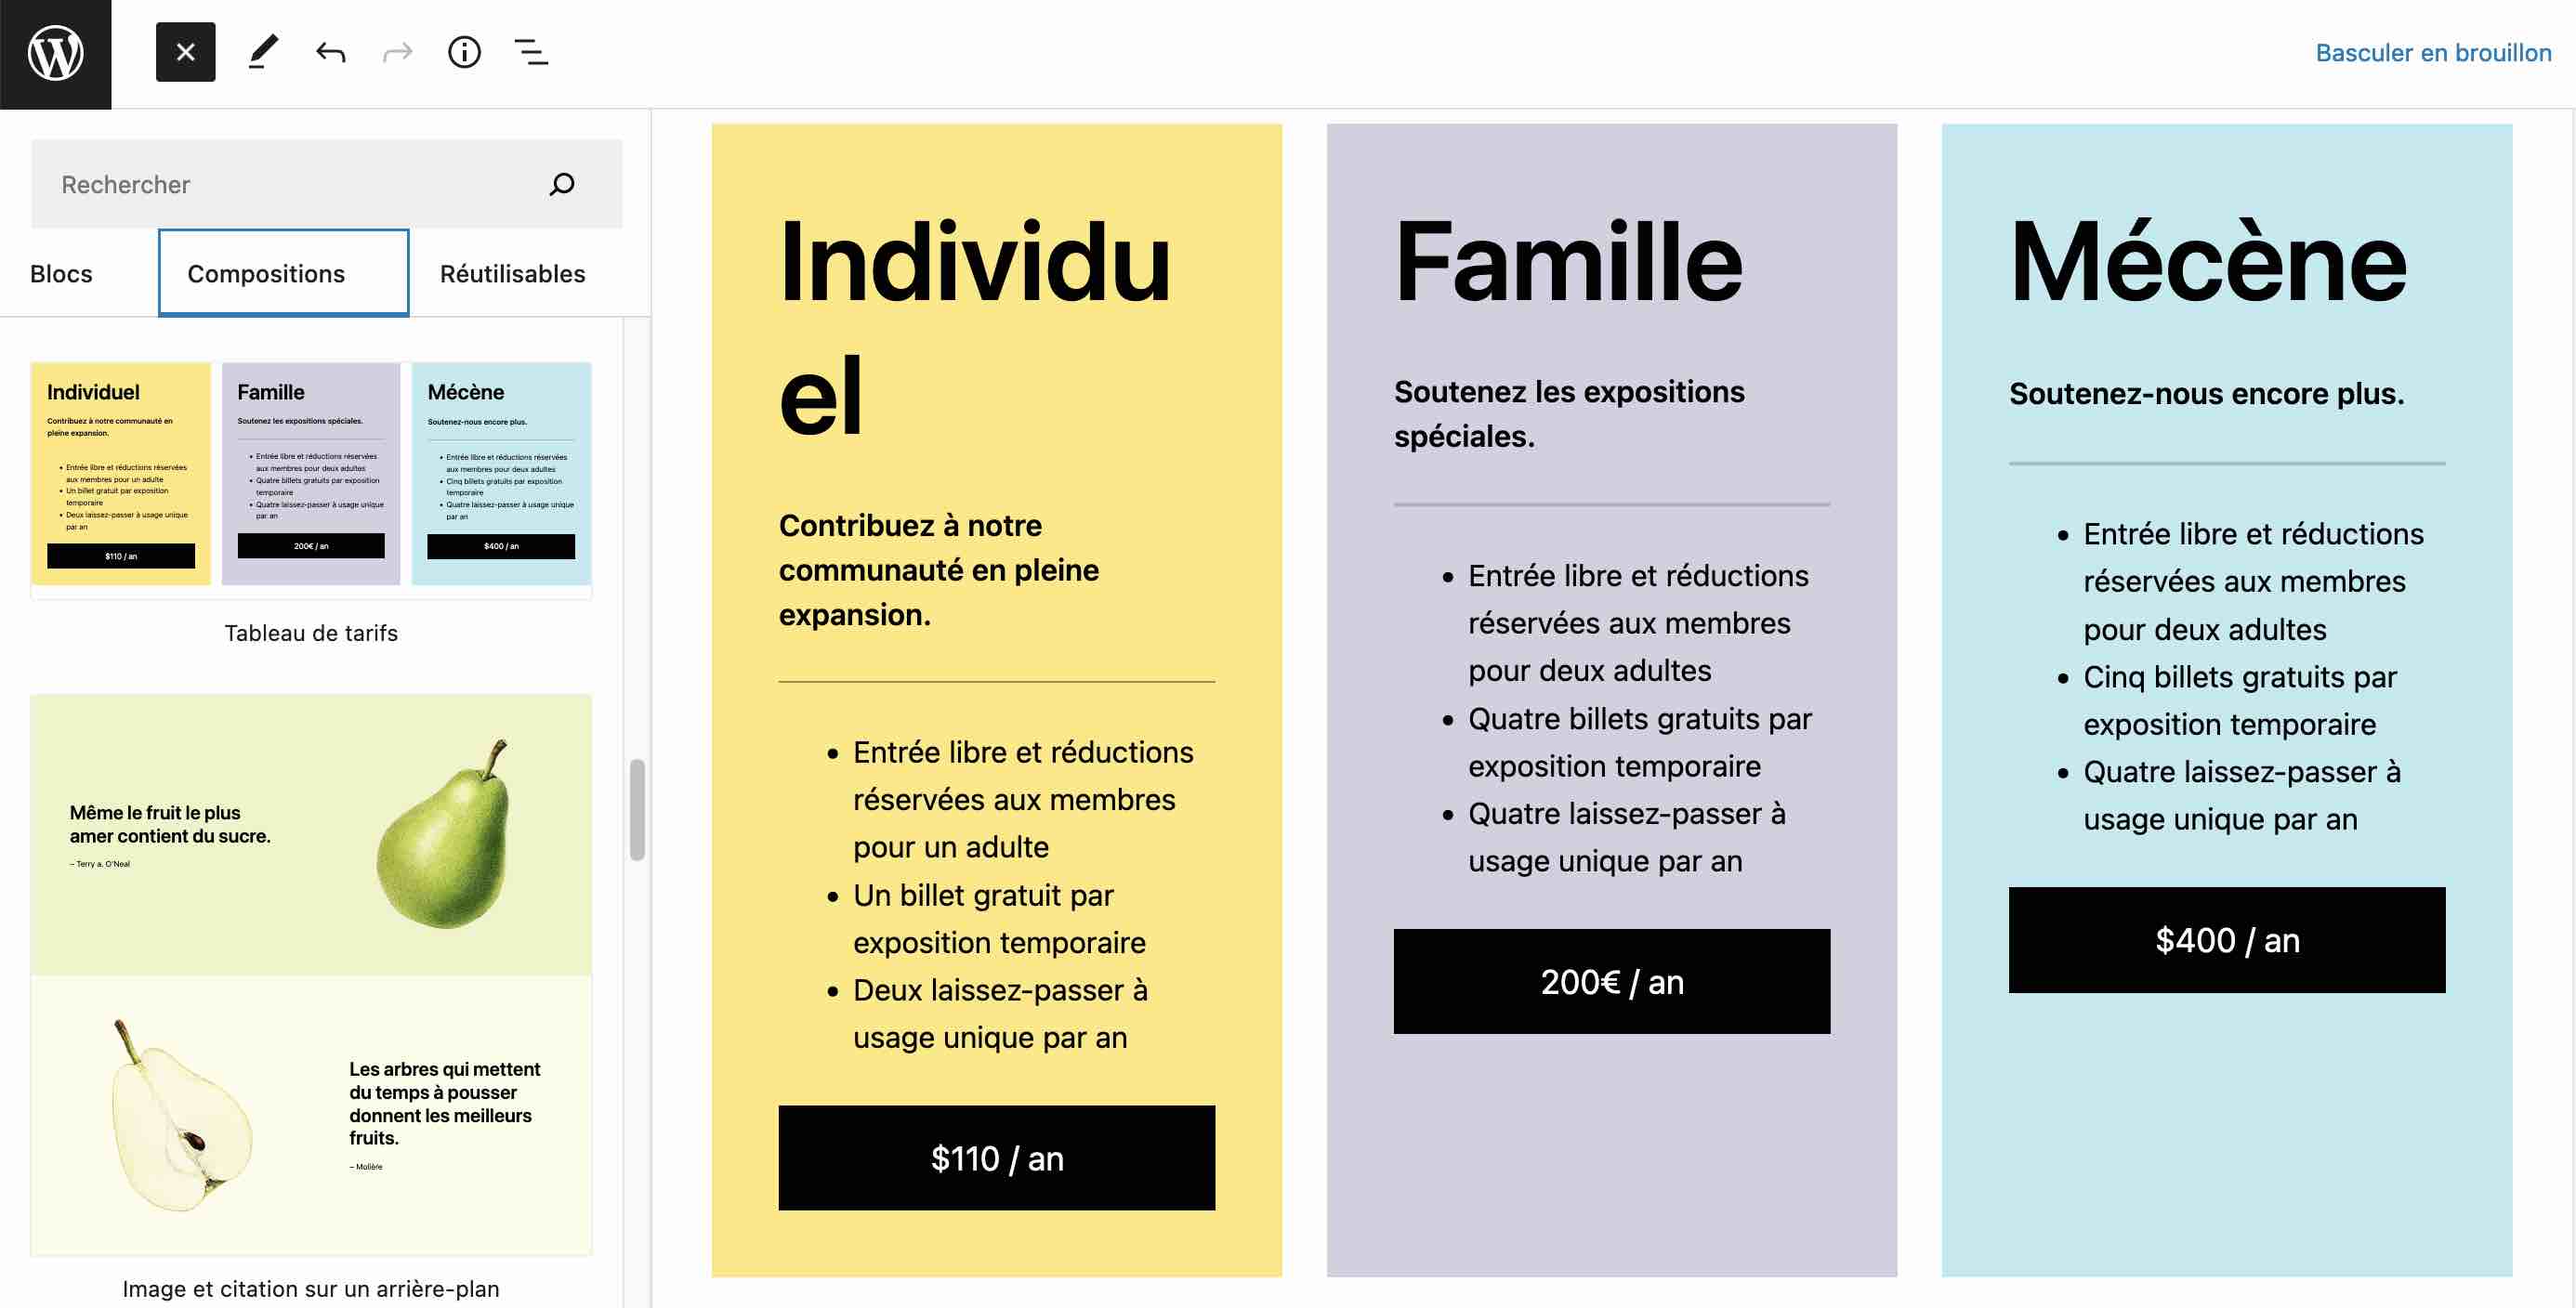
This can save you a lot of time if you were to add a price formula. Of course, the template can be customized as you wish, without touching the code. You can change everything, from the text to the colors. And there is nothing to stop you from adding your own blocks in each composition.
You can access more compositions on the official WordPress directory. developers from all over the world publish their block patterns there, which you can either download or copy and paste directly into your content.
How to use reusable blocks?
If block patterns will help you be more productive, so will another of Gutenberg’s main features: reusable blocks.
With this option, you can create a custom block or composition and reuse it wherever you want on other pages or articles (type of content) of your WordPress site.
You can imagine a lot of uses with reusable blocks. For example, it can be very useful to create calls to action to contact you.
Calls to action that you can then scatter in strategic places on your site… without having to create them every time.
Setting up your template – your reusable block – is very simple
- select the block of your choice from the menu. For example, we will choose the Button block. But you can also use the Image block, the Title mode etc. Finally, the one you want;
- apply the style and content settings of your choice to it;
- click on the three small dots in the editing toolbar, then on “Create a reusable block”;
- finish by giving your reusable block a name.
The reusable block is now available in the block insertion tool, in the “Reusable” tab:
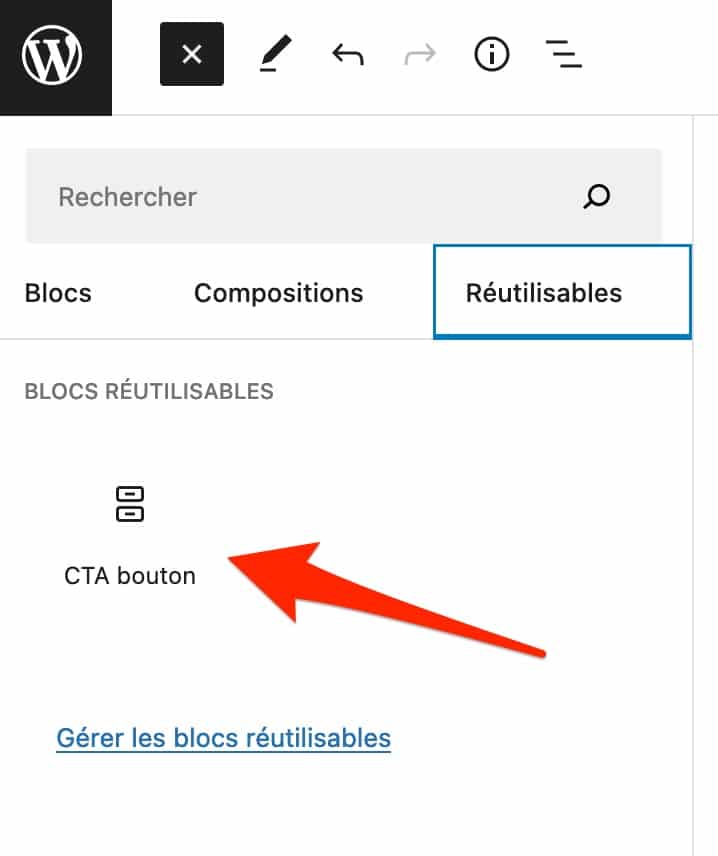
To go further with reusable blocks and to take advantage of an administration interface with more options to set them up, use the extension Reusable Blocks Extended.
How do I use the WordPress site editor?
So far, most of our presentation has focused on using the Gutenberg WordPress editor on your content types (posts and pages).
If you are using a block-based theme, you can also use Gutenberg to edit all parts of your site. To do so, go to Appearance > Editor.
You will be taken to the home page of your site/blog. The way the editor works is the same as for your articles and pages.
You can add blocks and compositions via the insert tool, then edit them in the right sidebar.
But there are some specificities:
- in Site Editor mode, you have control over the editing of your header and footer by clicking on the relevant area;
- you can add pre-built page templates (blog, 404, archives etc.). To do so, click on the icon representing the WordPress logo, in the upper left corner;
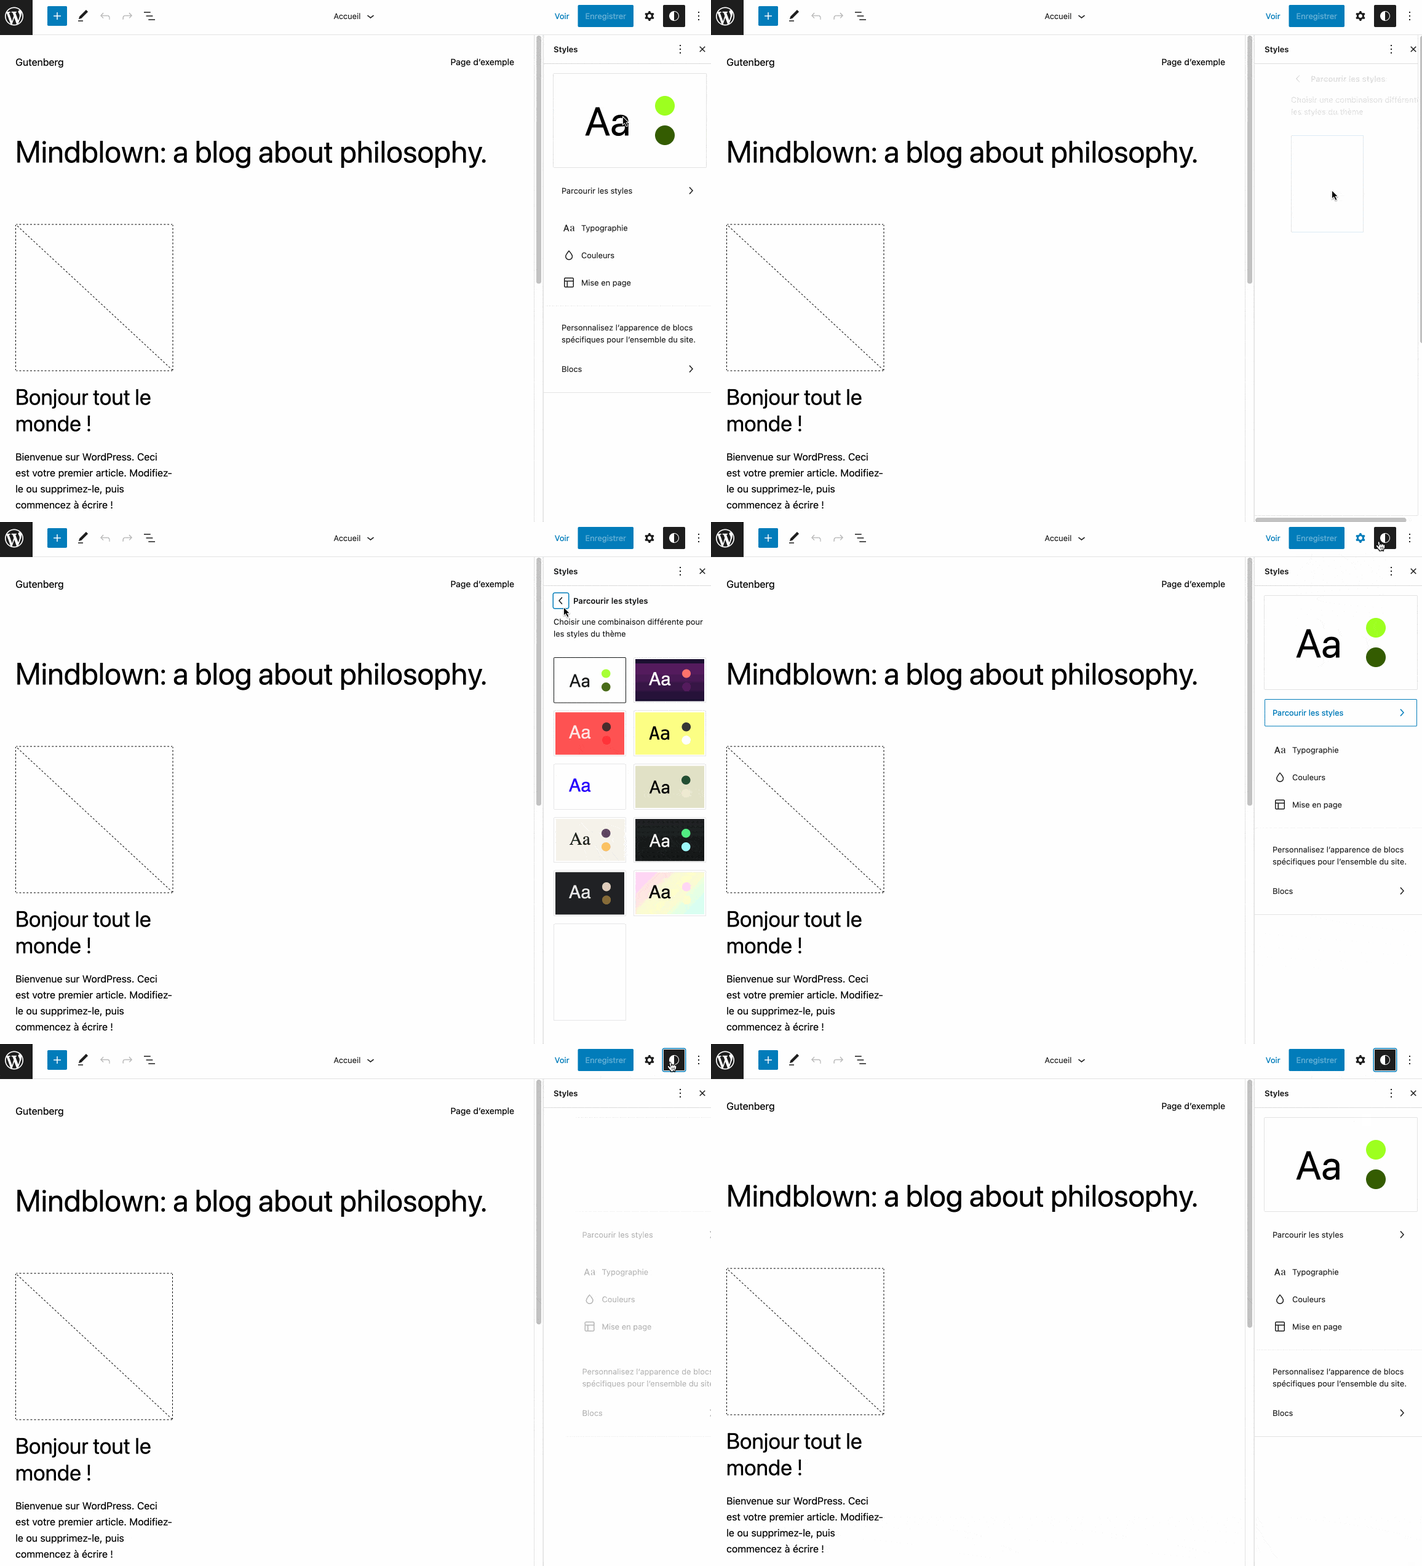
- with theGlobal Styles editing interface, you can modify the overall style of your site in its entirety (colors, typography, layout), without having to modify each block one by one. You can even apply a style to each block of your choice, so that it is applied to all the blocks of the same type on your site.
How to disable Gutenberg?
At this point, you should be much more familiar with Gutenberg. It may also be that you miss the old TinyMCE editor
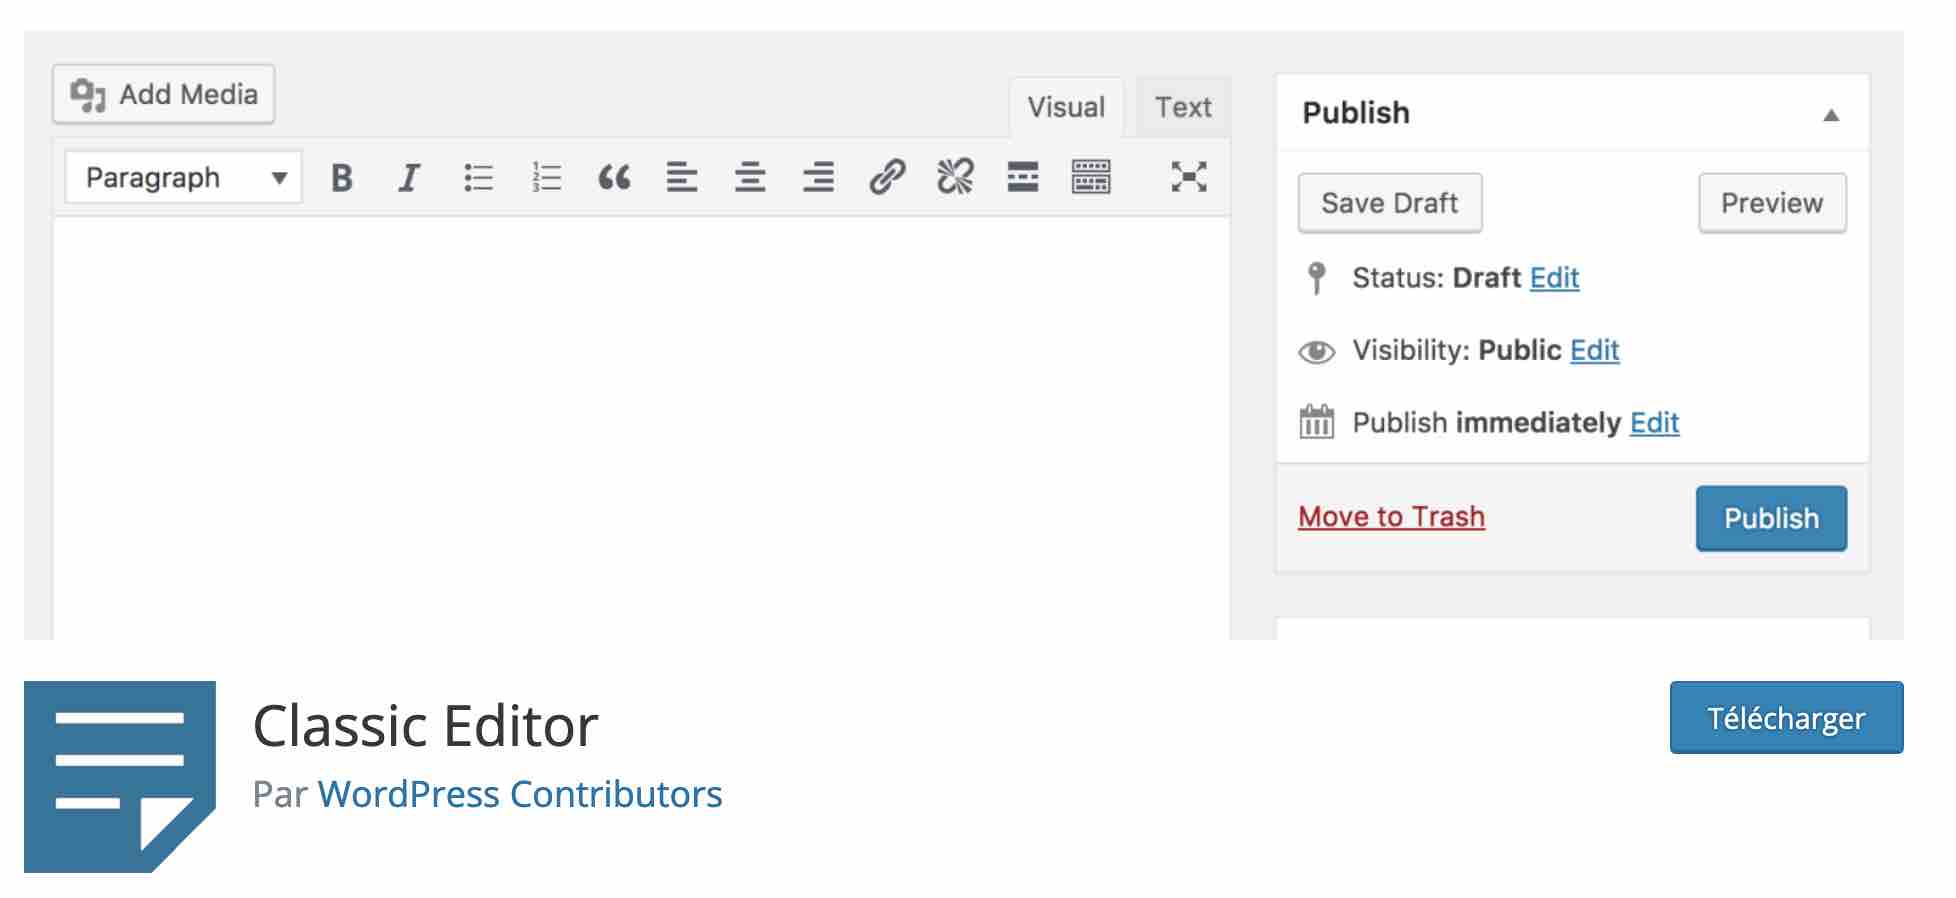
If you are using WordPress 5.0 (or higher), it is possible to disable Gutenberg by activating the Classic Editor extension (Classic Editor).
Maintained by the WordPress development team, this plugin “brings back the old classic WordPress editor and its edit screen”, says its description on the official extensions directory
However, the Classic Editor plugin may not be immortal. Its maintenance is currently planned until 2024 at the most, or maybe a little more “if necessary”.
10 plugins to extend the capabilities of the WordPress editor
With Gutenberg, the field of possibilities opens up considerably. With it, you’ve discovered that it’s possible to create entire WordPress sites, starting from scratch.
Since it is malleable and extensible by nature, many developers in the WordPress ecosystem are taking advantage of the opportunity to offer their own plugins to extend and improve its capabilities.
Thus, there are dozens and dozens of plugins that offer their own catalog of blocks for the text editor.
But also, for some of them, templates and other block compositions.
Most of the time, with this kind of plugins, you get additional options in terms of design and layout, compared to what WordPress offers natively
These plugins also offer blocks that you don’t find by default on WordPress. This gives you more creative and layout options, without having to touch the code
Here are some of the Gutenberg blocks plugins that are among the downloads on the official extensions directory:
Besides, there are also less “catch-all” extensions (without the pejorative side) whose objective is to offer a simple block to perform a specific operation
For example, the Map Block for Google Maps extension allows you to add a Google Maps in your content, using a Gutenberg block.
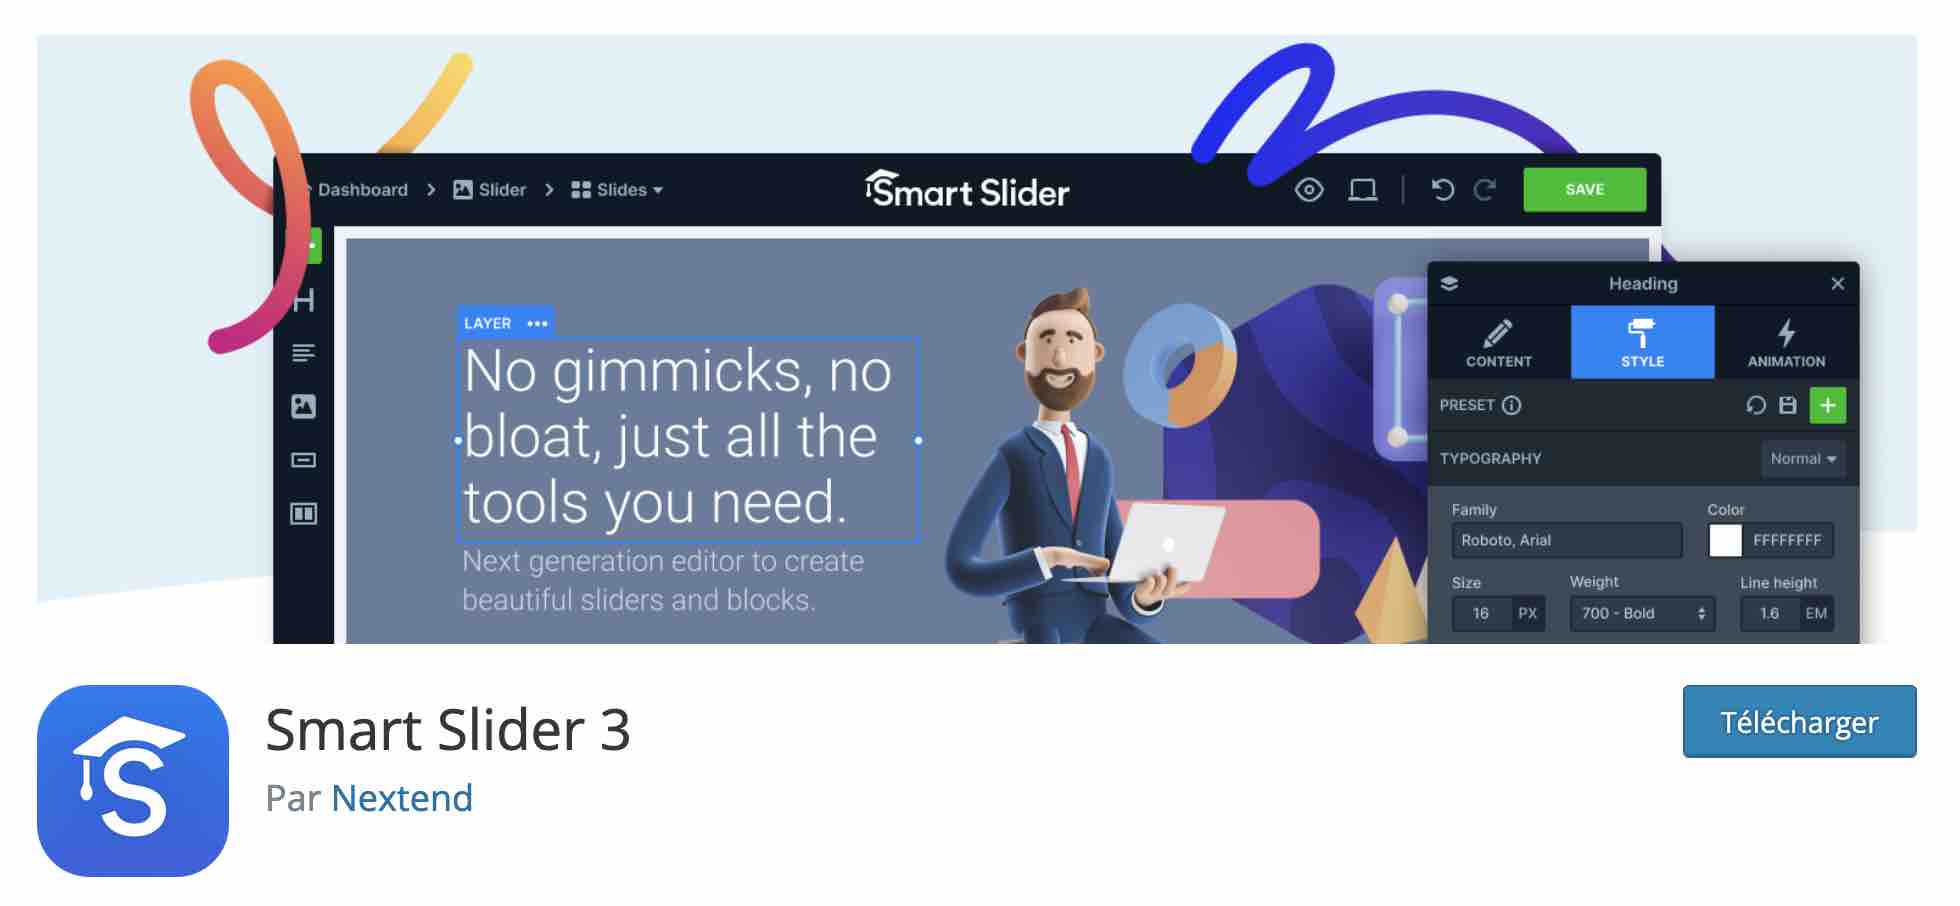
The same goes for the Smart Slider 3 plugin, which adds a slider to your pages and articles.
You know how Gutenberg works on WordPress. And you even have a nice set of extensions to use for additional features!
Finally, check out some handy tips on how to be more productive with the WordPress text editor
6 tips to work more efficiently with Gutenberg on WordPress
Use keyboard shortcuts
Are you a fan of Ctrl + Z (for PC fans), or Cmd + Z (for Mac fans)? Well, good news, it works on Gutenberg too!
Did you add a block, content, layout or anything else too fast? Go back immediately with a simple Ctrl + Z or Cmd + Z.
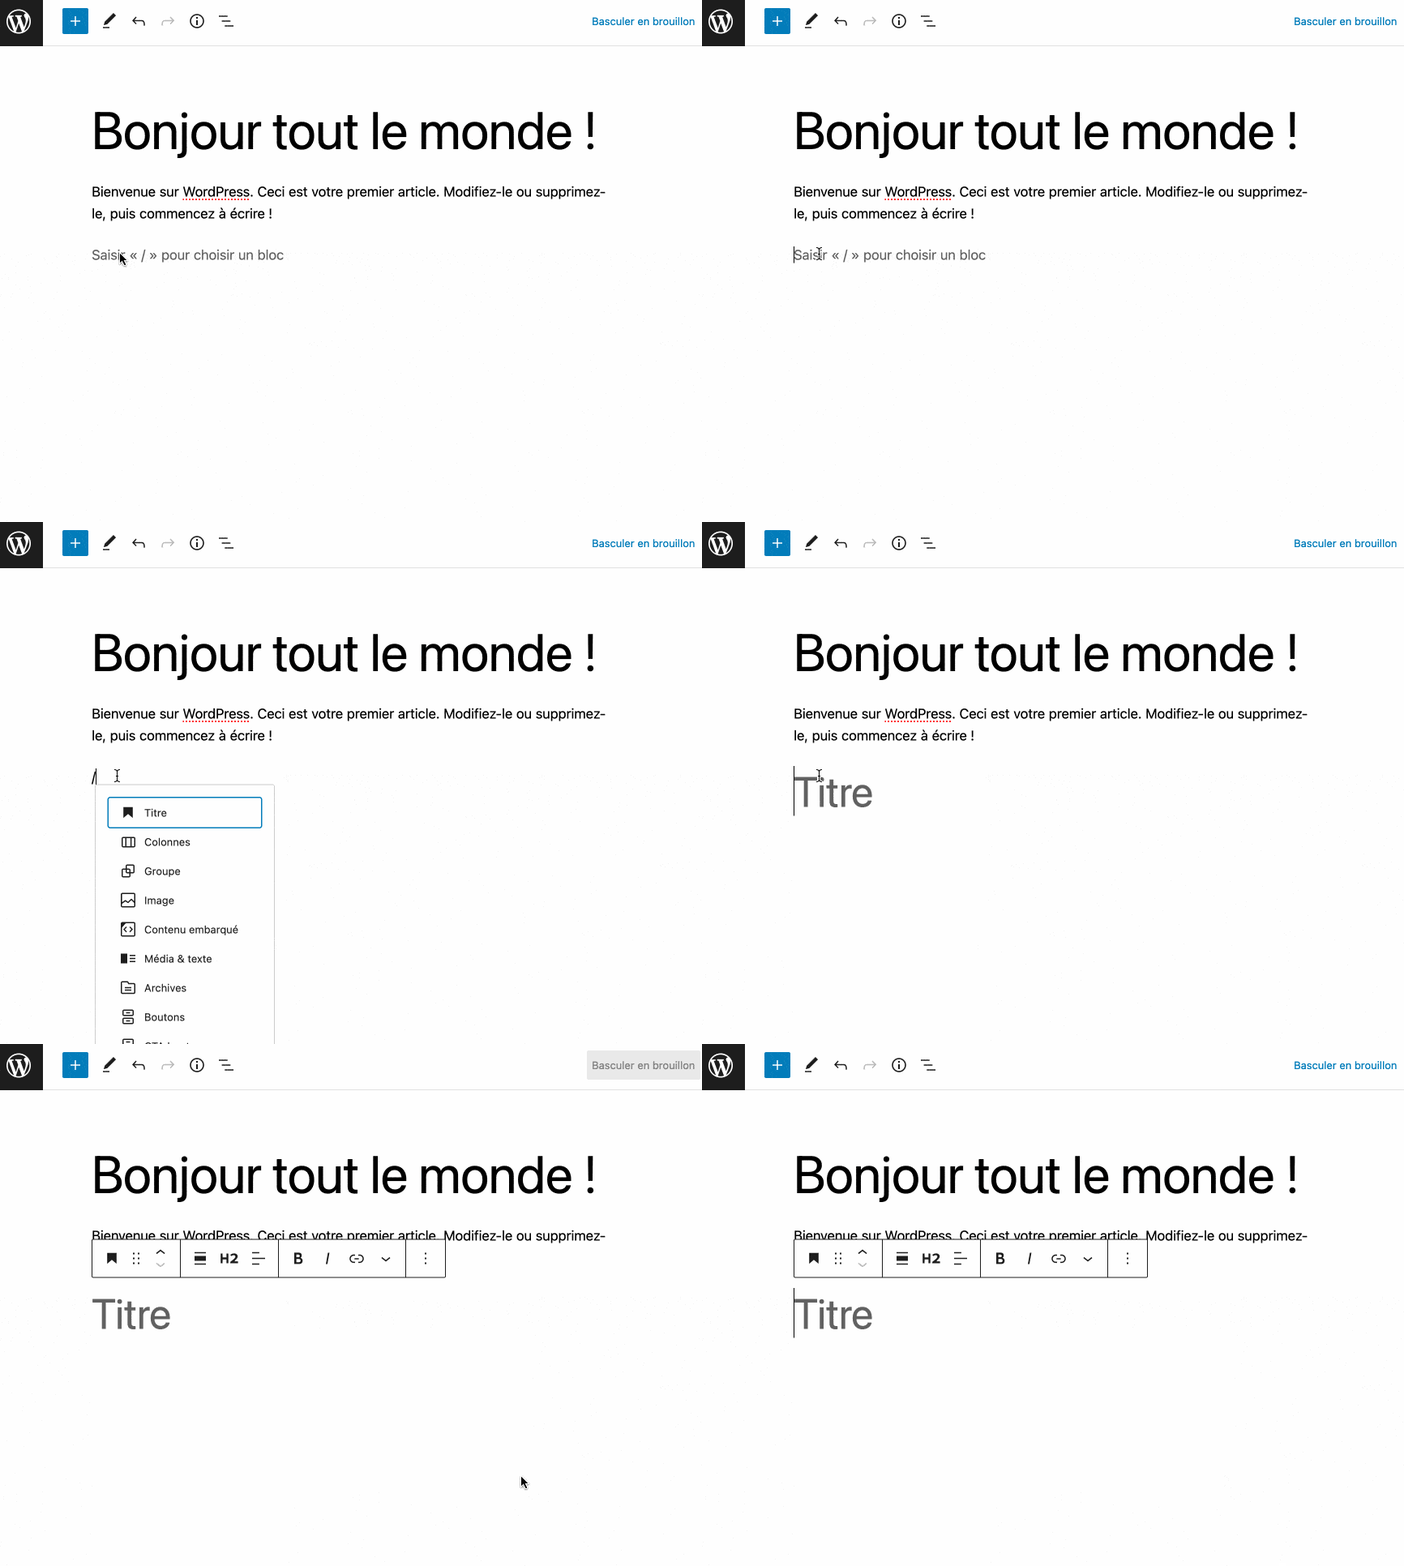
Another handy trick when talking about keyboard shortcuts: you can integrate a block by adding a slash (/), without having to use the insertion tool:
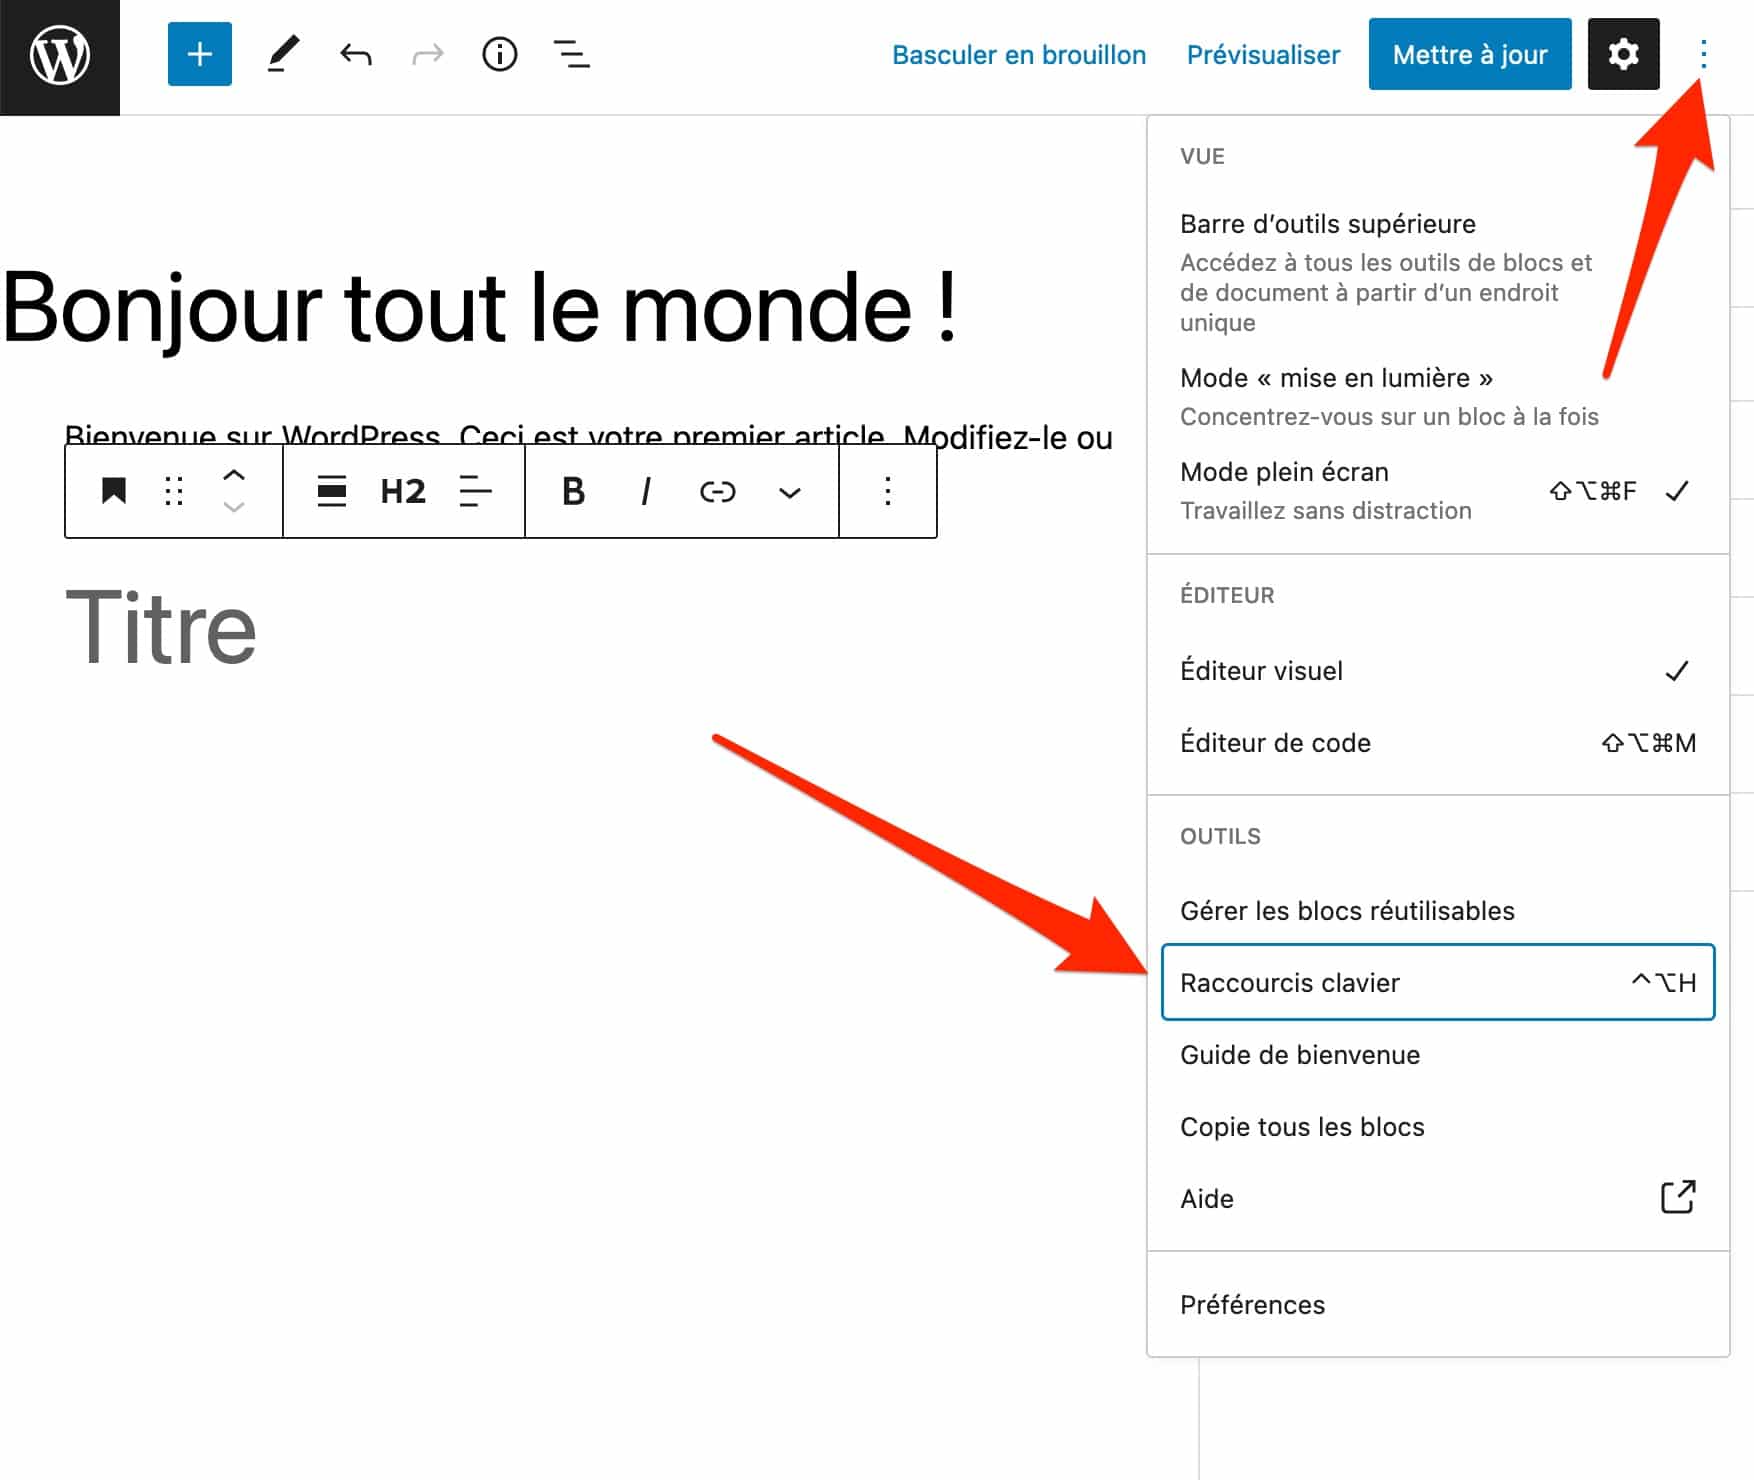
Finally, you can access a list of keyboard shortcuts offered by the text editor by clicking on the 3 small dots, at the top right of the editor.
Take advantage of the “View” mode options of the WordPress editor
If you are used to writing content, you know that concentration is very important to be productive and efficient.
Working without distractions can be a real plus, and this is what Gutenberg offers through its “View” mode options.
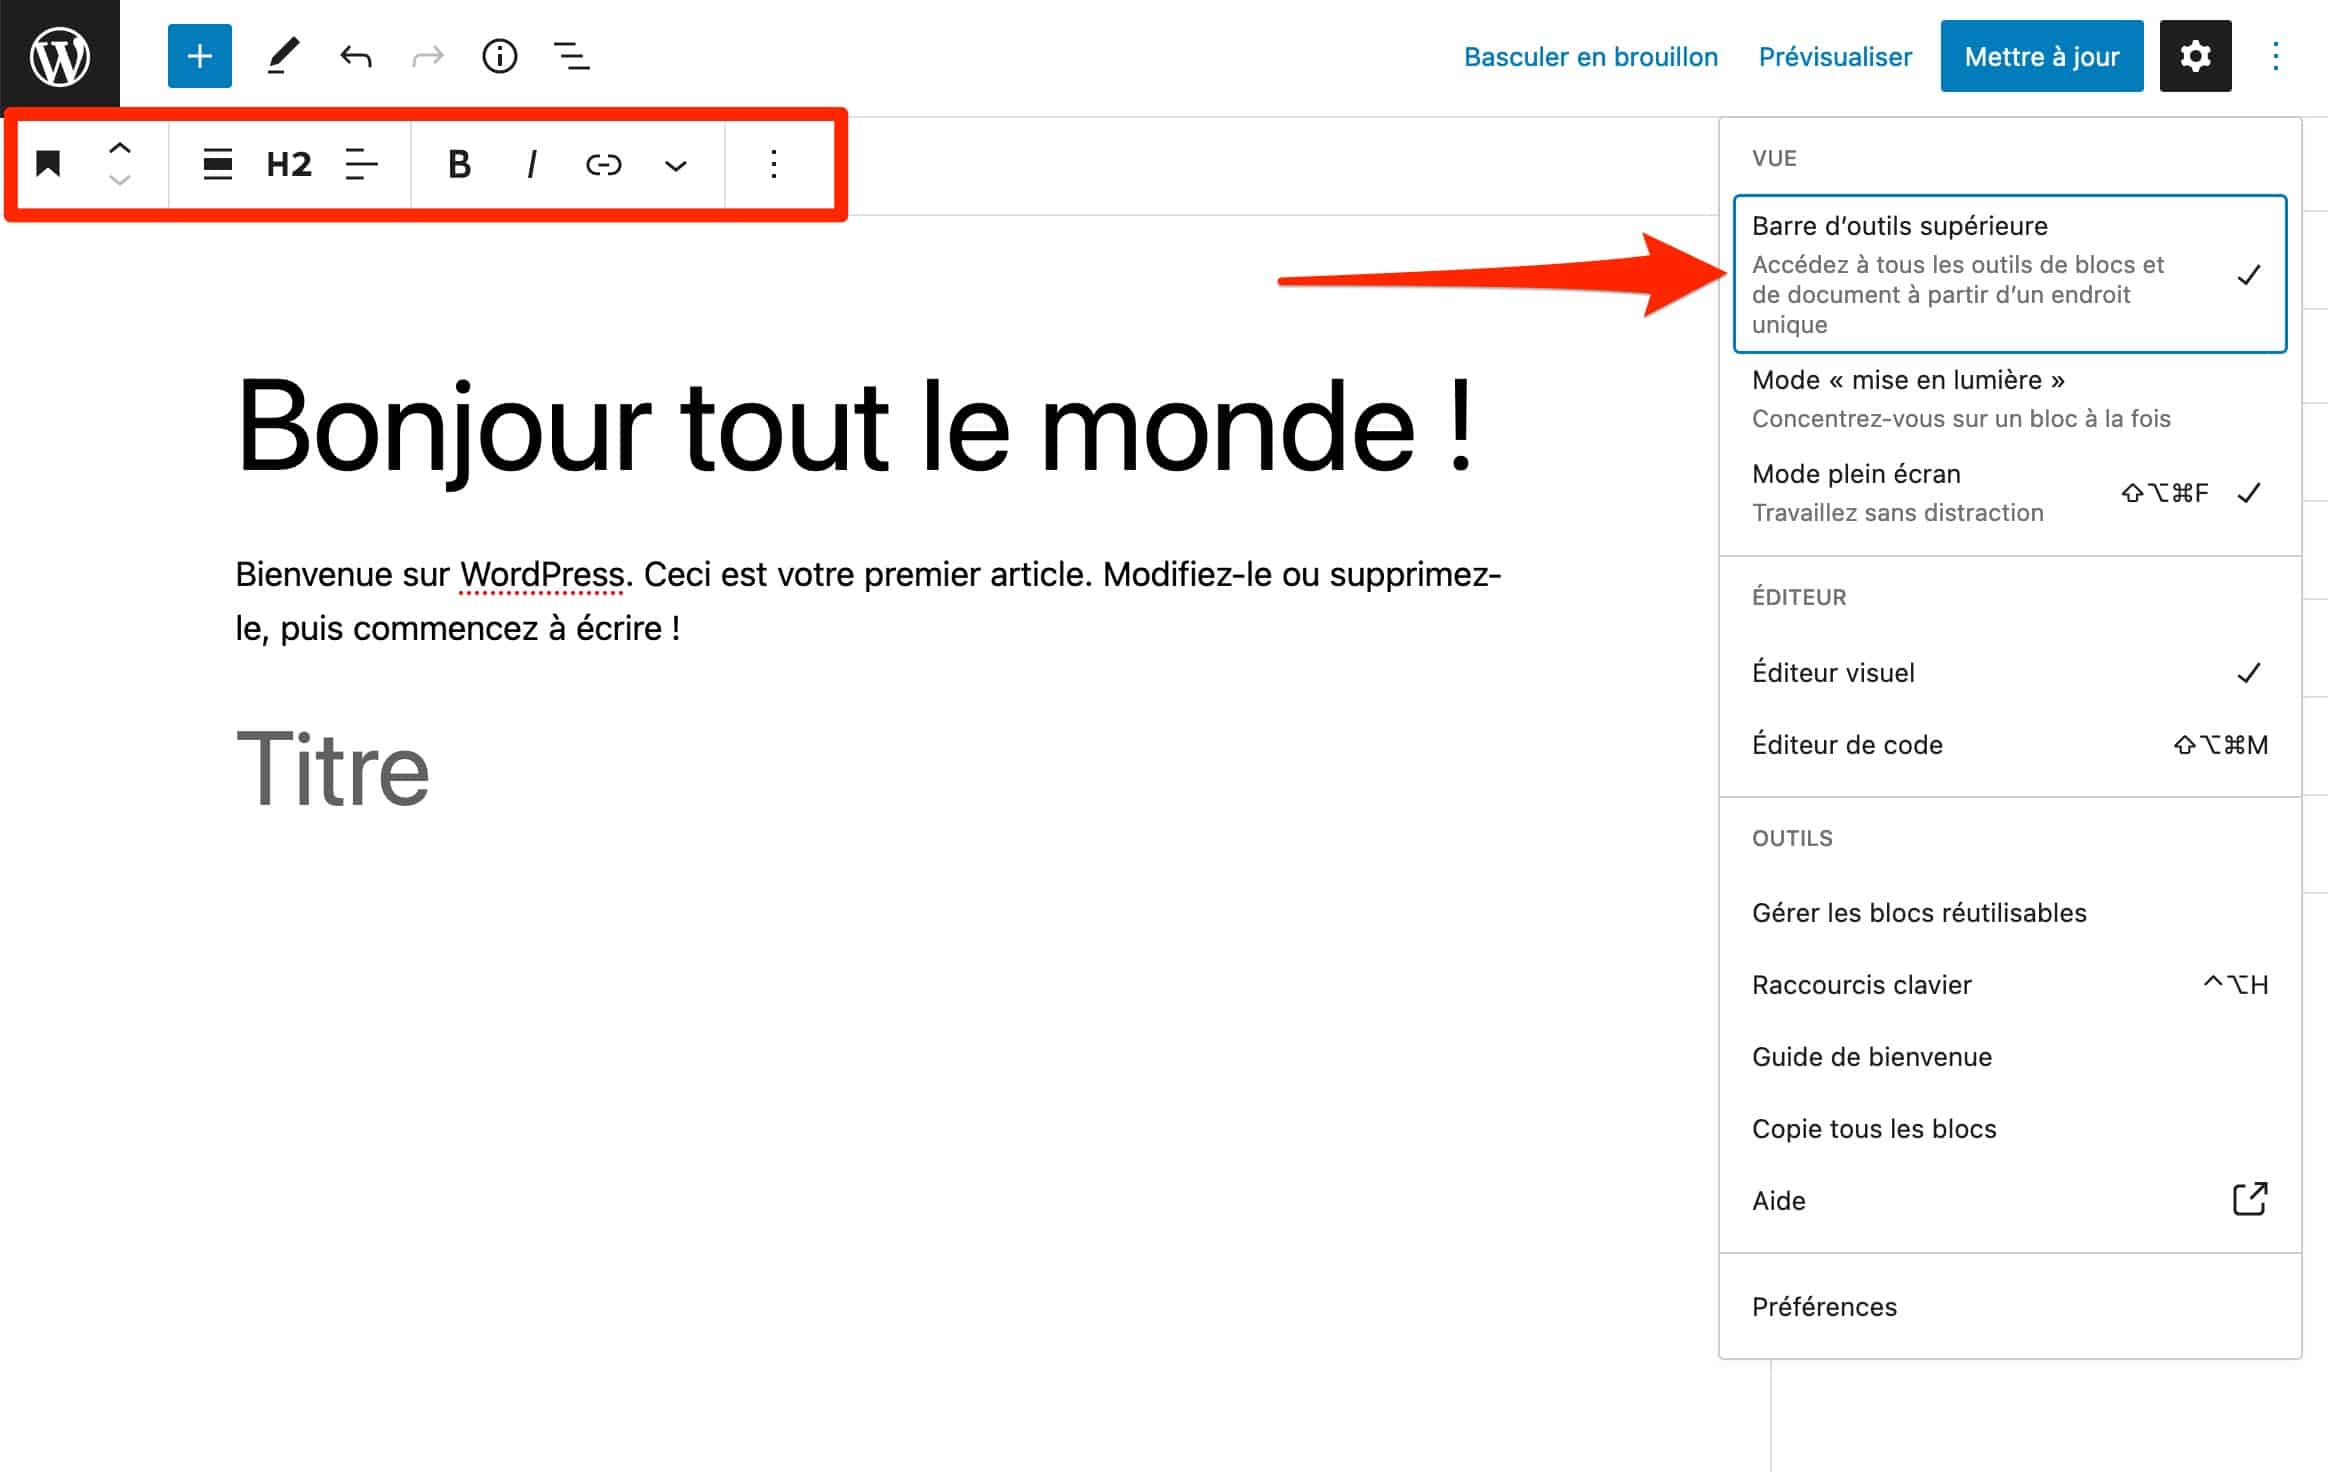
To access it, click on the 3 little dots at the top right of your editing window (you know, now). You can then activate the following modes:
- full screen mode. In this case, you won’t see the WordPress admin menus and you’ll be able to concentrate on your layout;
- highlightmode, which highlights only the block you are working on;
- top toolbar mode. In this case, the toolbar and all its options will be displayed at the top of the screen all the time.
Create columns in one click with Gutenberg on WordPress
With Gutenberg, blocks are stacked one below the other, by default. Of course, you can rearrange them as you wish by dragging them up or down in your post or page.
For more advanced layouts, it is possible to group several blocks on the same “line”, by presenting them as columns.
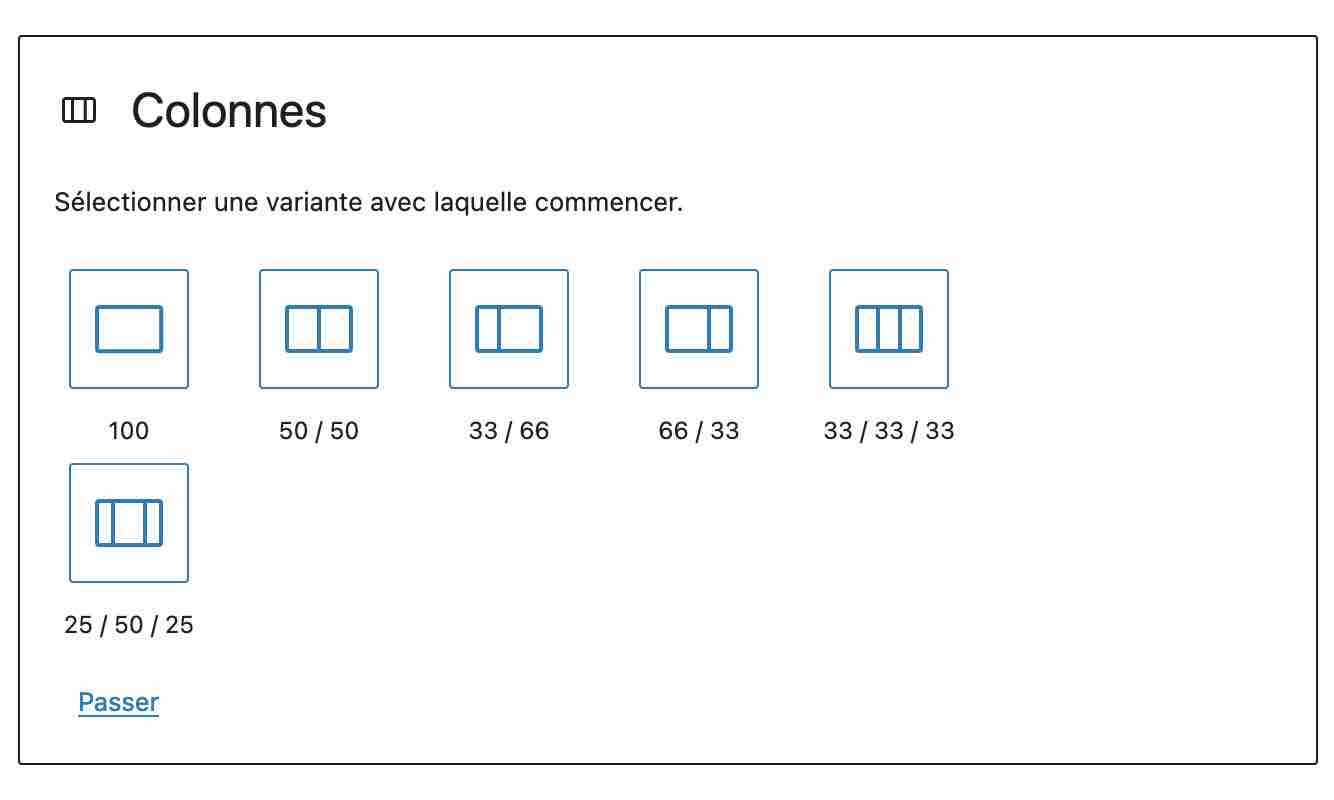
For this, there is a dedicated block, soberly named Column. When you have added it, you can choose from 6 types of columns, and then add the block(s) of your choice in each column:
Add your images by drag and drop from your computer
To enhance your columns, you may need an image. If it is on your computer desktop, you can integrate it into your content by a simple drag and drop action (without having to add an Image block).
Thanks to this, you no longer need to upload the image in question to your Media Library.
However, don’t forget to give your image an explicit title beforehand, and then fill in its
Easily integrate link anchors
While Gutenberg has an HTML code editor – not very welcoming, let’s say – to let you edit your content types (posts, pages etc.), one of the strengths of the text editor is that it can be used without… coding
With it, adding a link anchor becomes child’s play, without having to manipulate HTML
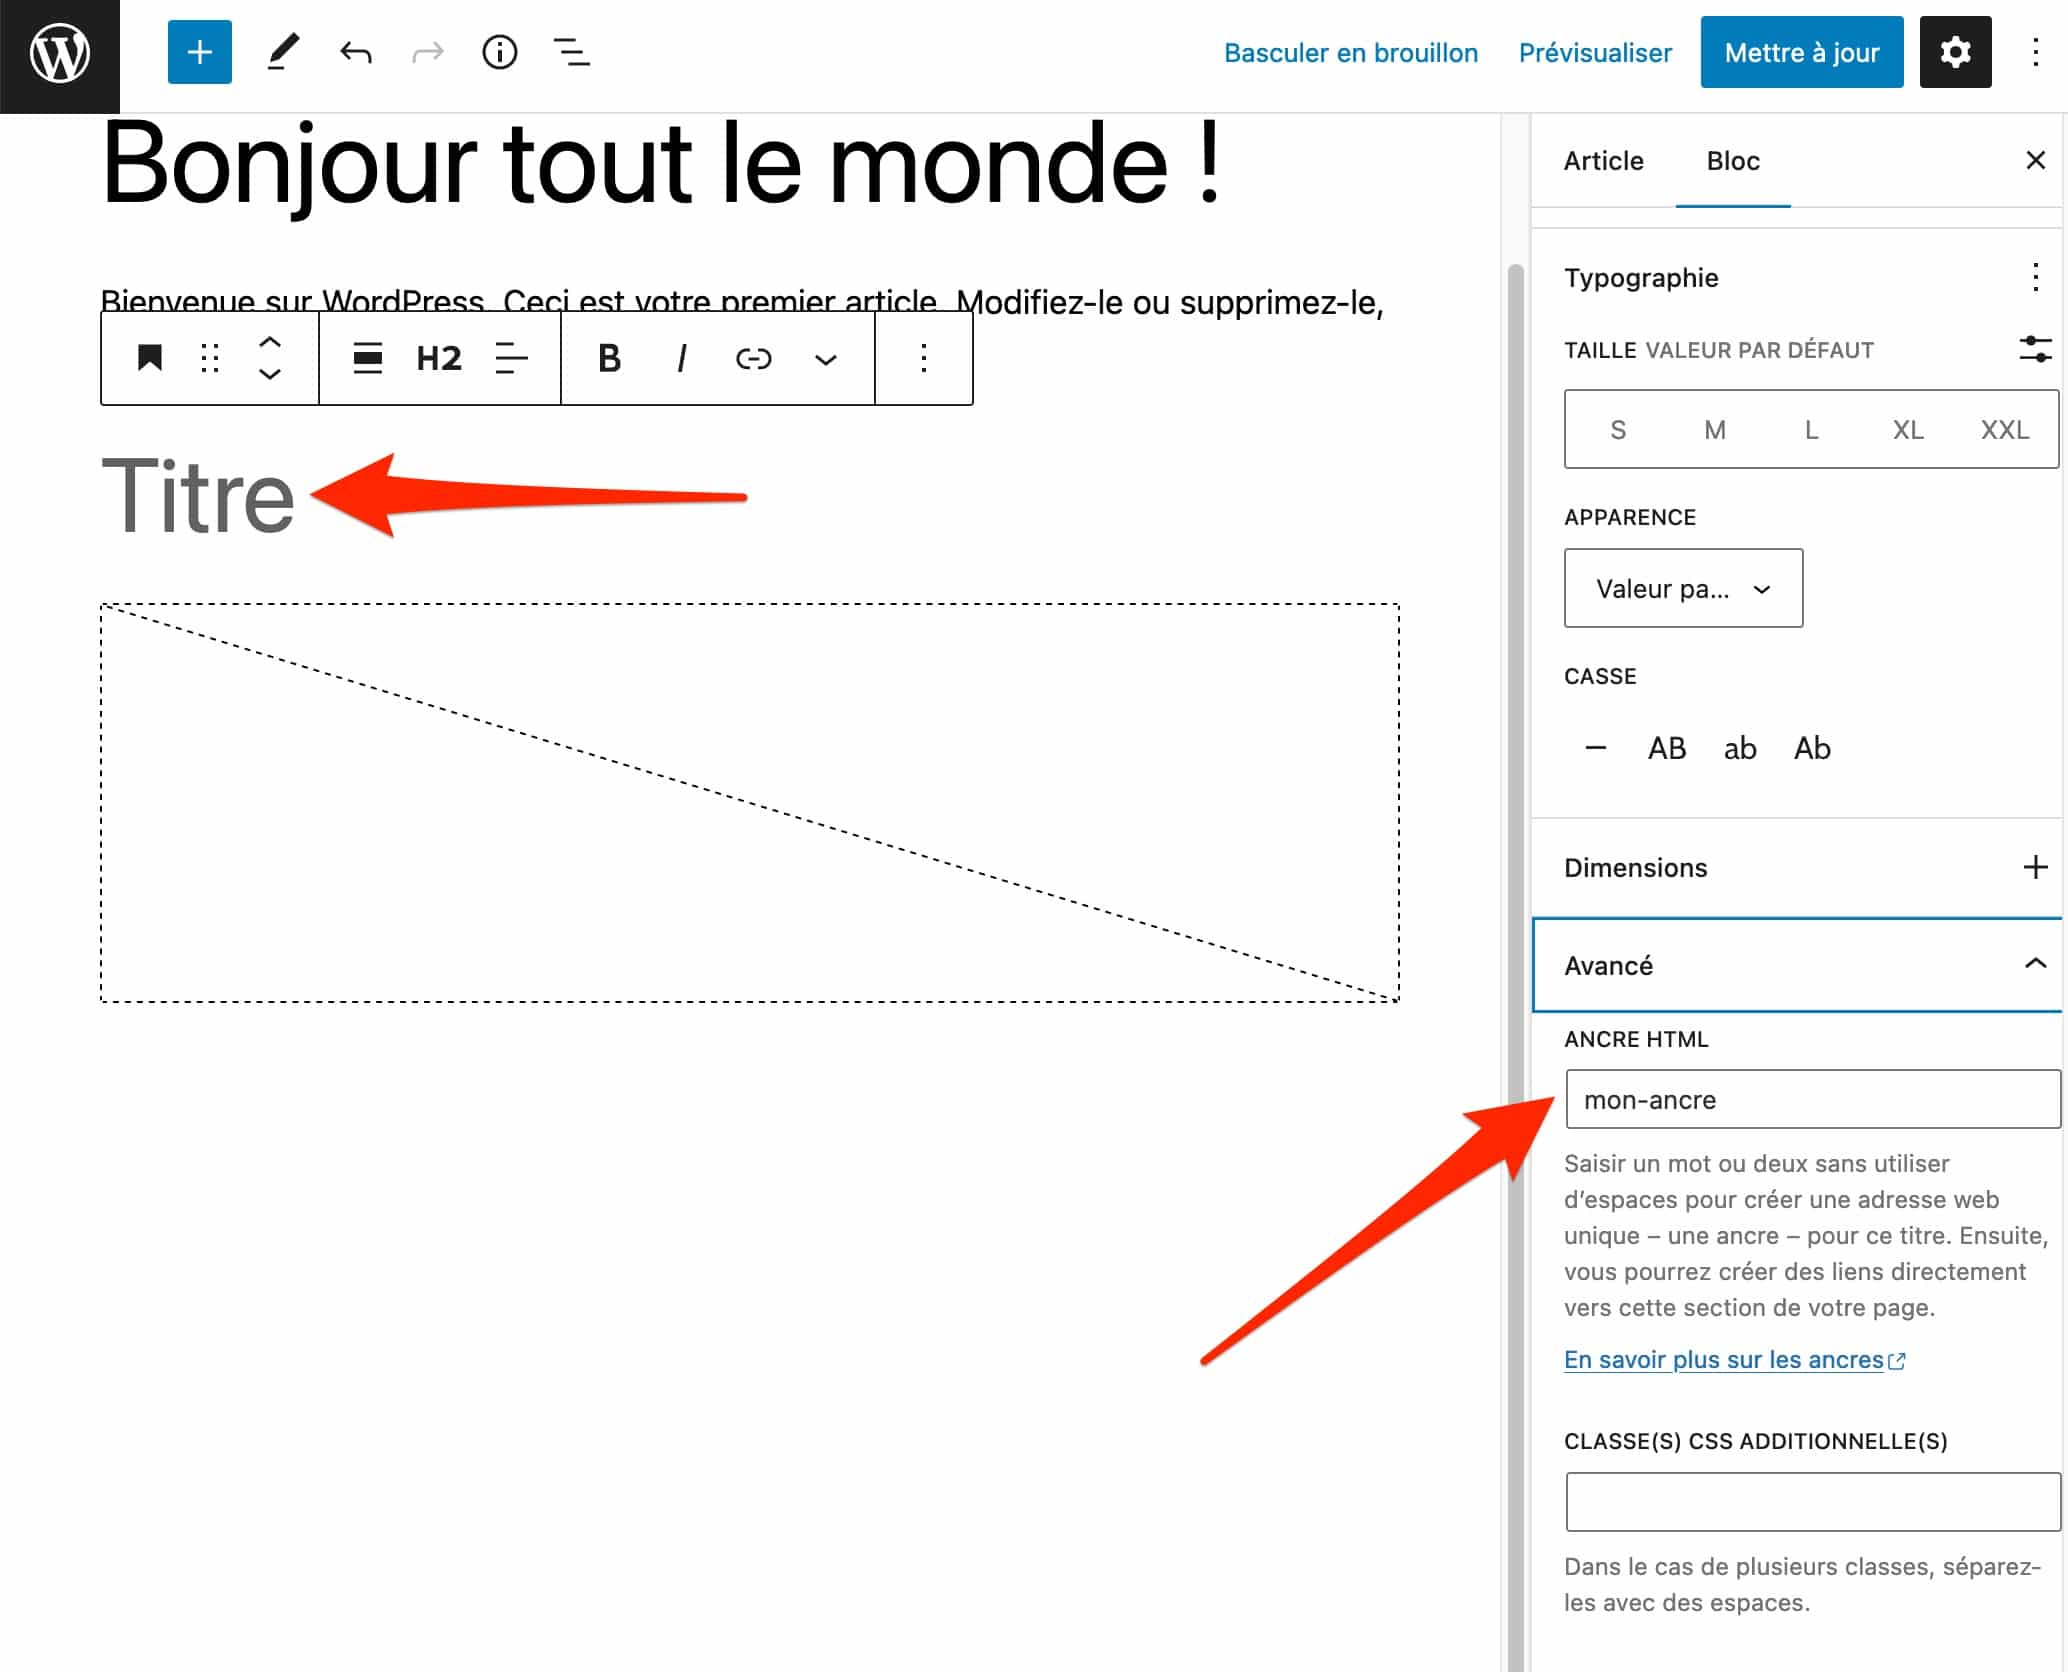
To do so, follow this little Gutenberg tutorial dedicated to WordPress. First, create an anchor on the title of your choice.
Select it, then give it the name of your choice (e.g. my-anchor) in the “Advanced” part of the Title block:
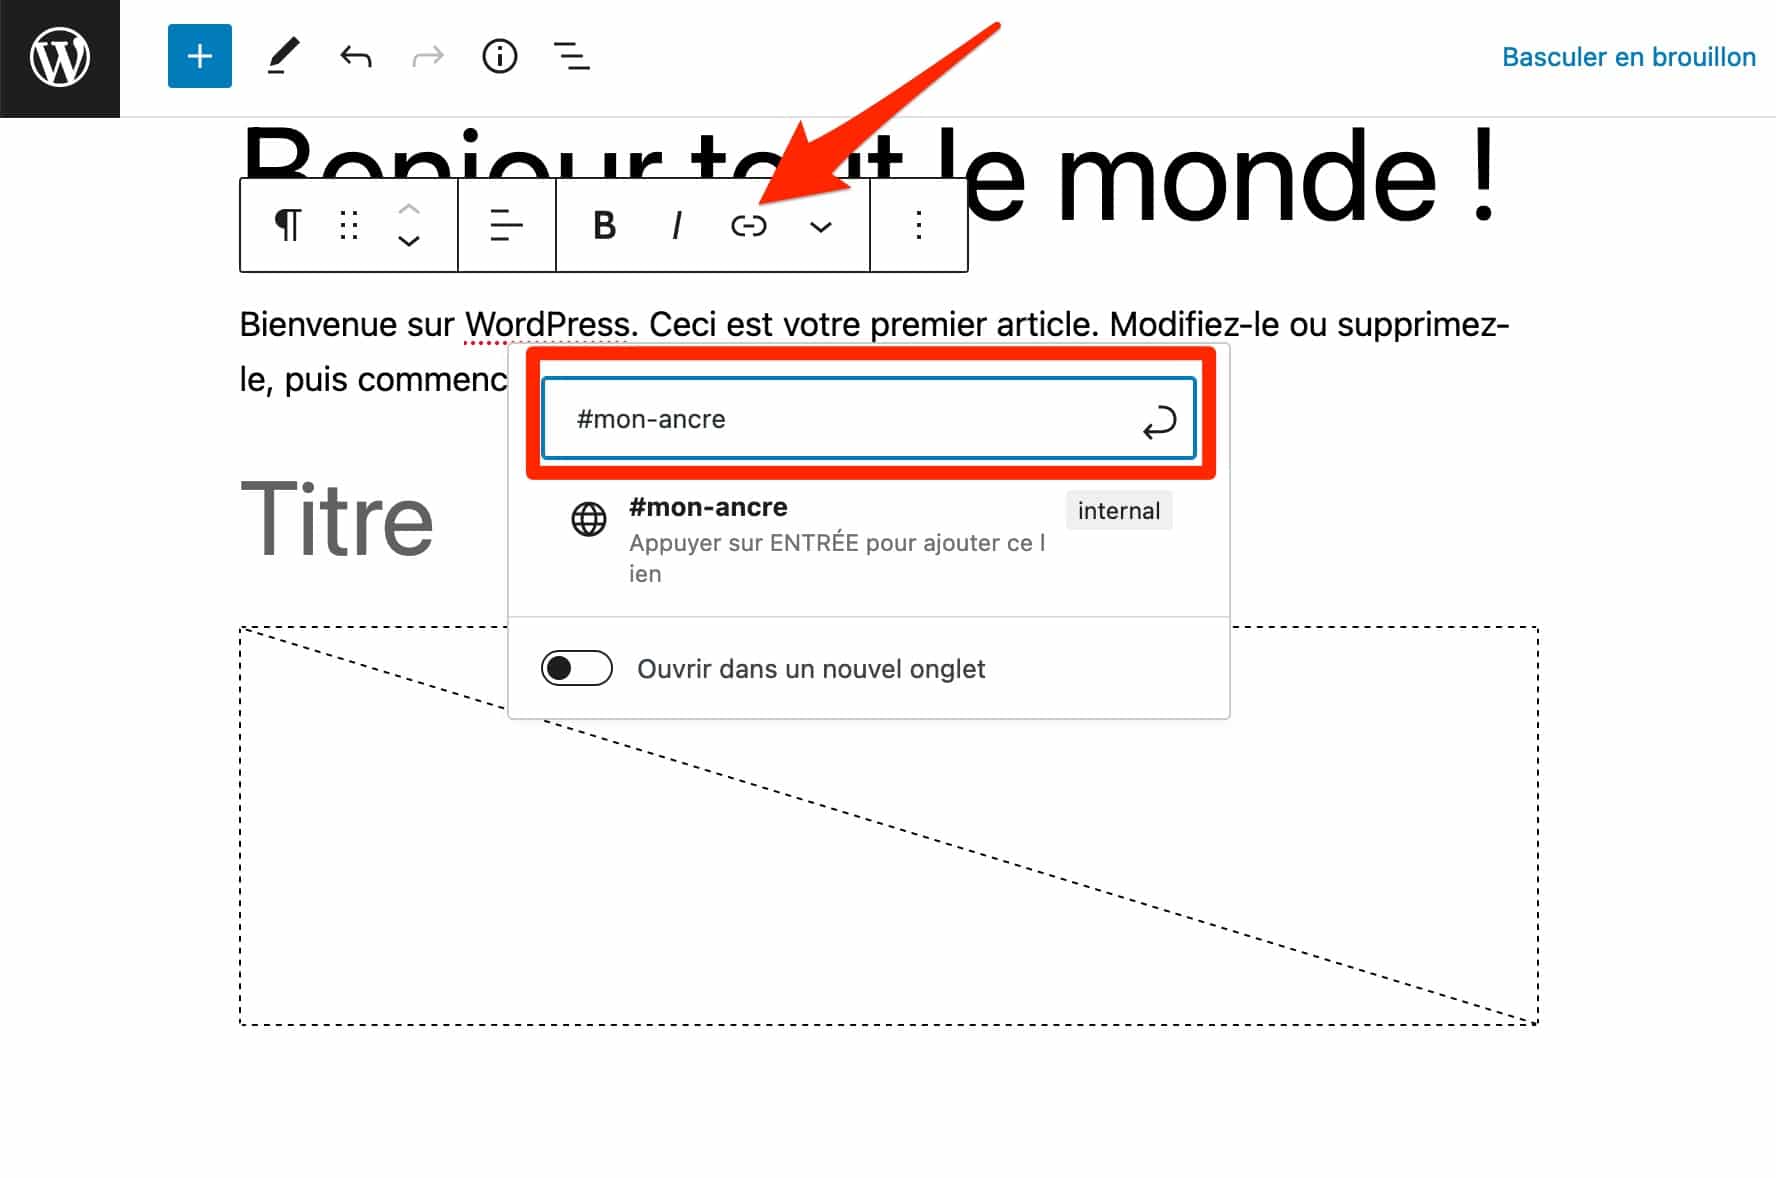
Finish by creating an anchor link on the text of your choice. This link will redirect to the title on which you added the previous anchor.
Proceed by selecting the text of your choice, then add a link containing the name of your anchor, preceded by the # sign (e.g.: #my-anchor):
Add links by copy and paste
Finally, note that Gutenberg allows you to easily add videos, tweets, images or audio by pasting the link of the source you want. This is called an embed link.
This works, for example, if you want to add a YouTube video to your content. The WordPress Gutenberg editor will automatically create a block and display a preview of the video, as below:
WordPress also offers a list of sites from which you can add embedded links, including Amazon Kindle, DailyMotion, Spotify, TikTok, Ted, Vimeo etc.
Summary
WordPress’ Gutenberg text editor is a constantly evolving tool. Launched in 2018 and originally only limited to posts and pages, it has been able to add more features over time.
Today,it even allows you to design an entire WordPress site thanks to the central concept of blocks, without touching the code (HTML, CSS, JavaScript etc.).
Throughout this guide dedicated to Gutenberg on WordPress, you will have discovered in particular:
- how Gutenberg works ;
- how to use it, thanks to mini-tutorials focused on practice;
- a dozen or so extensions to extend its features;
- tips to be more productive with this text editor.
Because creating content – or even an entire site – with Gutenberg requires technical skills, the MaintenanceWP team can help you with your various projects
Available 7 days a week, our team can offer you a custom solution that will meet your needs with speed, professionalism and efficiency. Contact us for more information.
